
cosmosdb-mcp
Azure Cosmos DB MCP Client and Server
Documentation
Azure Cosmos DB MCP CLient & Server
This repository contains a project that shows how to create an MCP Server and client for Azure Cosmos DB. The project is divided into 2 parts:
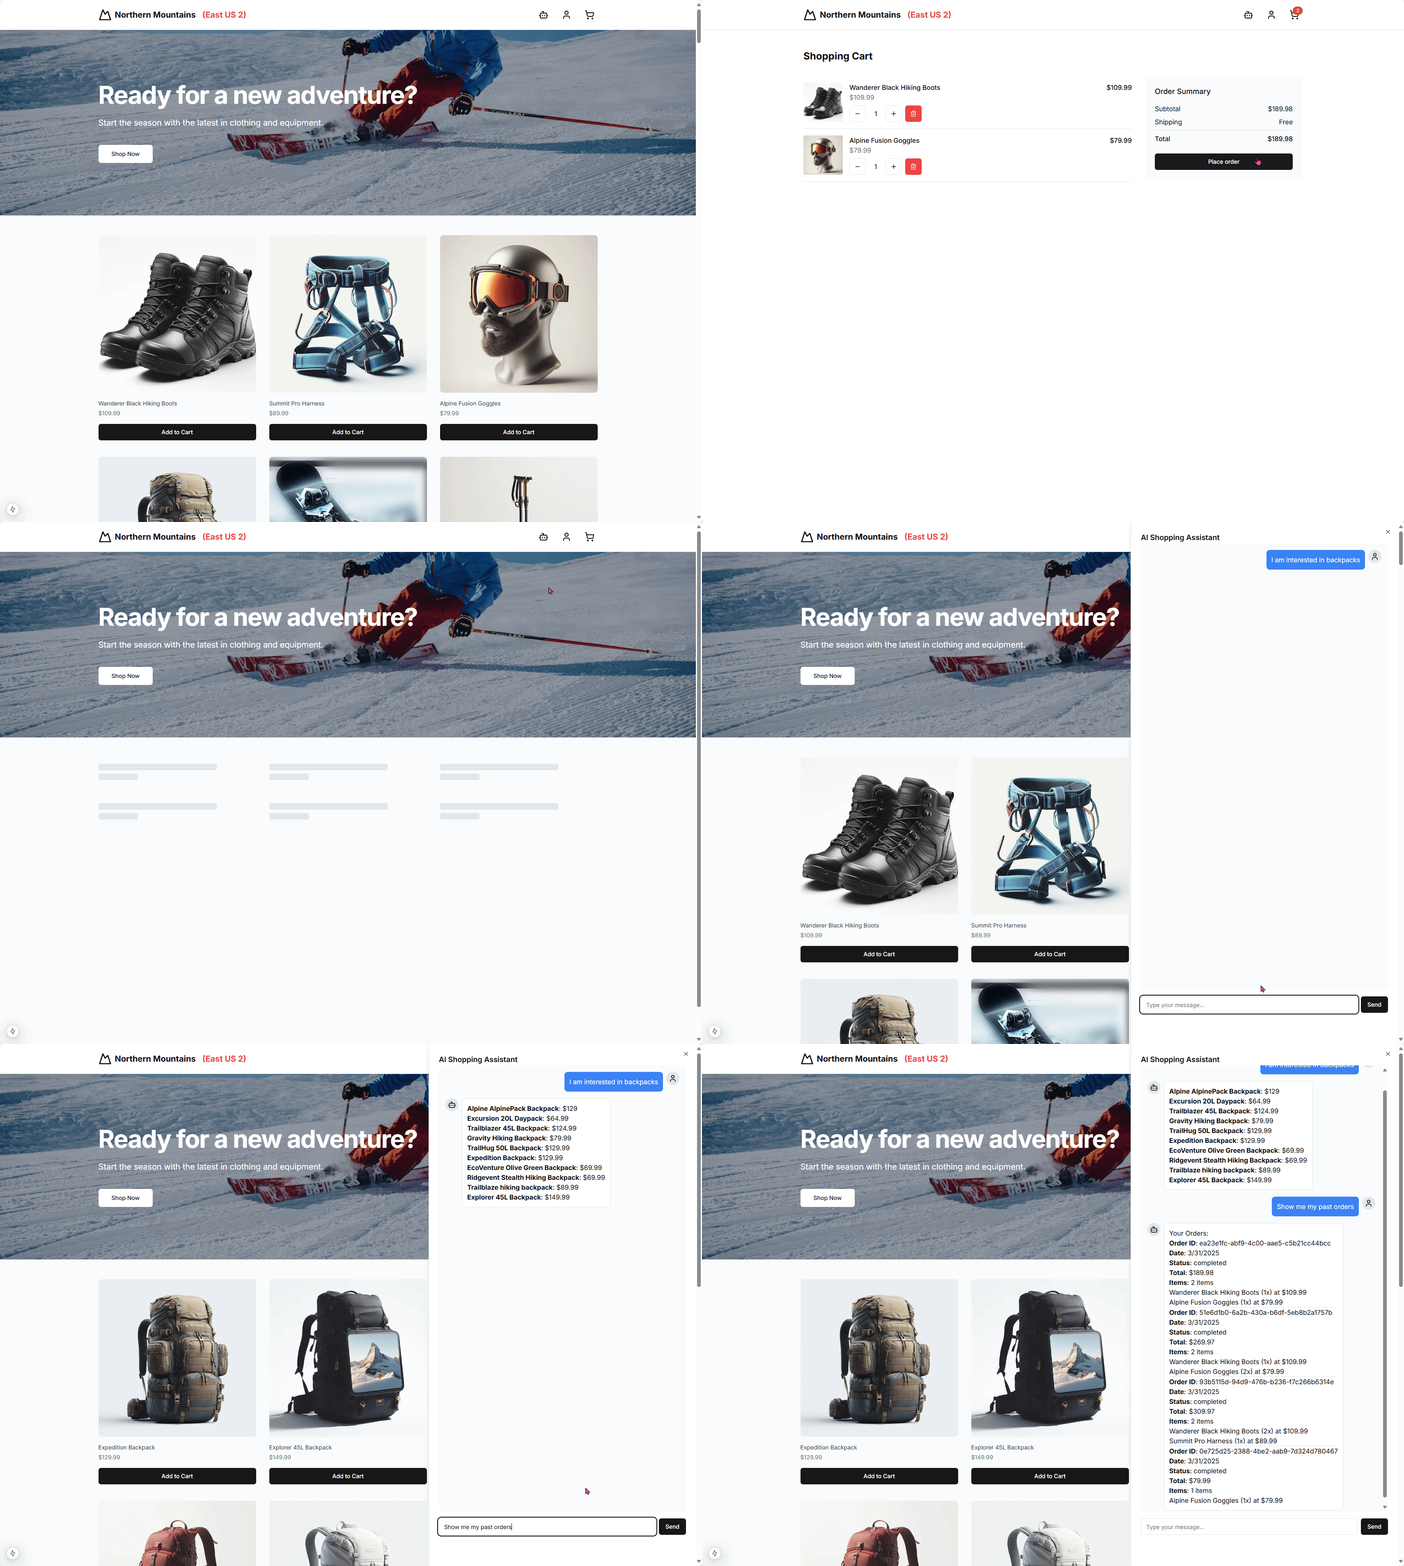
- Frontend application: NextJS 15 application that displays a products catalog and features an AI Assistant that helps users to find products in the catalog and get past orders
- an MCP Server component, connected to the Azure Cosmos DB NoSQL database and responsible for reading products and orders from the database.
Azure Architecture
- an Azure Cosmos DB NoSQL database that stores the product catalog
- a node.js server that serves as the MCP Server component
References
- Create an Azure Cosmos DB for NoSQL account
- Create an Azure Storage account
- Create a Windows virtual machine
- Windows execution policies
Step-by-step walkthrough
Installation
Azure Cosmos DB
In the Azure portal, create an Azure Cosmos DB for NoSQL account.
- Give a unique name for your Azure Cosmos DB account. We will be using cosmos-eastus2-nosql-2 in the rest of this walkthrough.
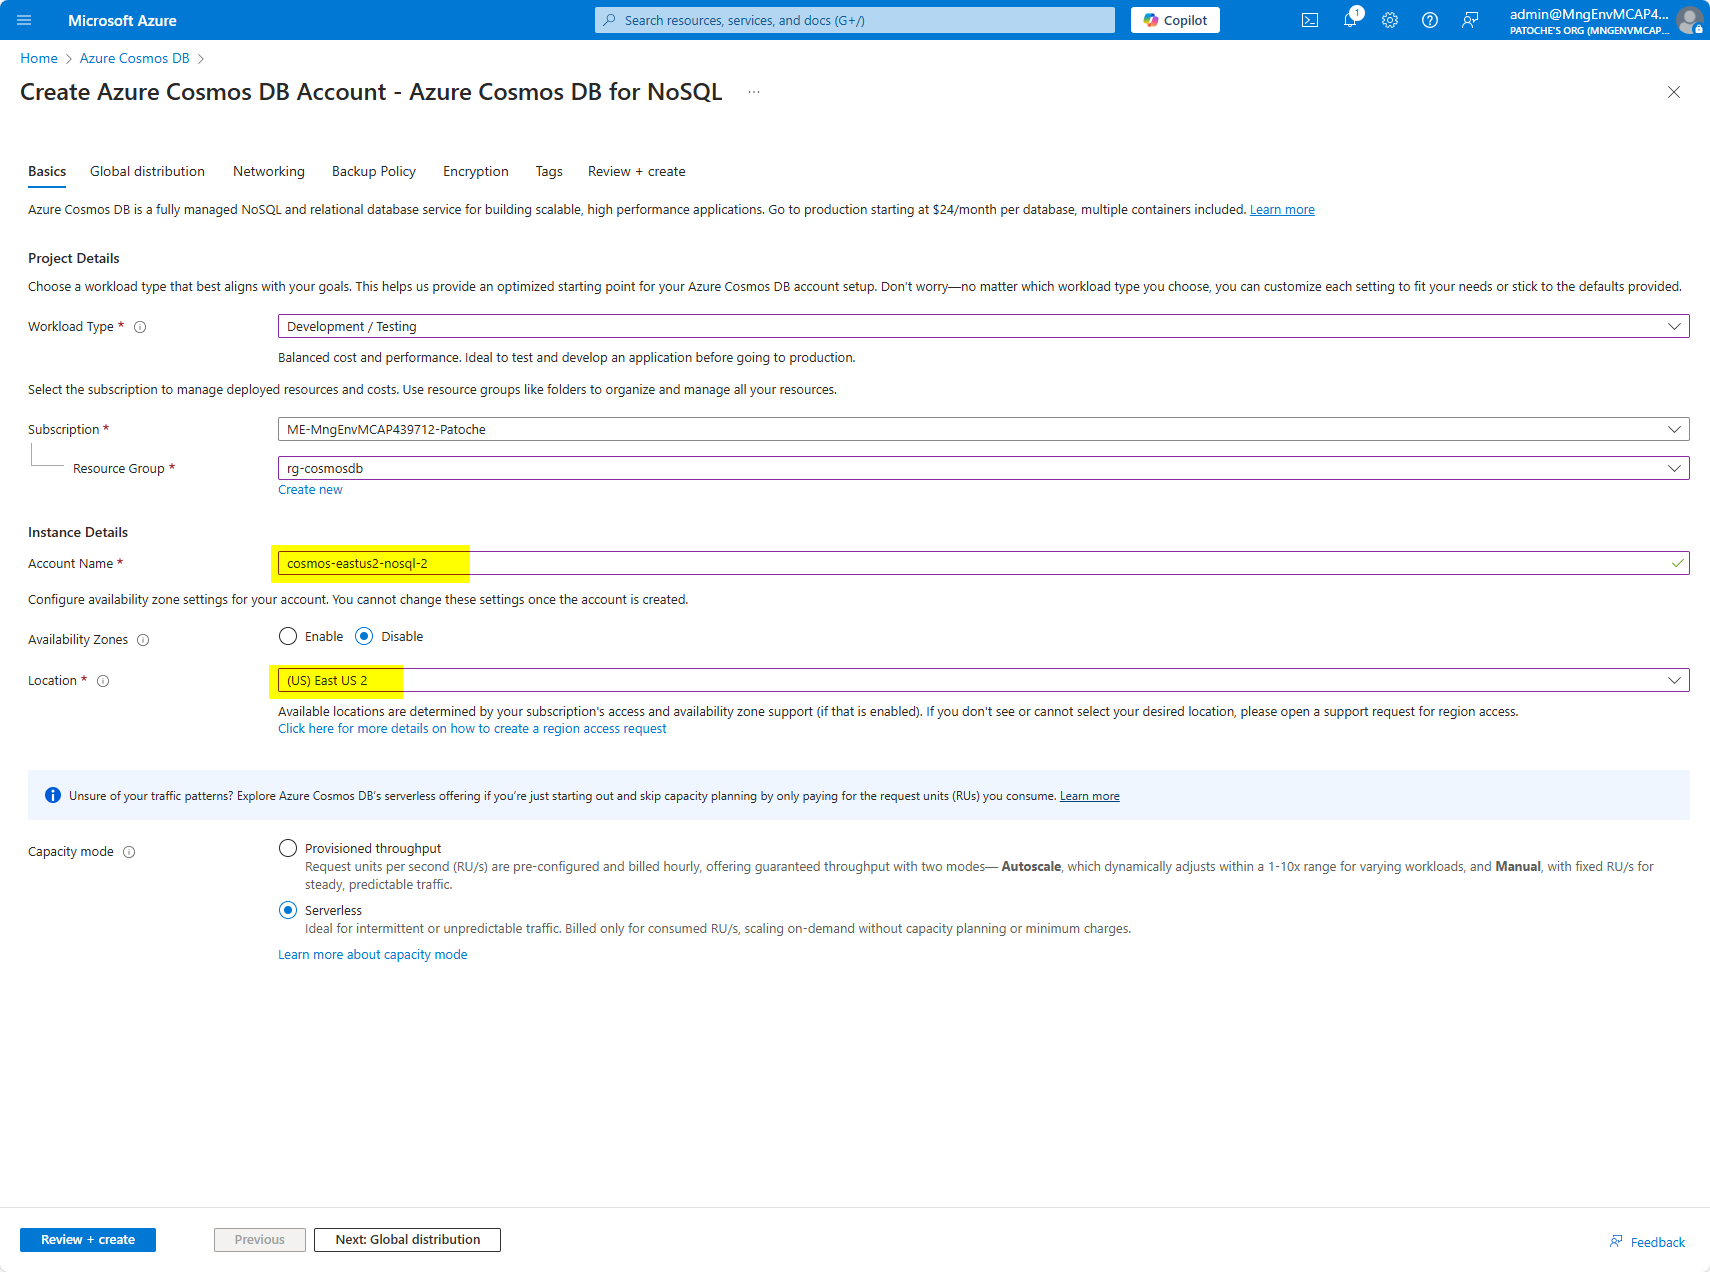
- Click on "Next: Global distribution"
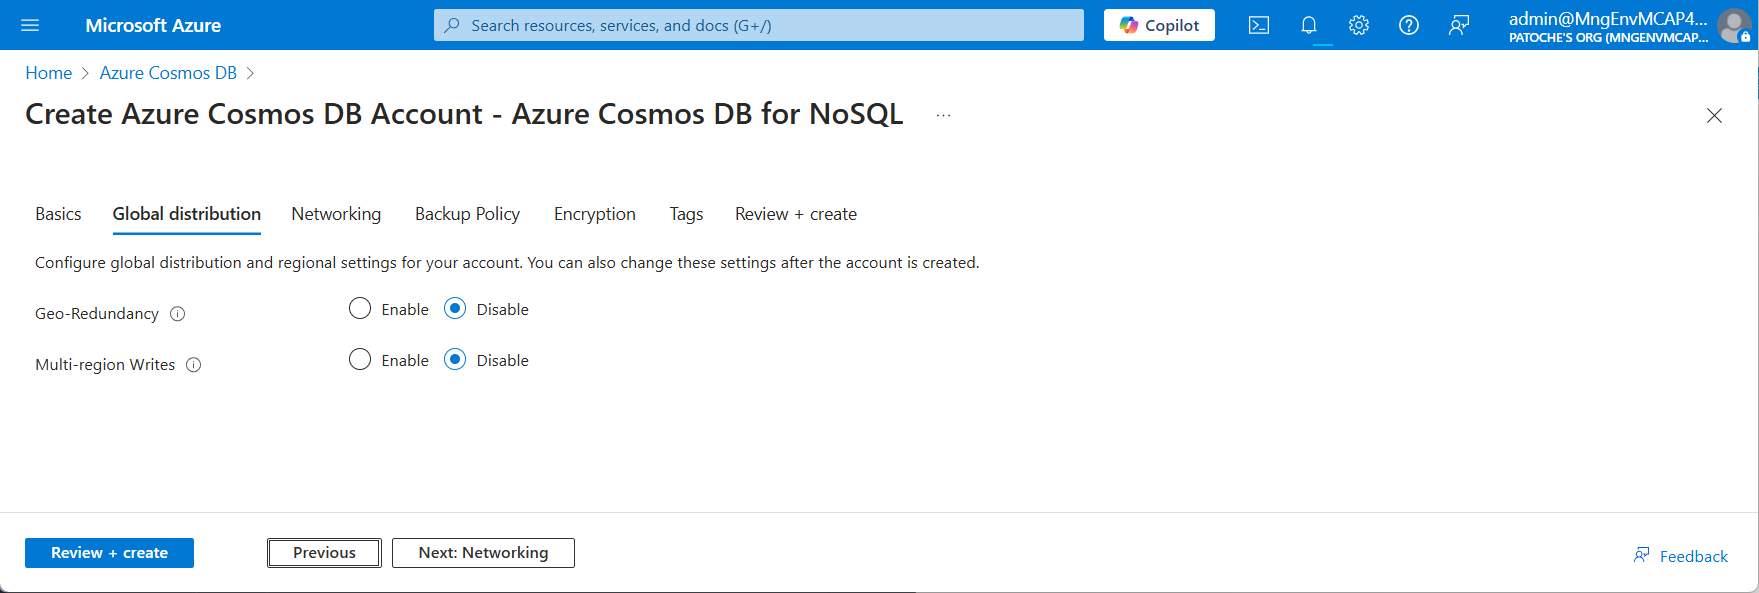
- Accept the default values and click on "Next: Networking"
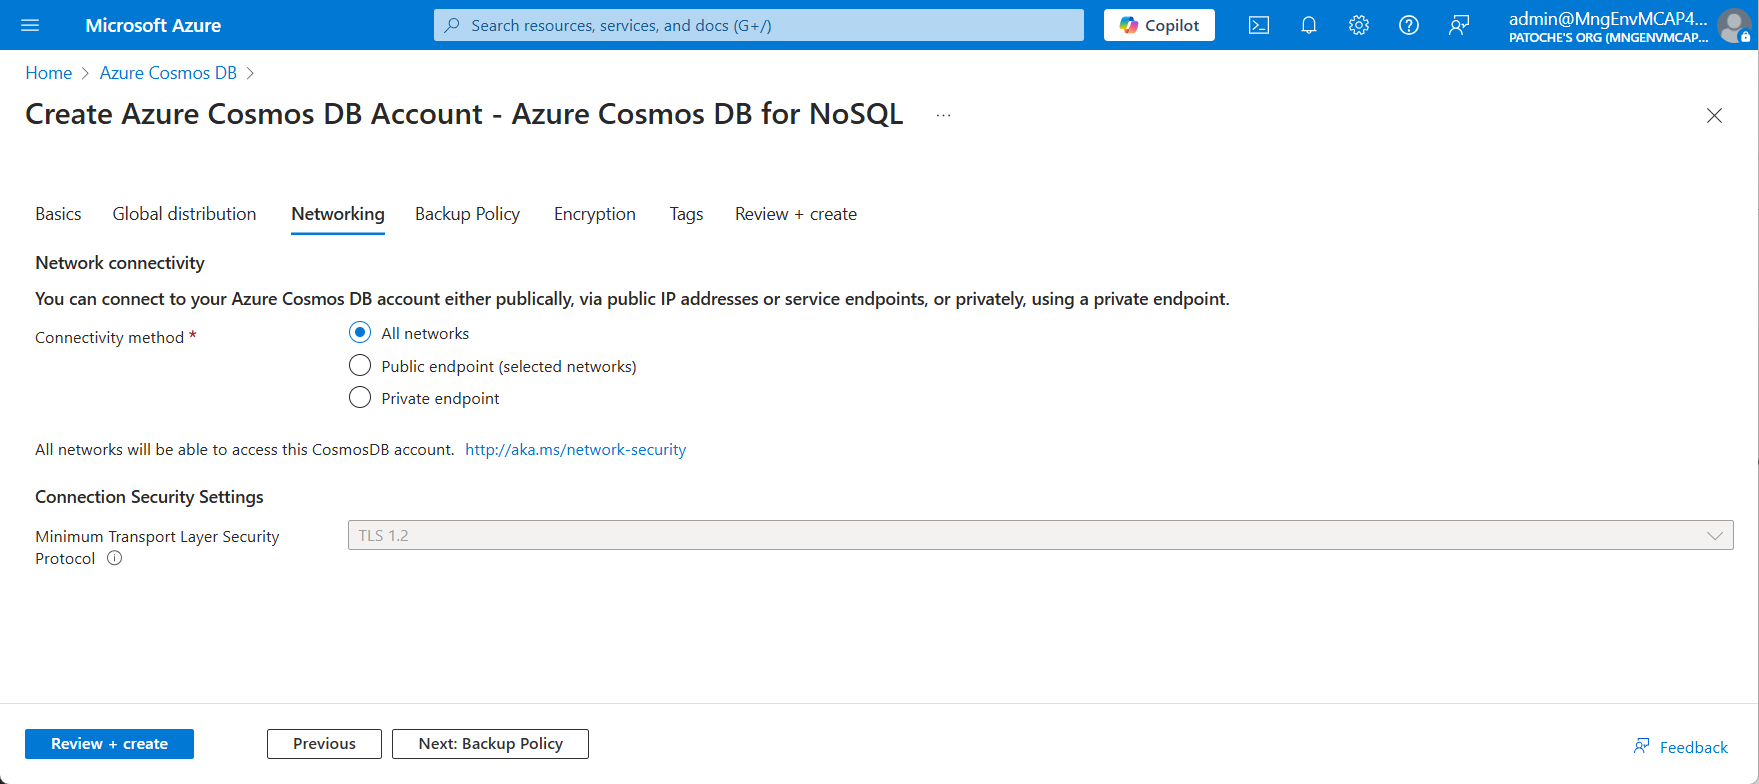
- Accept the default values and click on "Next: Backup Policy"
- Select "Periodic" backup policy
- Select "Locally-redundant backup storage"
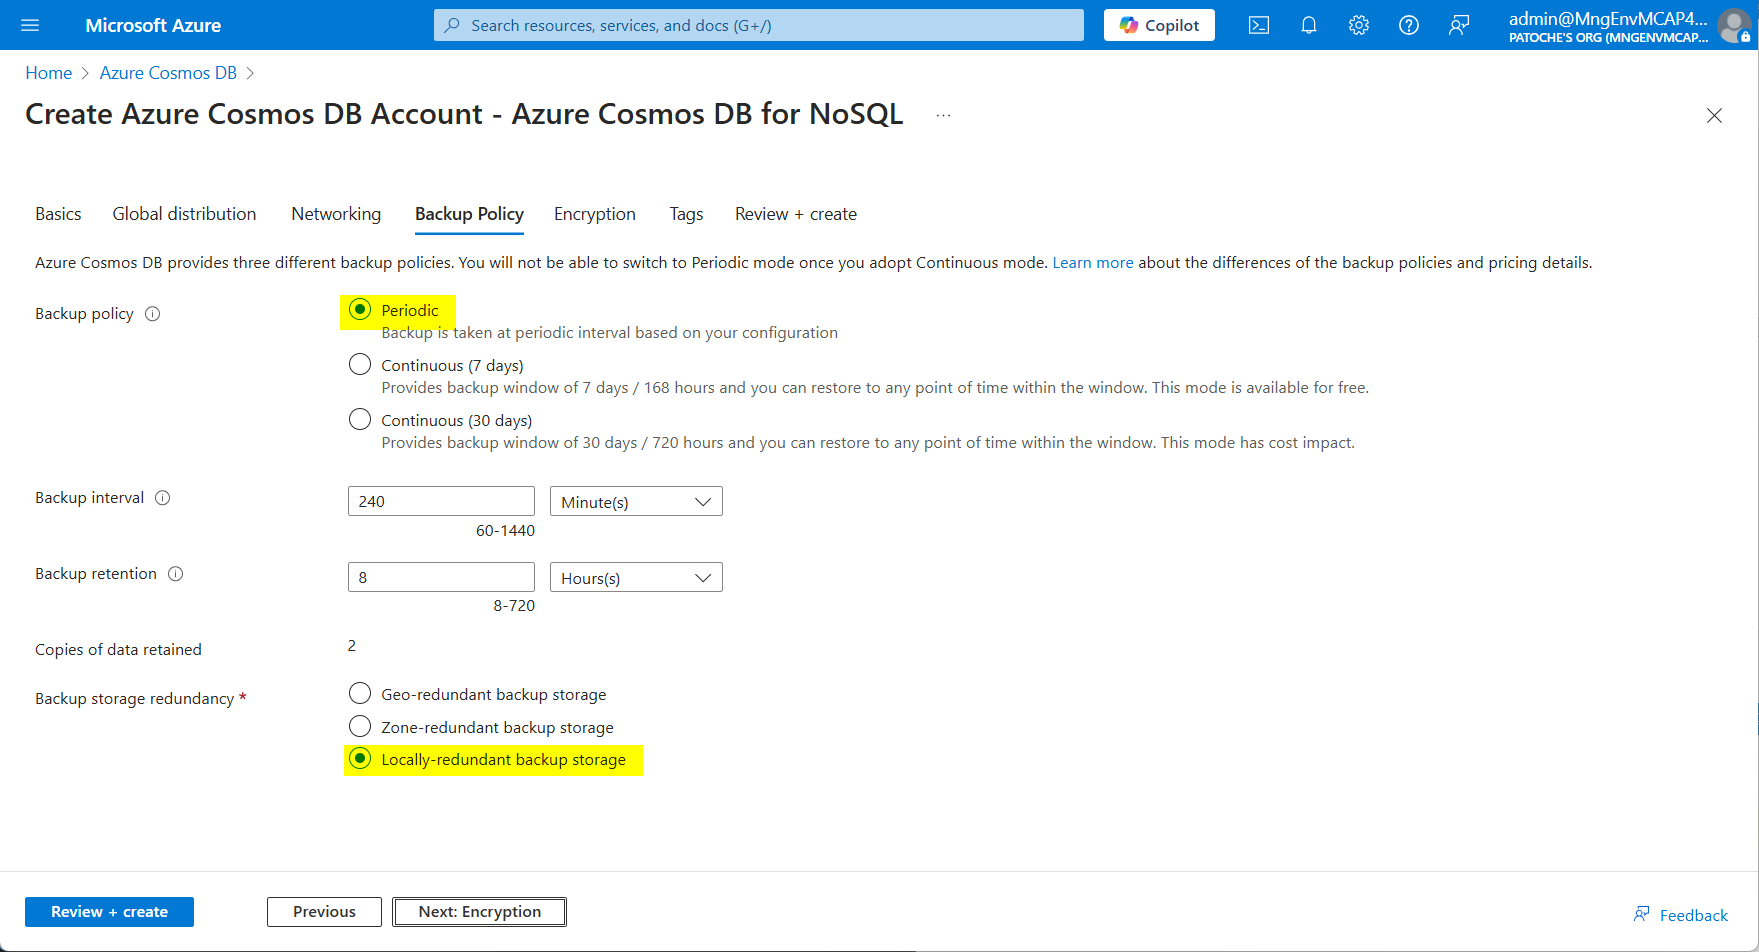
- Click on "Next: Encryption"
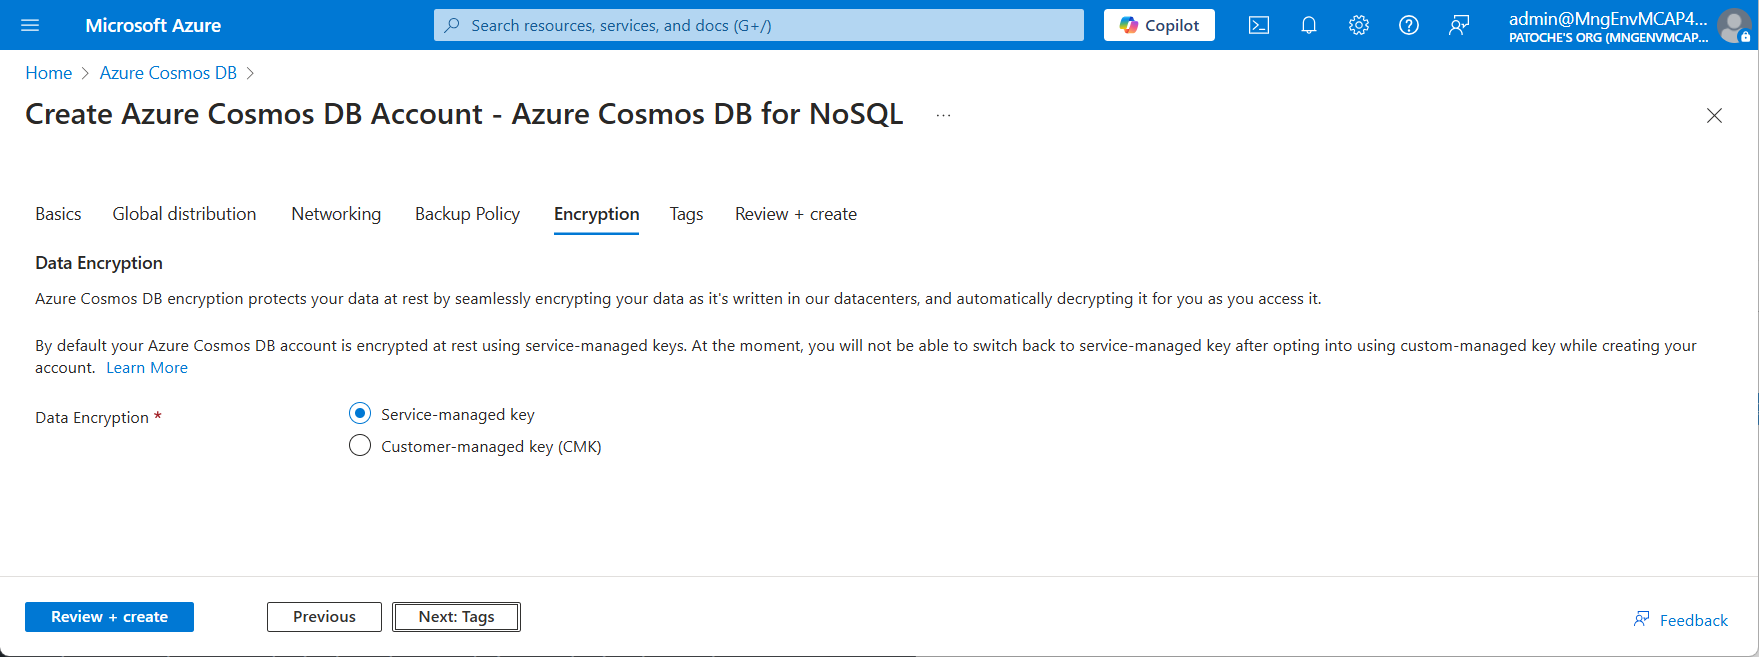
- Click on "Review and Create" to start validation
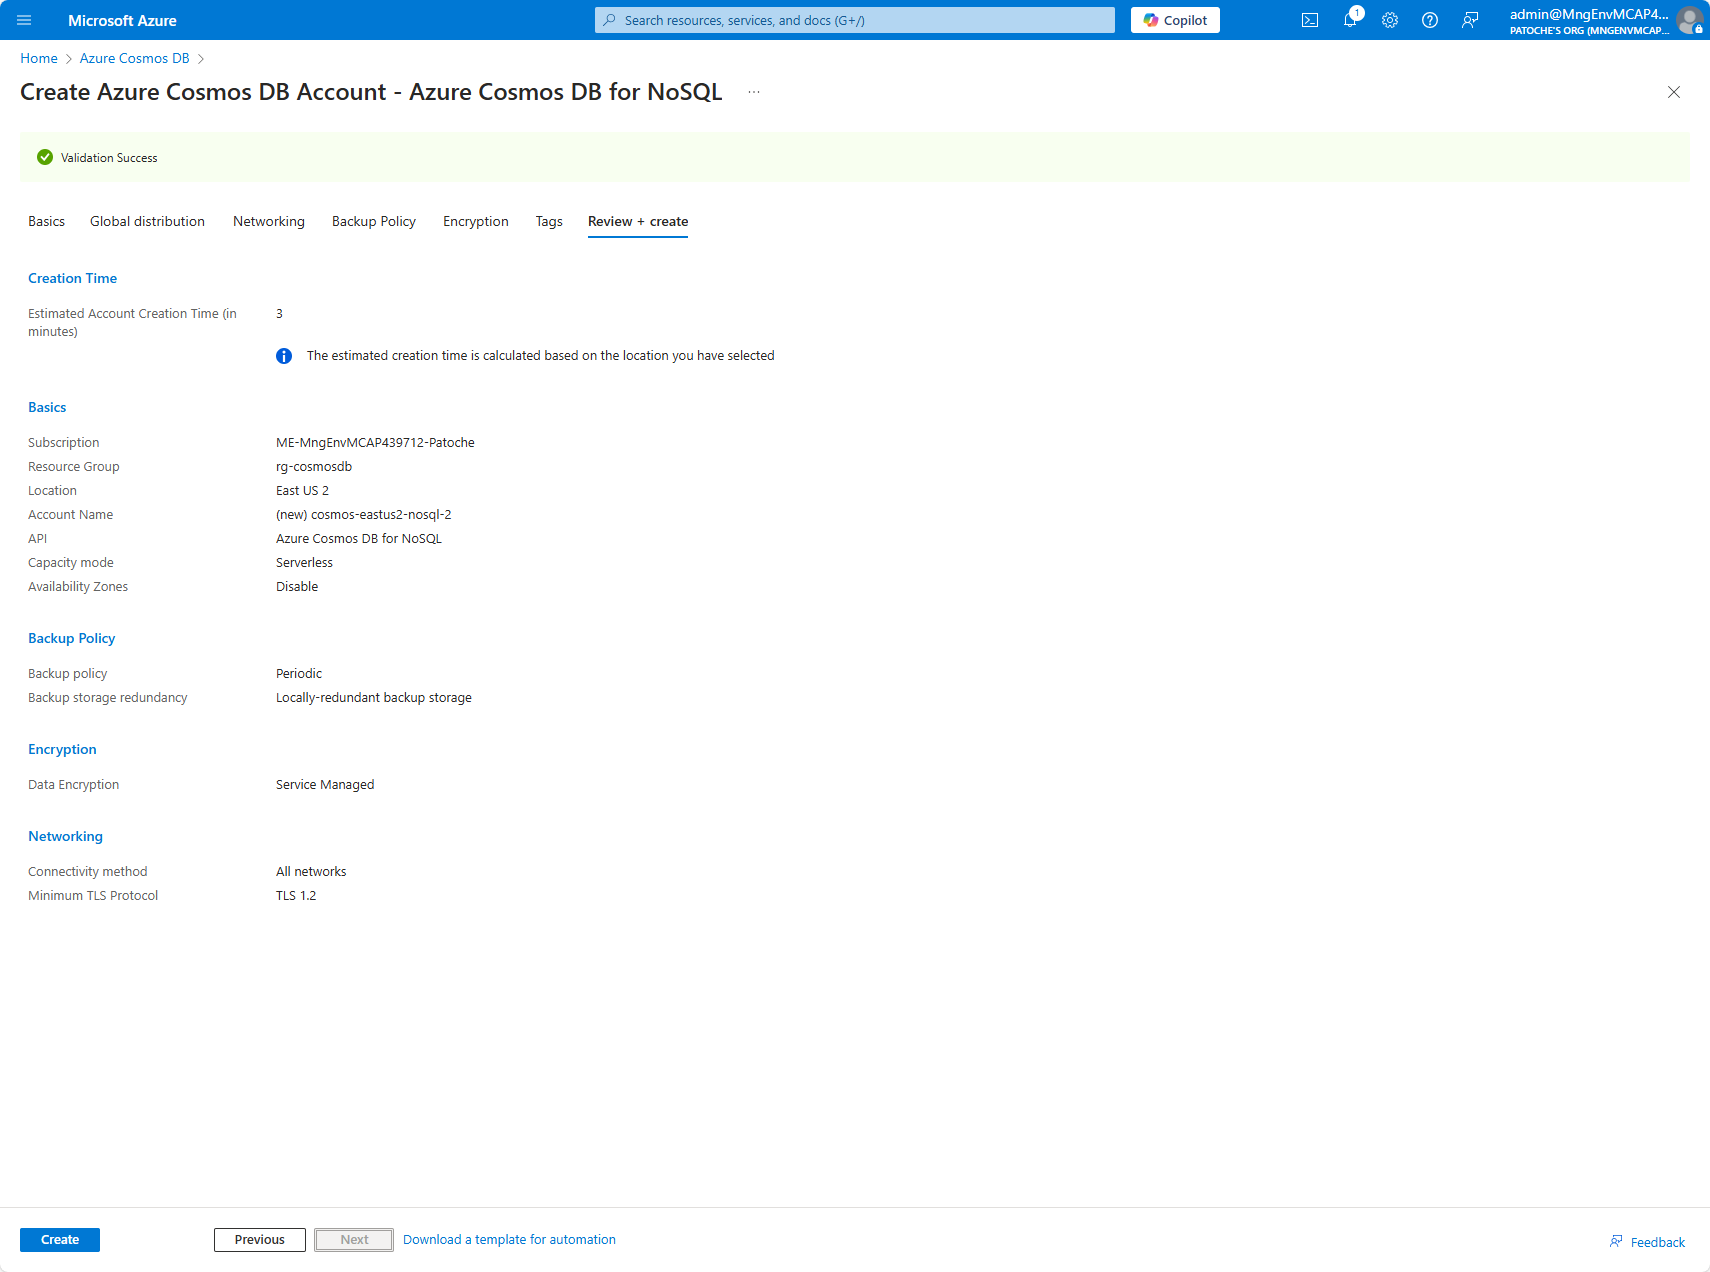
- Click on "Create" to start the creation of the Azure Cosmos DB for NoSQL account
For this project, you will need to enable vector support on the Azure Cosmos DB account.
- In the settings section, select Features, then "Vector Search for NoSQL API"
- In the panel that opens, click on the Enable button
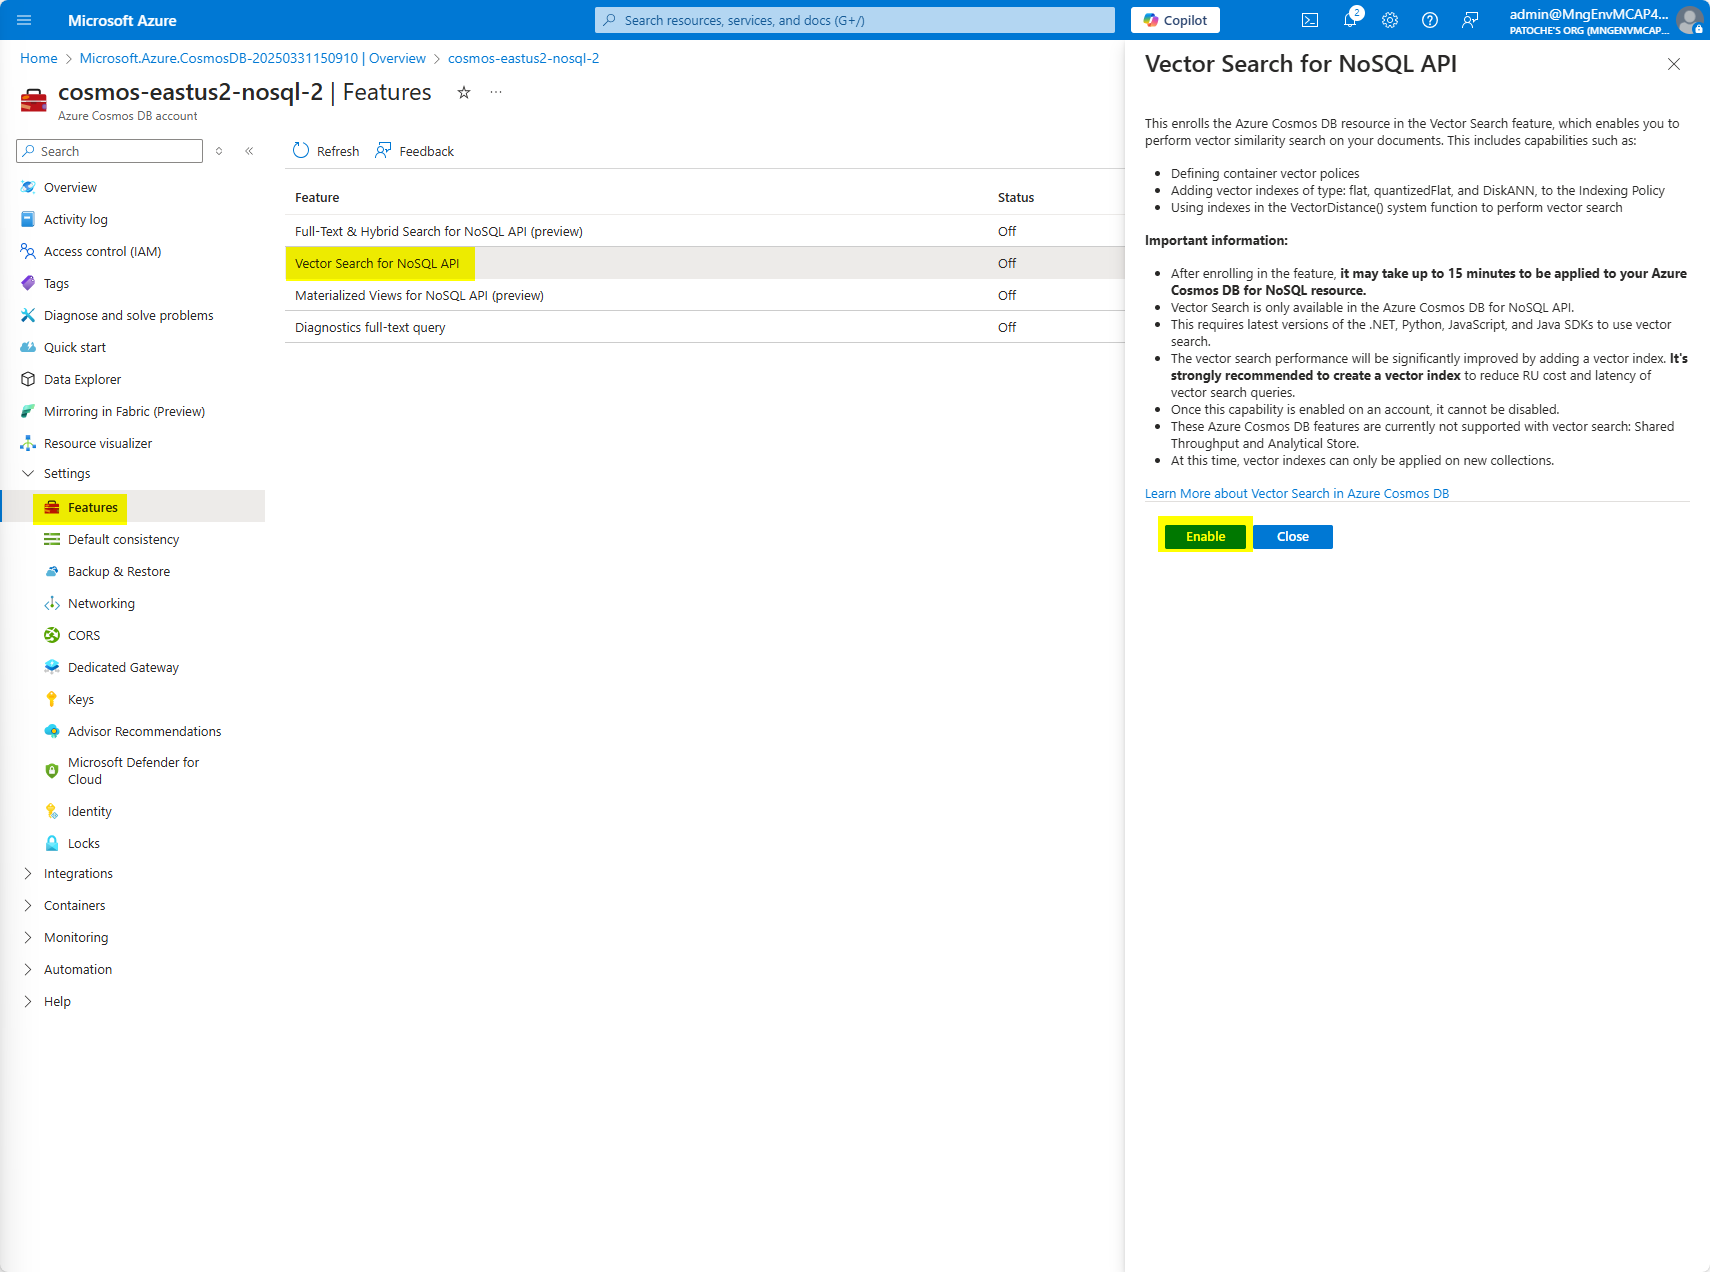
- Create the Azure Cosmos DB eShop database and the Products container
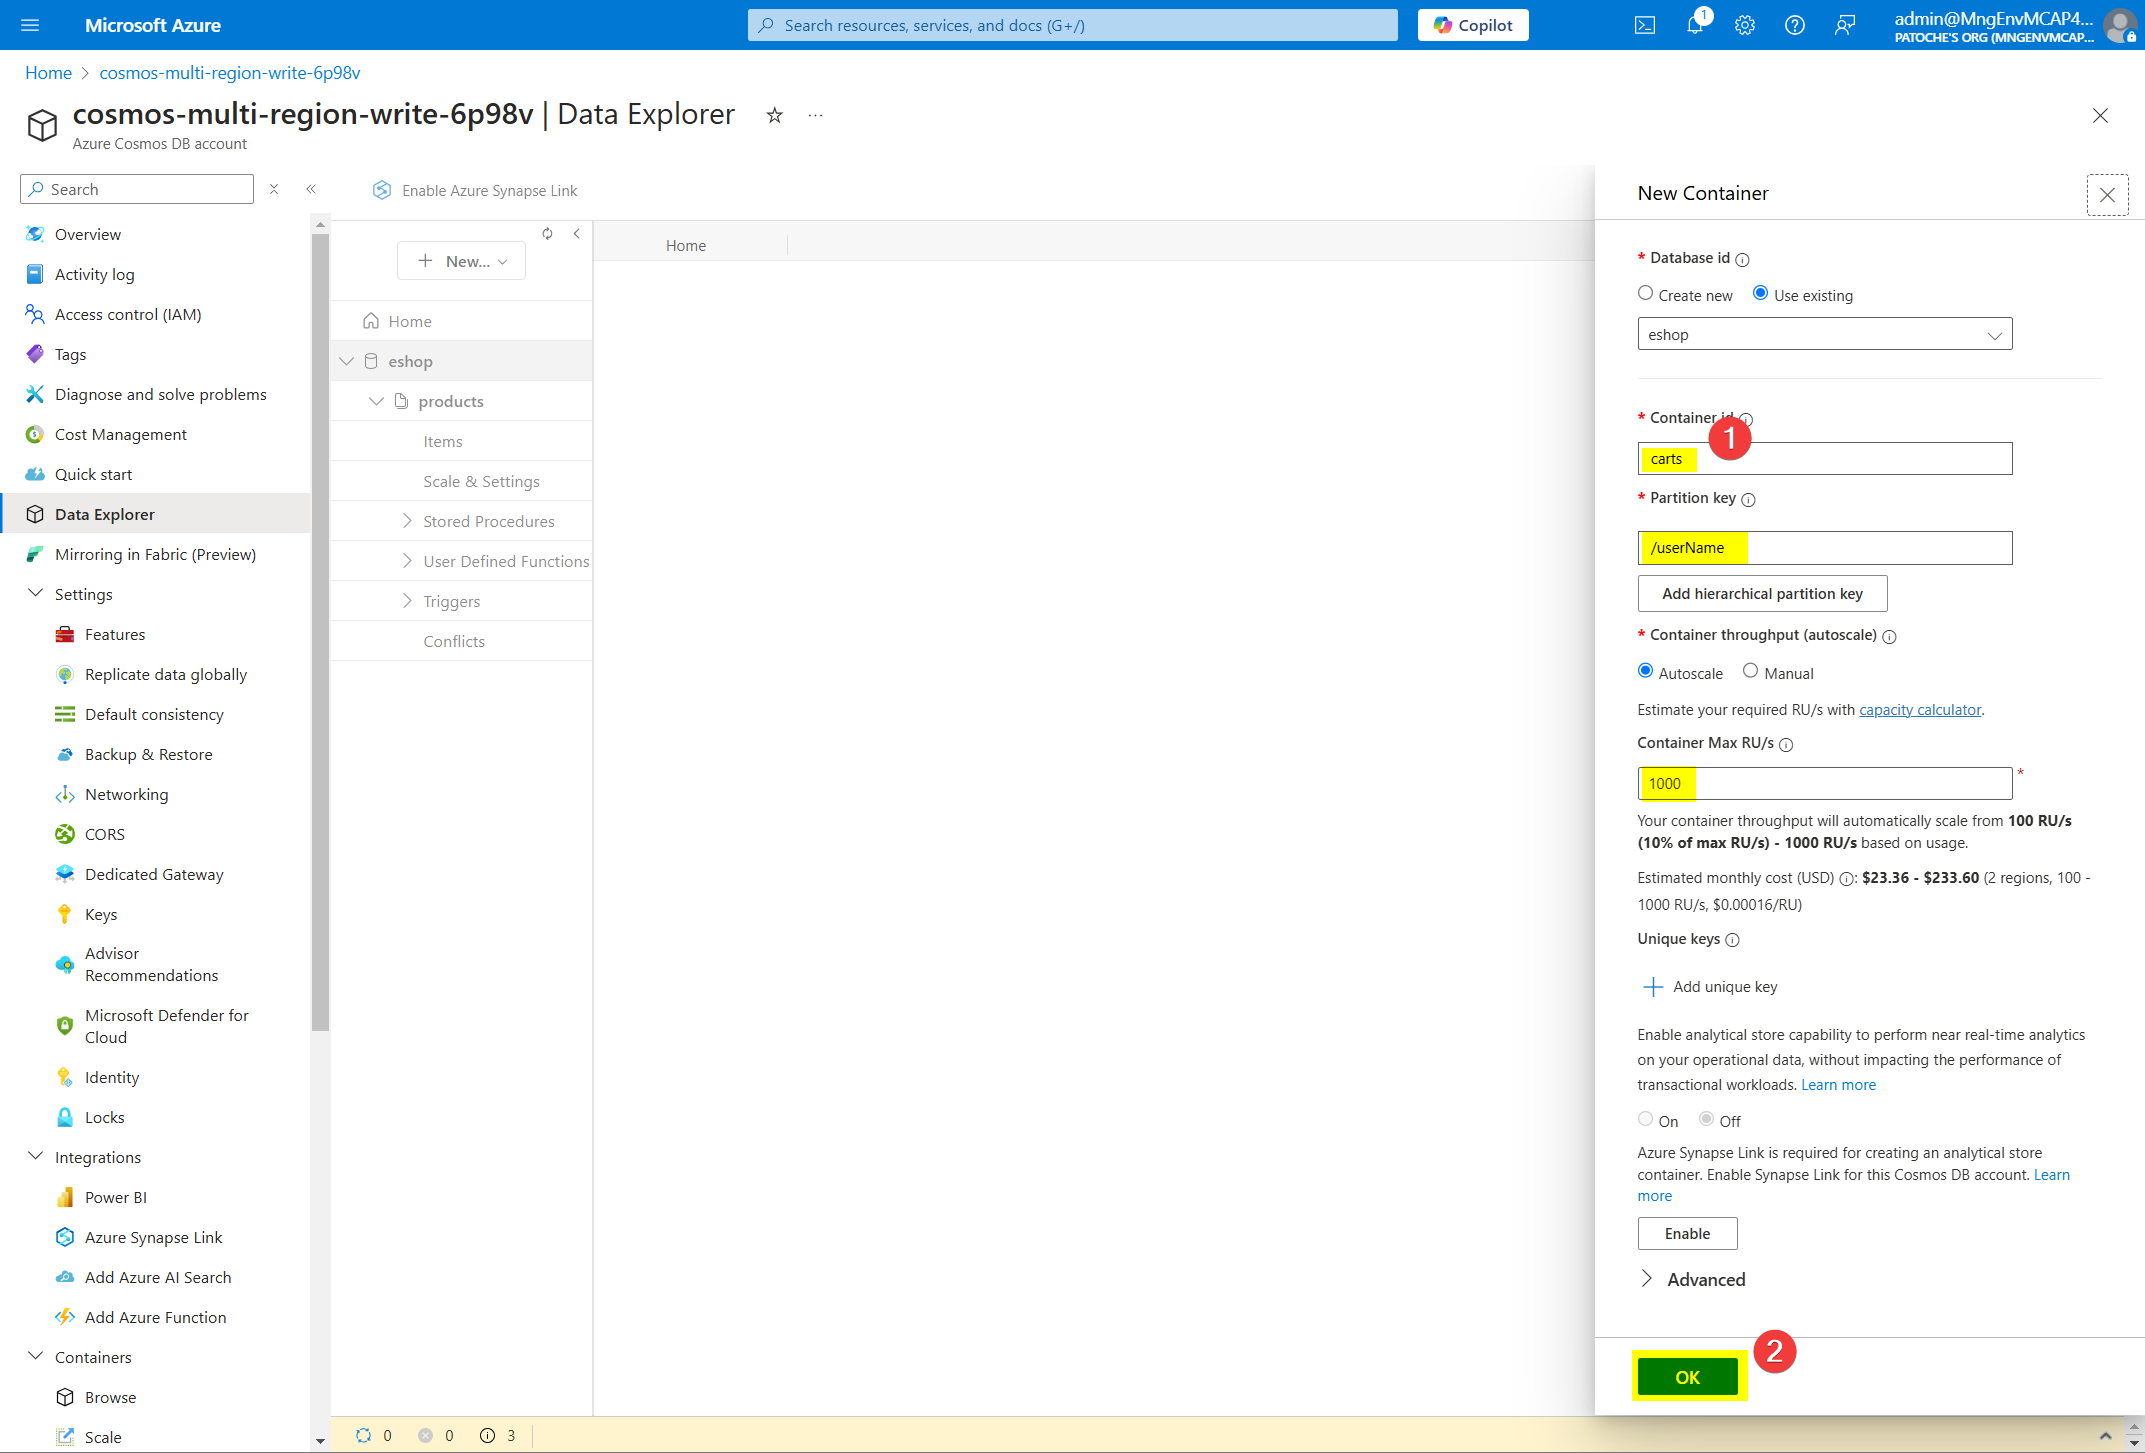
- Click on "..." next to eShop to display the contextual menu and select "New container" to create the "carts" container in the eShop database.
Make sure that the partition key is _"/id"_ (the partition key is case-sensitive)
Expand "Container Vector Policy" and click on the "Add vector embedding" button
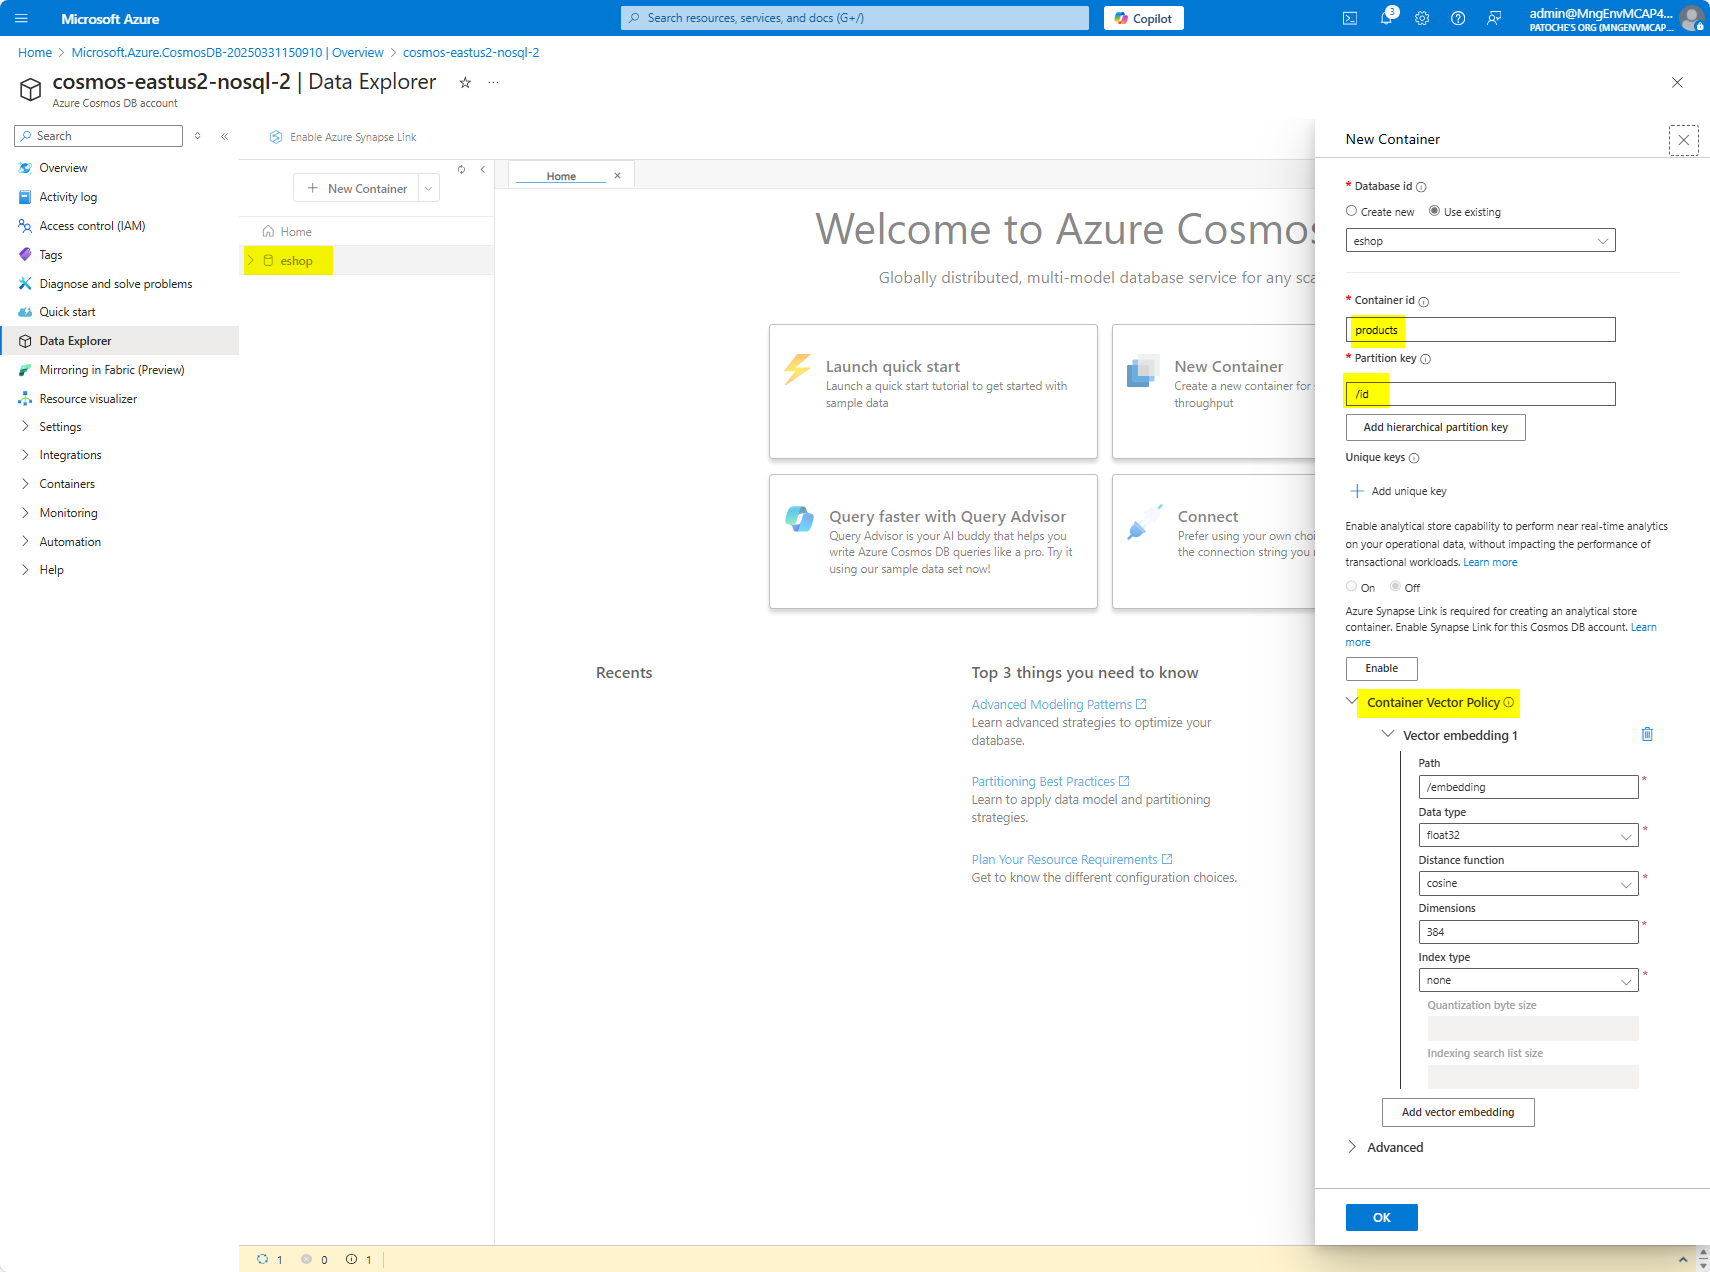
- Create the carts container
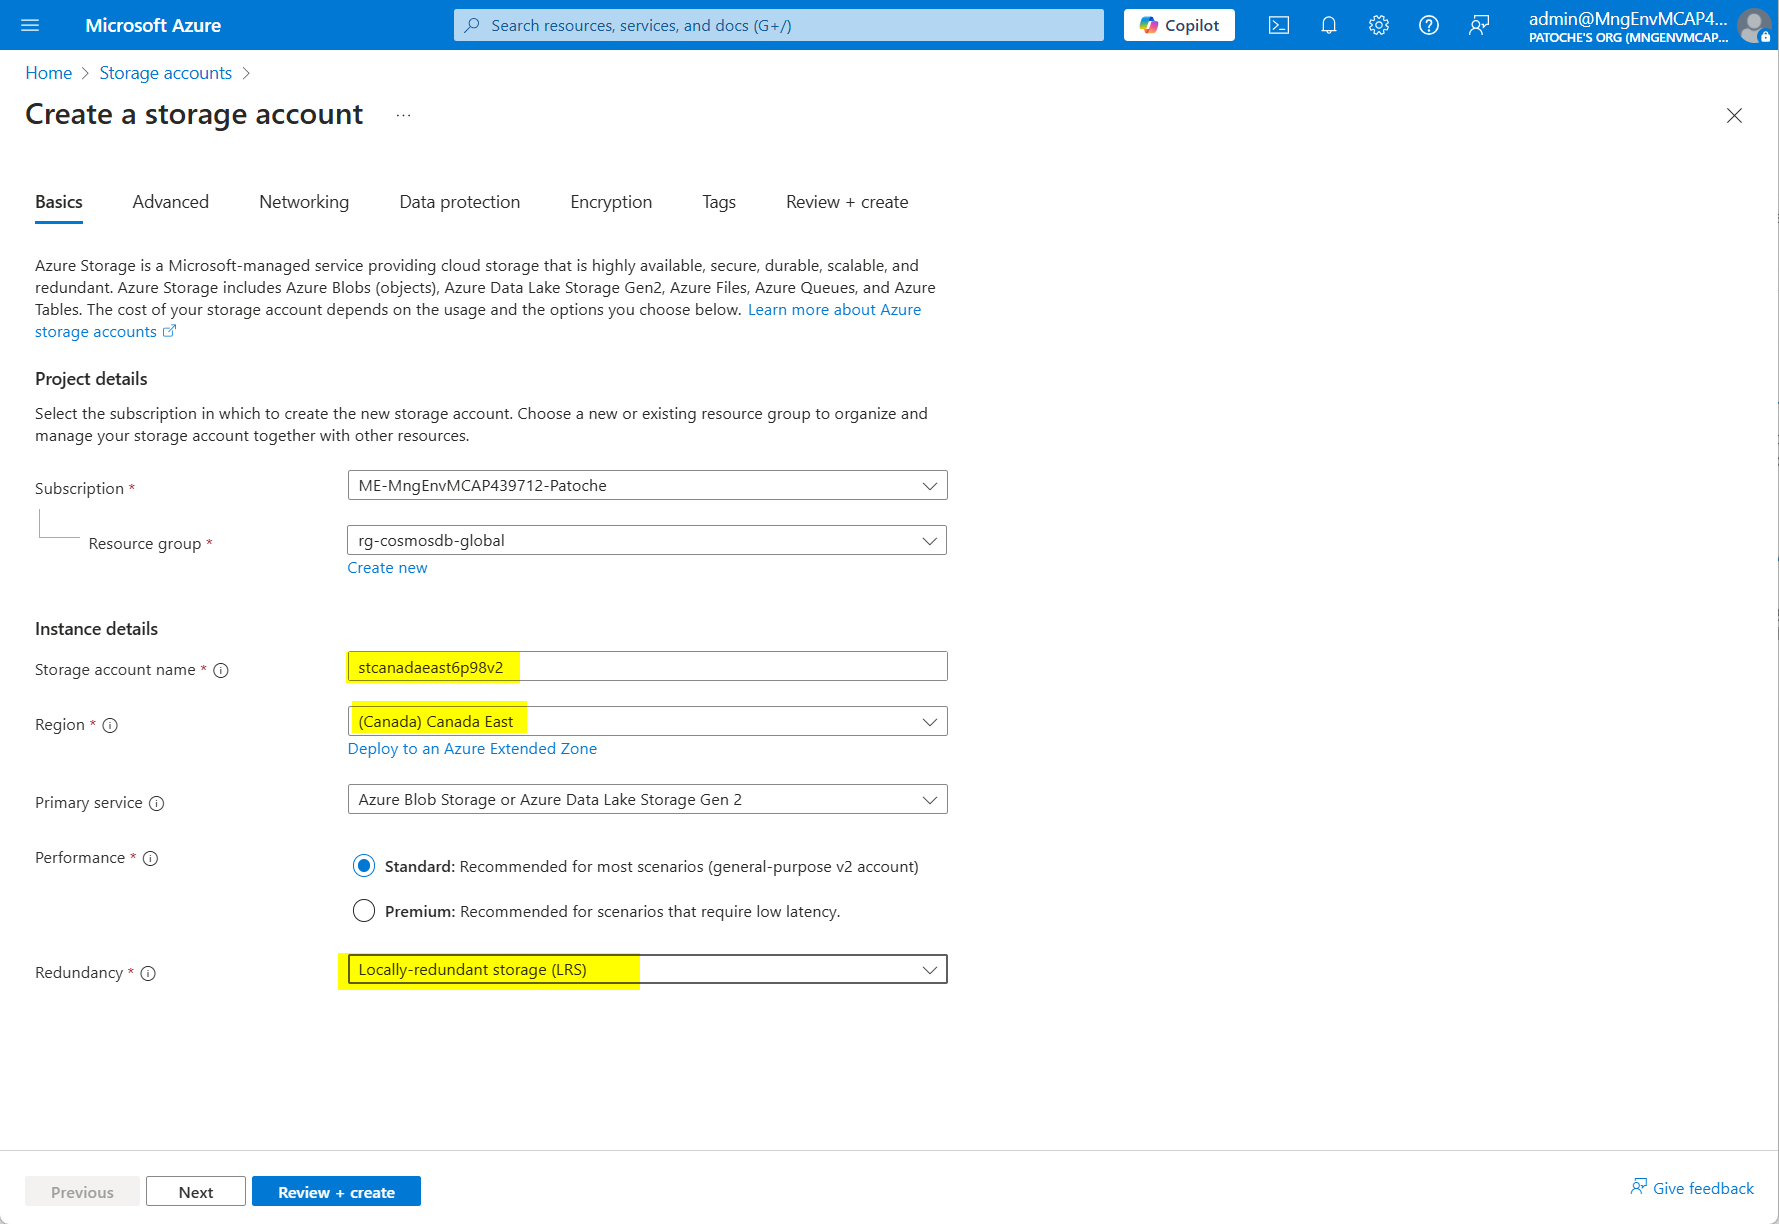
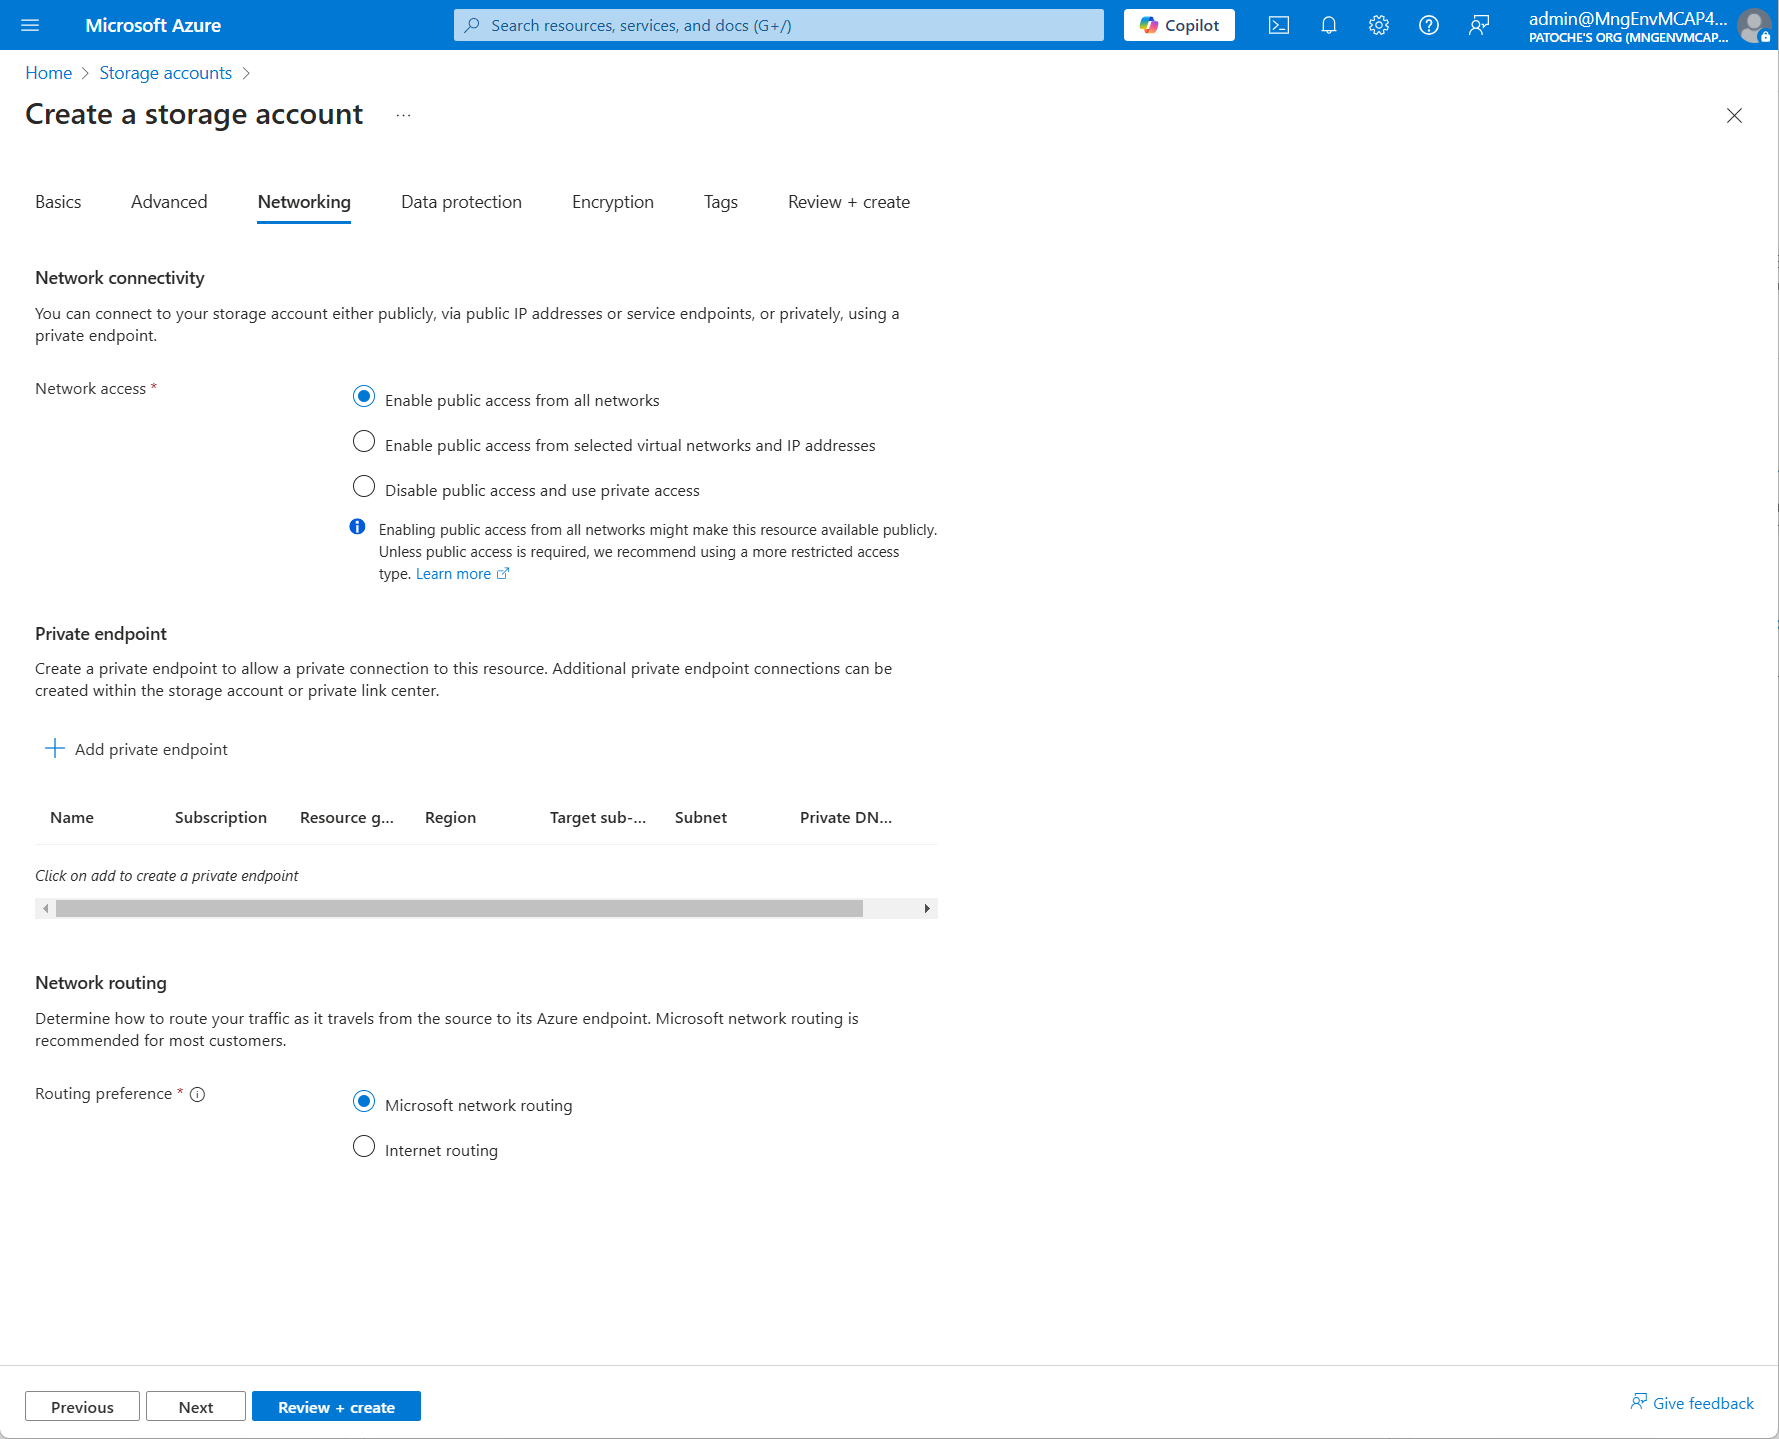
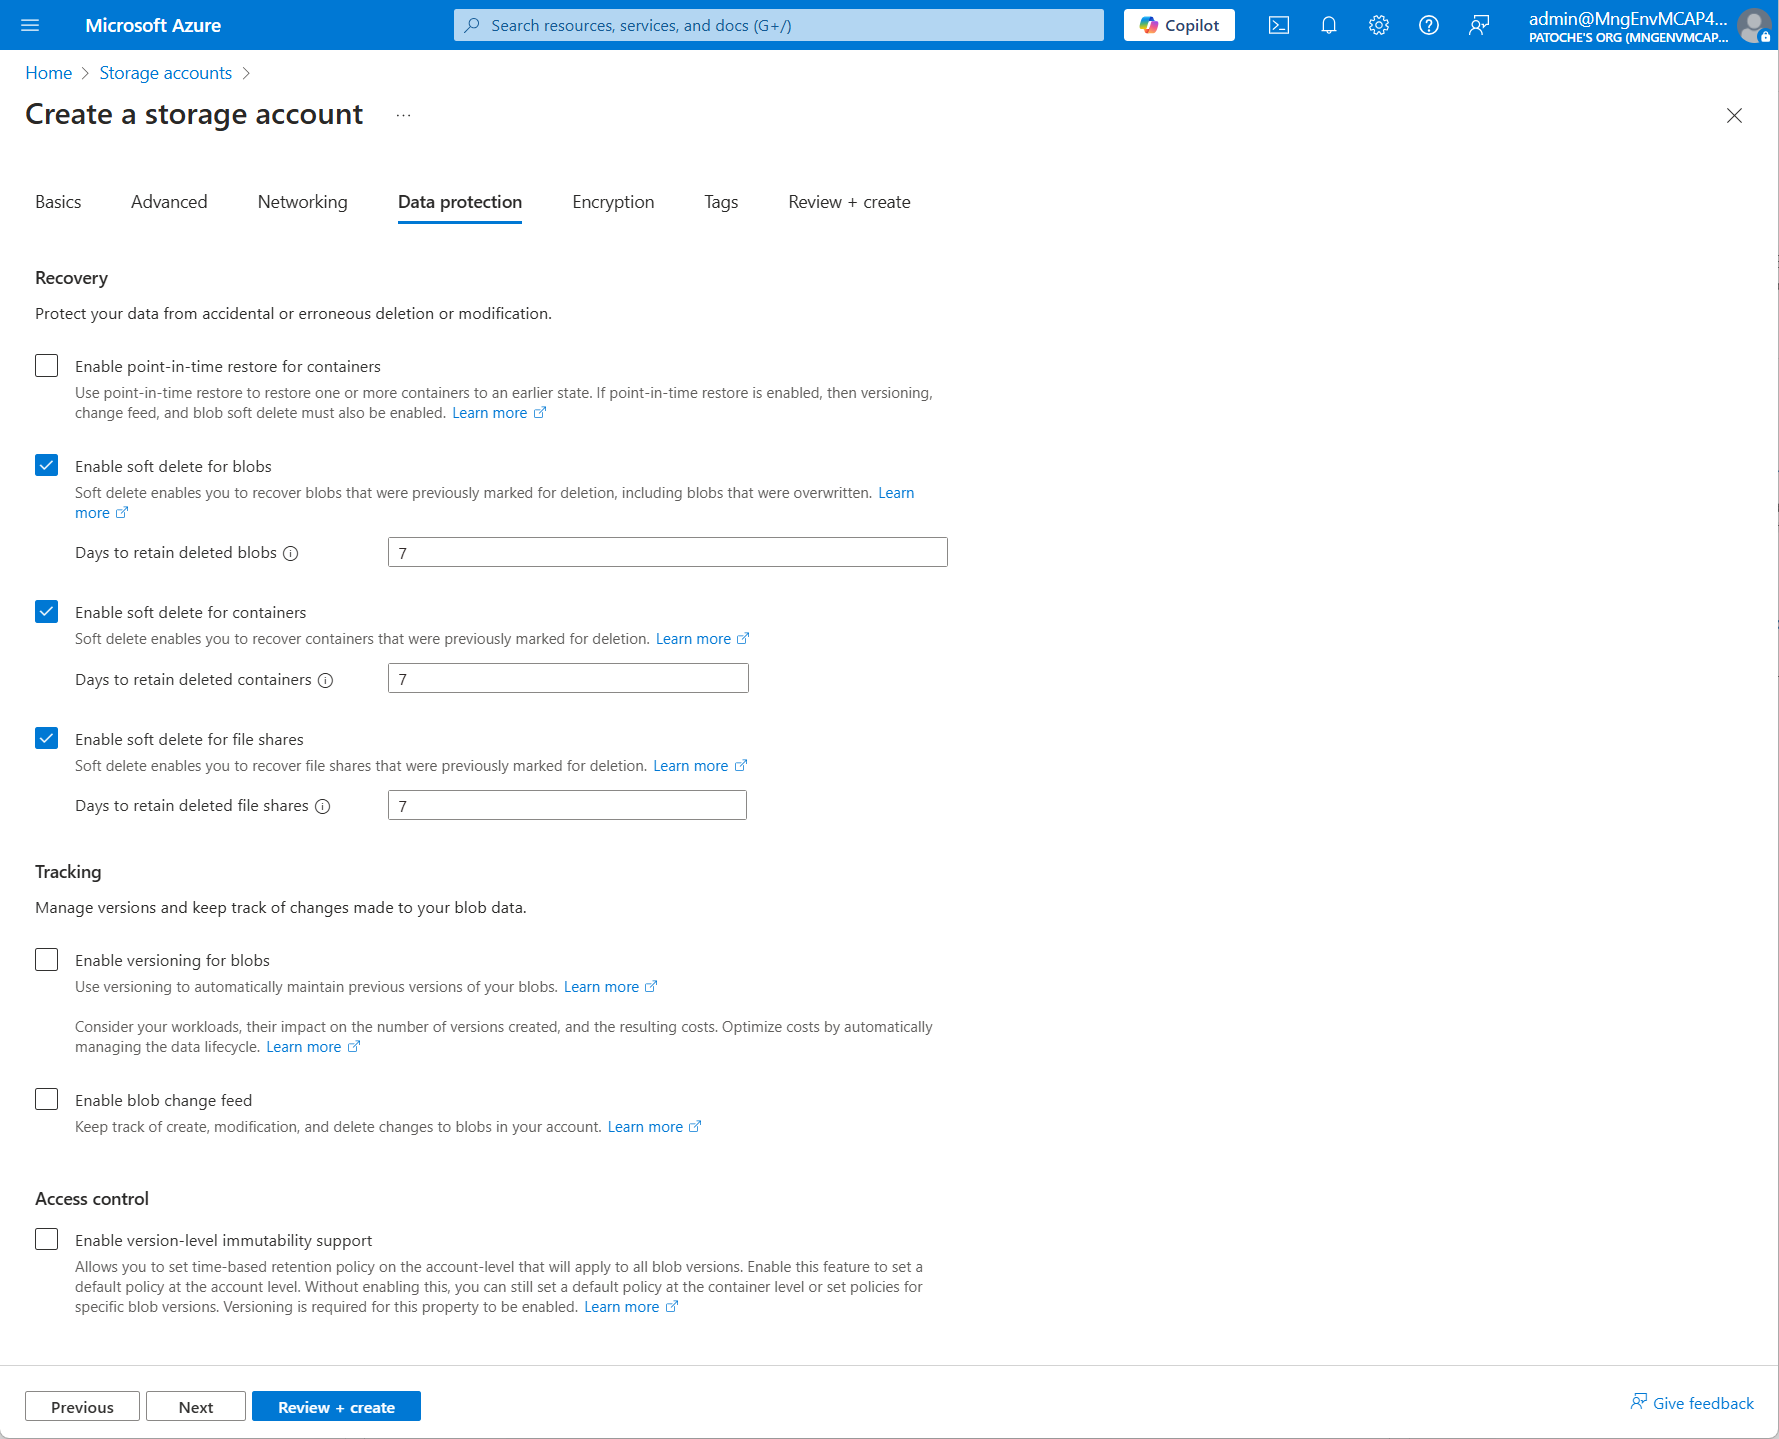
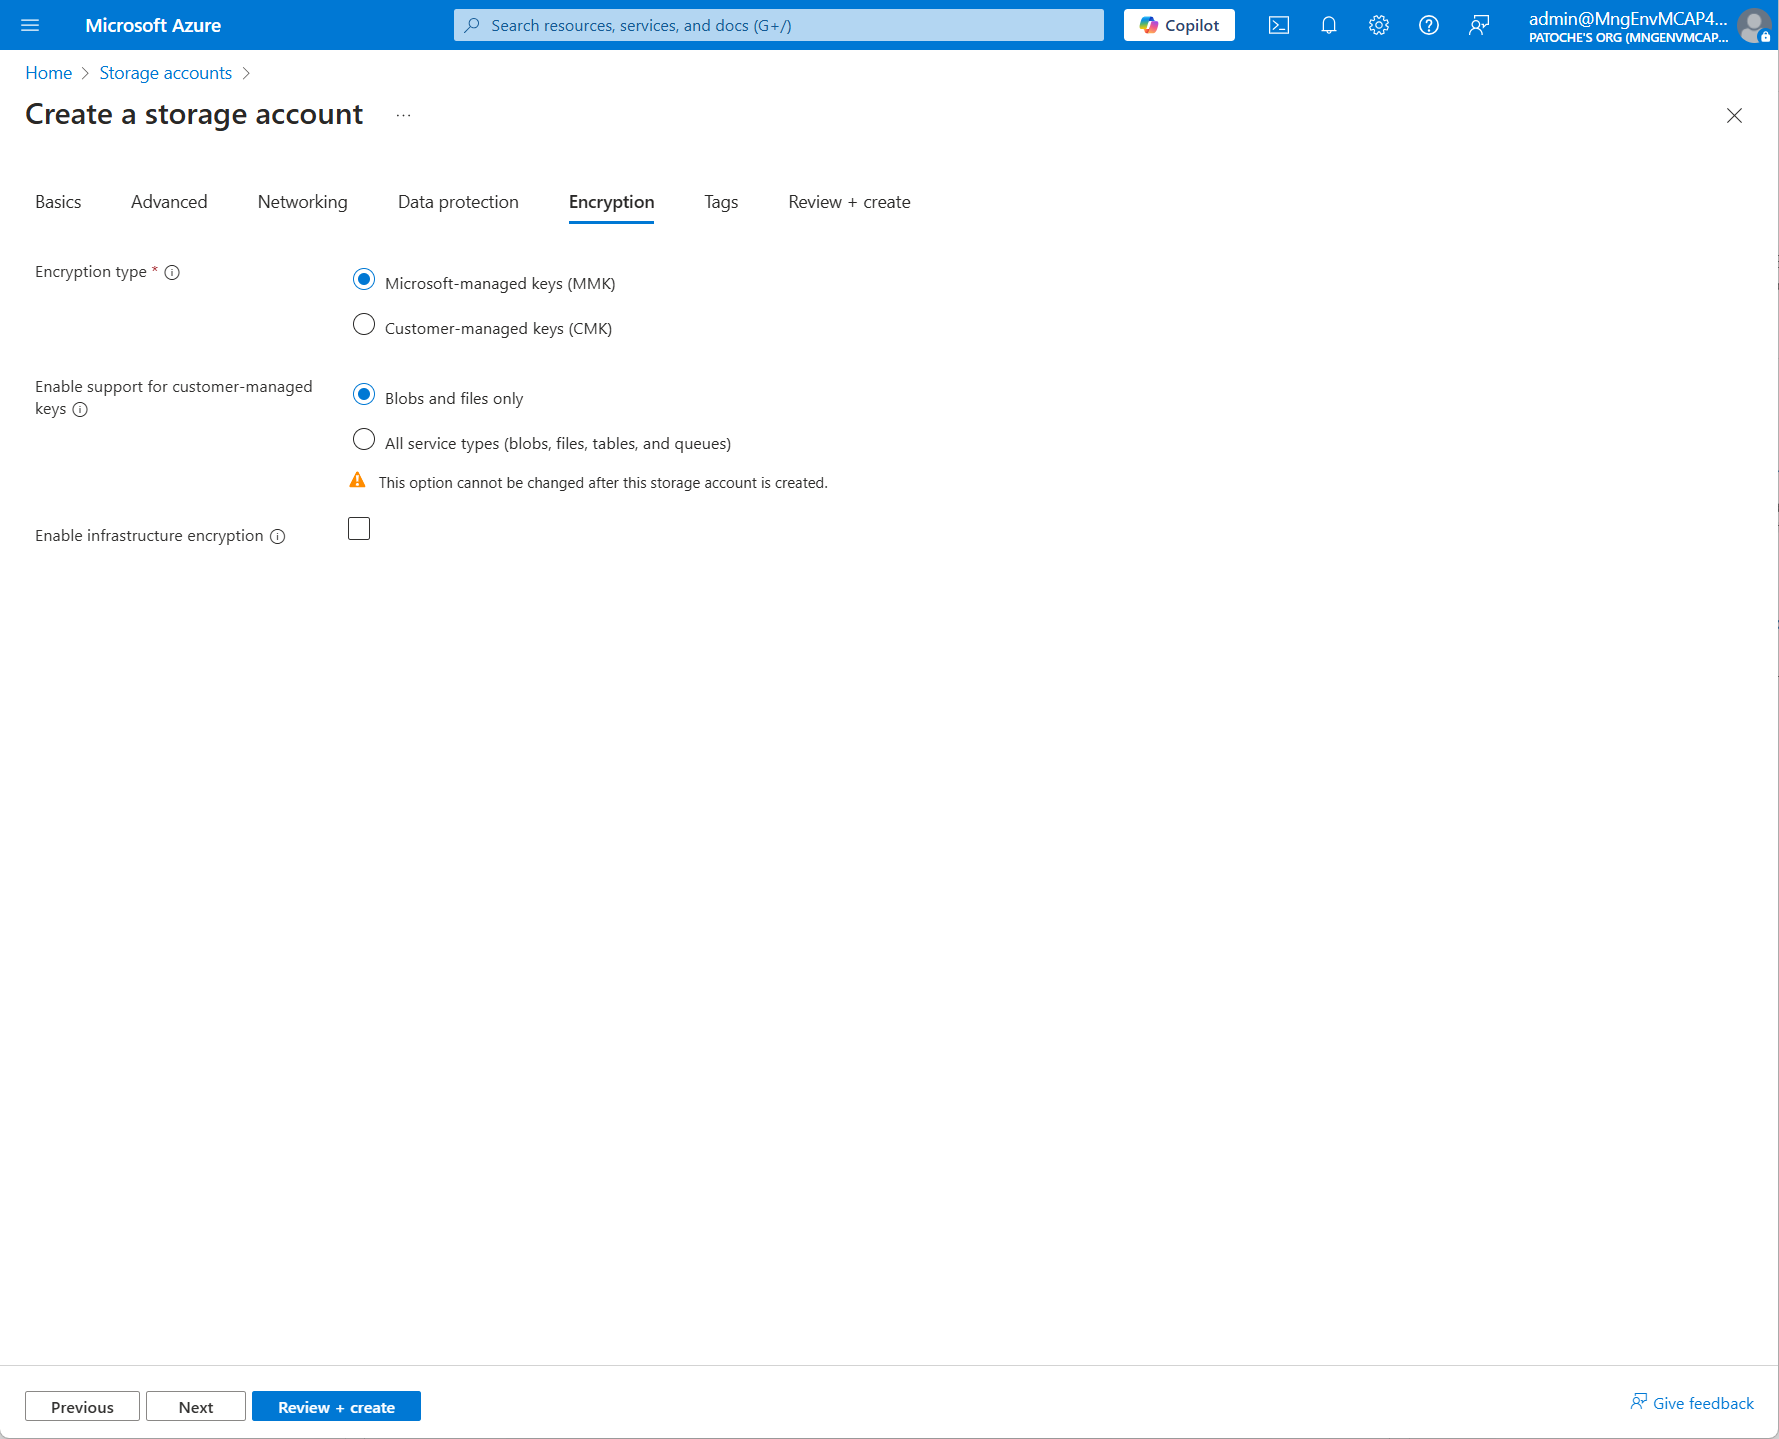
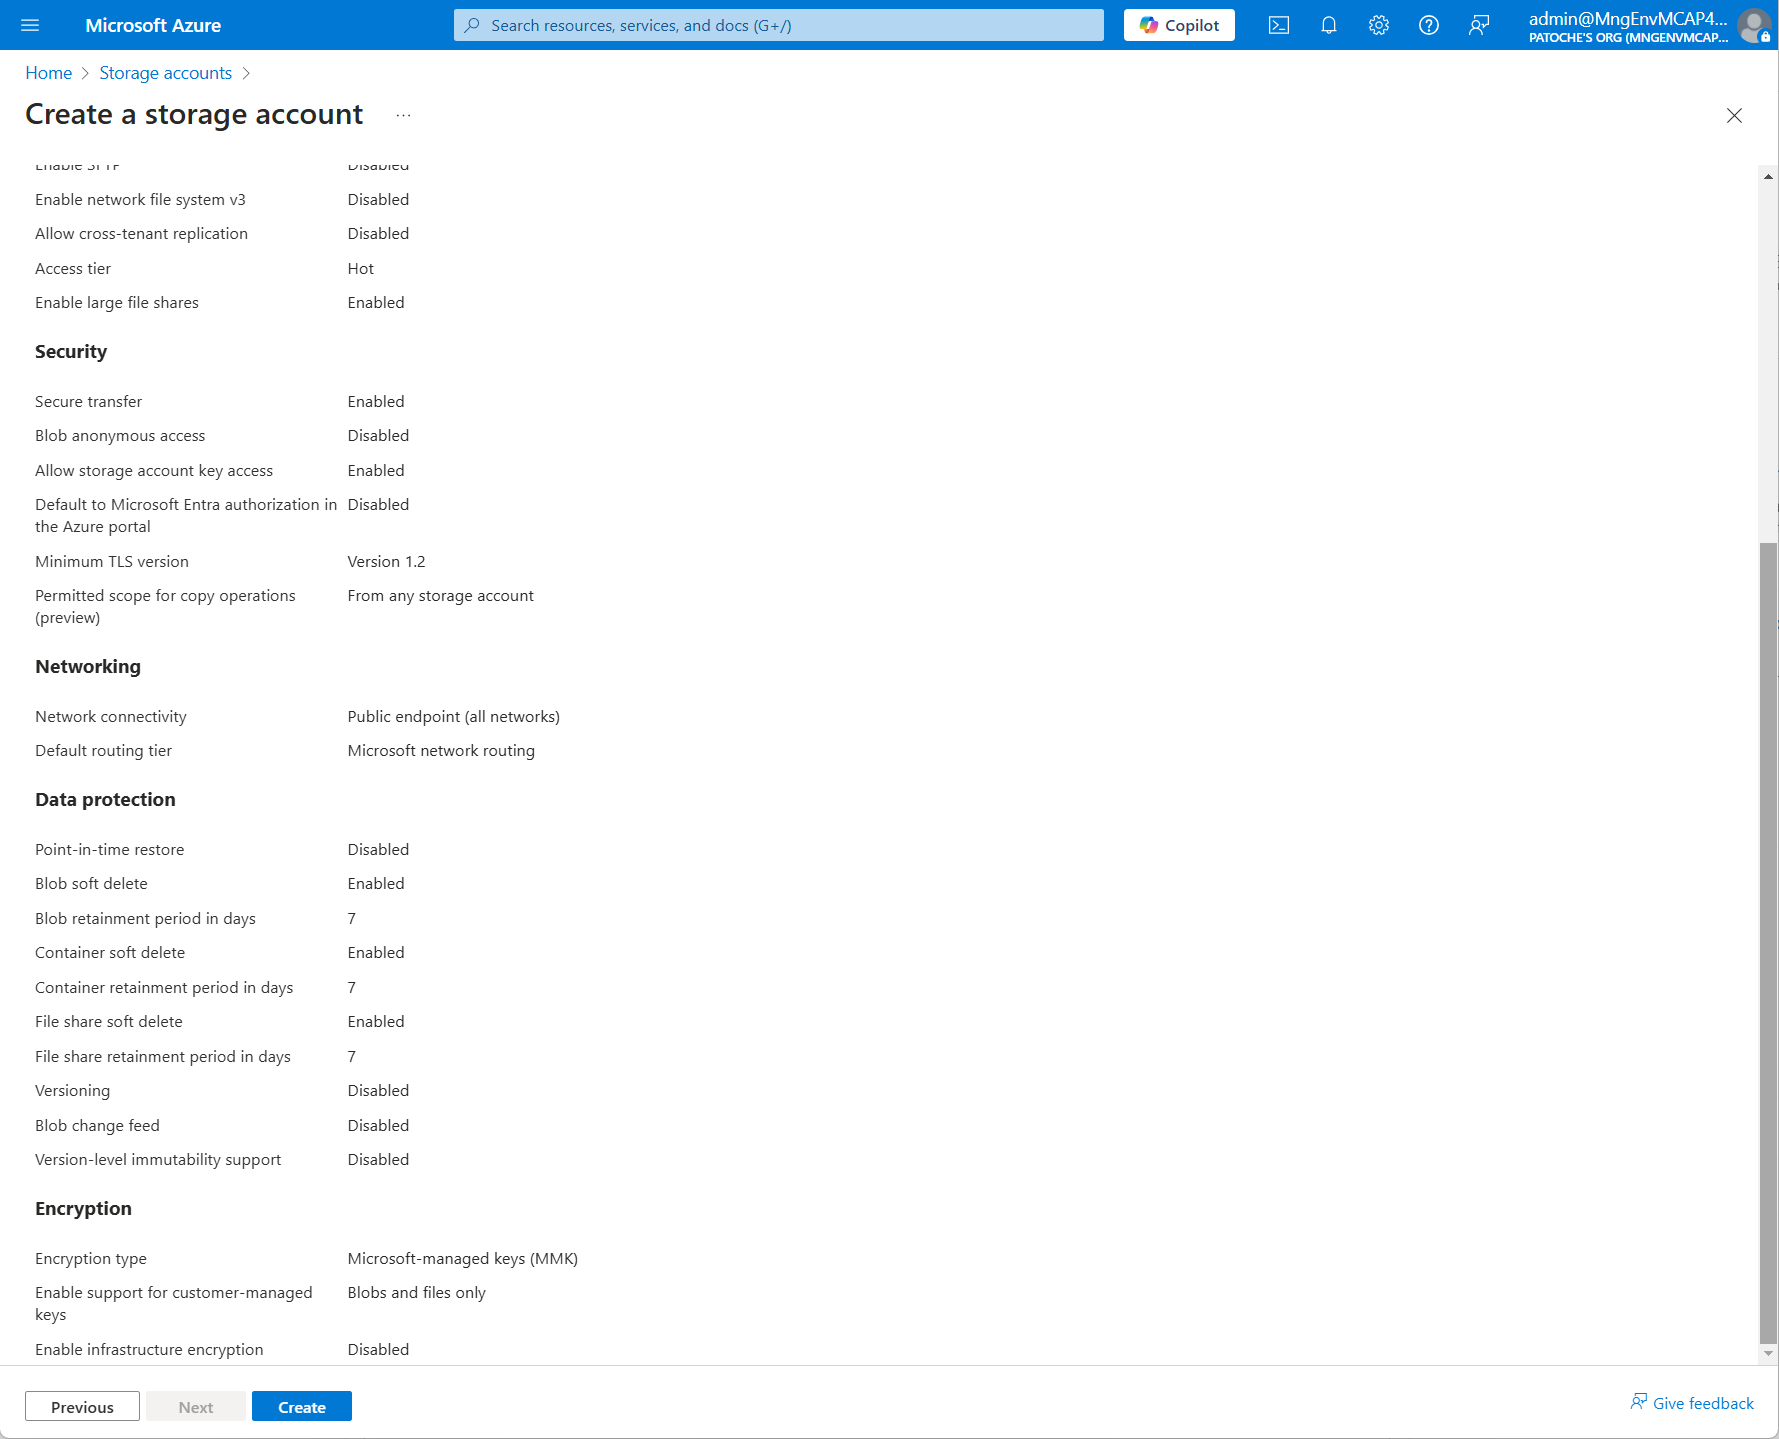
Storage account
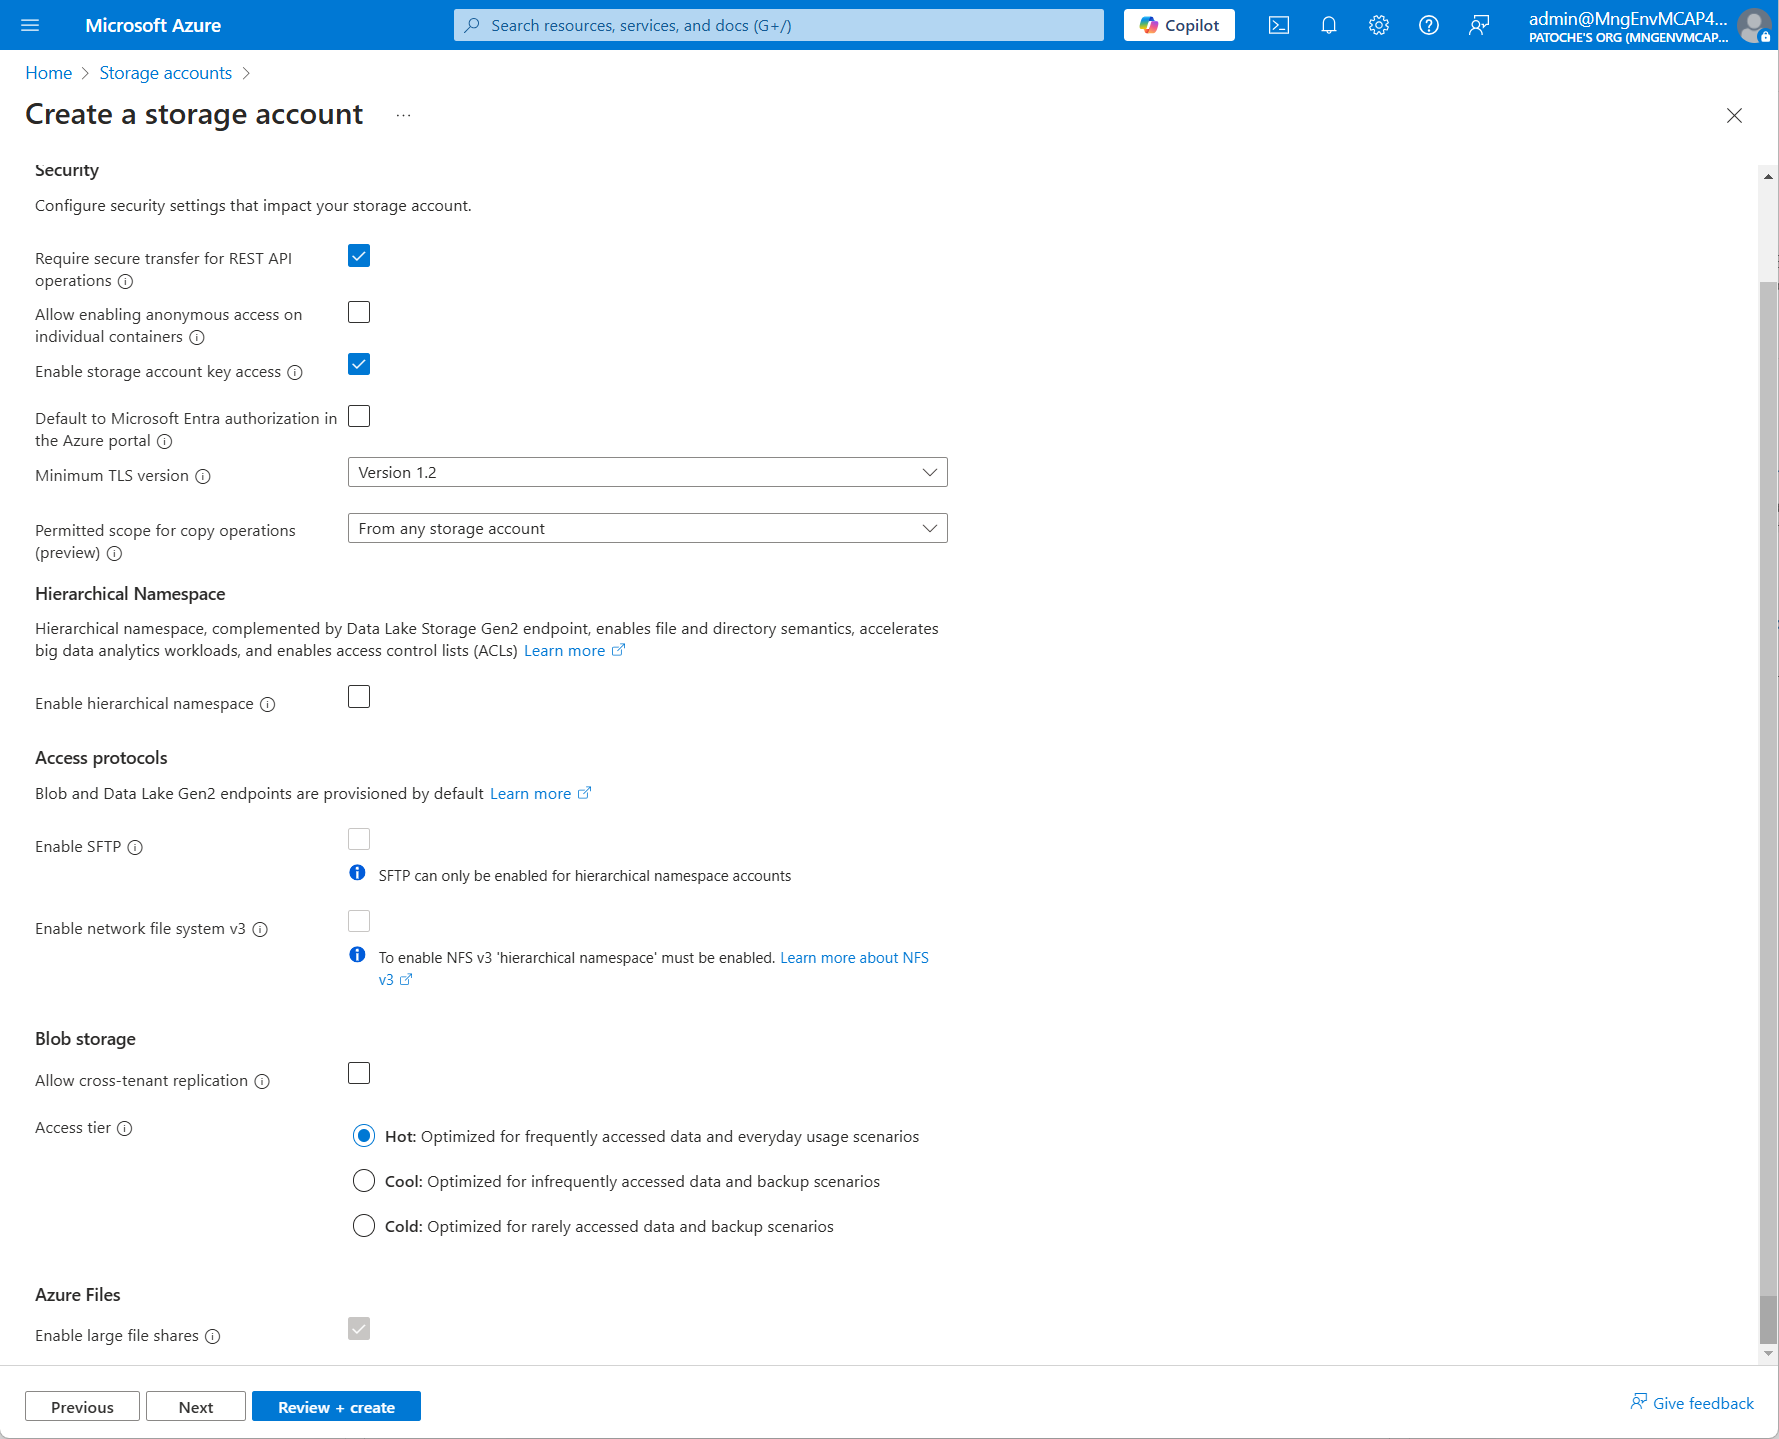
1. Create a storage account to store the product images
For more details, refer to the documentation: https://learn.microsoft.com/en-us/azure/storage/common/storage-account-create?tabs=azure-portal
Install software pre-requisites
1. Create a virtual machine in Azure or use your local computer
2. Install node.js v22.13.1 (LTS) from https://nodejs.org/en/download
3. Install Visual Studio Code x64 1.97.0 from https://code.visualstudio.com/download
4. Install Git 2.47.12 x64 from https://git-scm.com/downloads
5. Install .NET SDK x64 v9.0.102 from https://dotnet.microsoft.com/en-us/download/dotnet/thank-you/sdk-9.0.102-windows-x64-installer
6. Open a terminal window and add nuget source with
dotnet nuget add source https://api.nuget.org/v3/index.json -n nuget.org7. If necessary, change PowerShell execution policies for Windows computers. Open a Powershell window in administrator mode and run this command
Set-ExecutionPolicy -ExecutionPolicy RemoteSigned -Scope CurrentUser8. If necessary, install nuget, powershell, az cli and az modules
# install az cli
winget install -e --id Microsoft.AzureCLI

# install nuget and reference nuget source
Install-PackageProvider -Name NuGet -MinimumVersion 2.8.5.201 -Force

# update to latest Powershell release (7.5 as of writing)
winget install --id Microsoft.PowerShell --source winget

# install az modules
Install-Module -Name Az -Repository PSGallery -Force -AllowClobber
9. Open a terminal window and clone the repository:
git clone https://github.com/patrice-truong/cosmosdb-mcp.git
cd cosmosdb-mcp
10. Navigate to the nextjs folder and install dependencies
cd cosmosdb-mcp/nextjs
npm install  --legacy-peer-deps
11. In the nextjs folder, create and configure an .env file with the following values:
AZURE_COSMOSDB_NOSQL_ENDPOINT=https://.documents.azure.com:443/
AZURE_COSMOSDB_NOSQL_DATABASE=eshop
AZURE_COSMOSDB_NOSQL_PRODUCTS_CONTAINER=products
AZURE_COSMOSDB_NOSQL_CARTS_CONTAINER=carts
AZURE_COSMOSDB_NOSQL_ORDERS_CONTAINER=orders
AZURE_STORAGE_ACCOUNT_NAME=
AZURE_STORAGE_CONTAINER_NAME=
12. Get your tenant ID. The tenant ID can be retrieved with this command:
az login
az account show --query tenantId -o tsv
13. In the webapi folder, configure the appsettings.json file and replace the tenant_id with the value obtained in the previous step:
{
  "CosmosDb": {
    "Endpoint": "https:/.documents.azure.com:443/",
    "TenantId": "",
    "DatabaseName": "eshop",
    "ProductsContainerName": "products",
    "CartsContainerName": "carts",
    "OrdersContainerName": "orders"
  },
  "AzureBlobStorage": {
    "AccountName": ""
  }
}
14. Create an app registration in the Azure Portal
15. Create an app secret in the Azure Portal
16. You will need to allow your app to get access to Azure Cosmos DB. Retrieve the 4 ids mentioned below and modify the file "populate/set_rbac.ps1".
| Variable | Reference |
|---|---|
| Subscription Id | Cosmos DB > Overview > Subscription Id |
| Azure Cosmos DB account name | cosmos-eastus2-nosql-2 |
| Resource group name | Cosmos DB > Overview > Resource group name |
| Principal Id | App registration Object Id |
$SubscriptionId = ""   # Azure subscription id
$AccountName = ""    # cosmos db account name
$ResourceGroupName = "" # resource group name of the Cosmos DB account
$PrincipalId = ""   # object id of the app registered in Entra ID
17. Open a Powershell prompt, run Connect-AzAccount and execute ./set_rbac.ps1
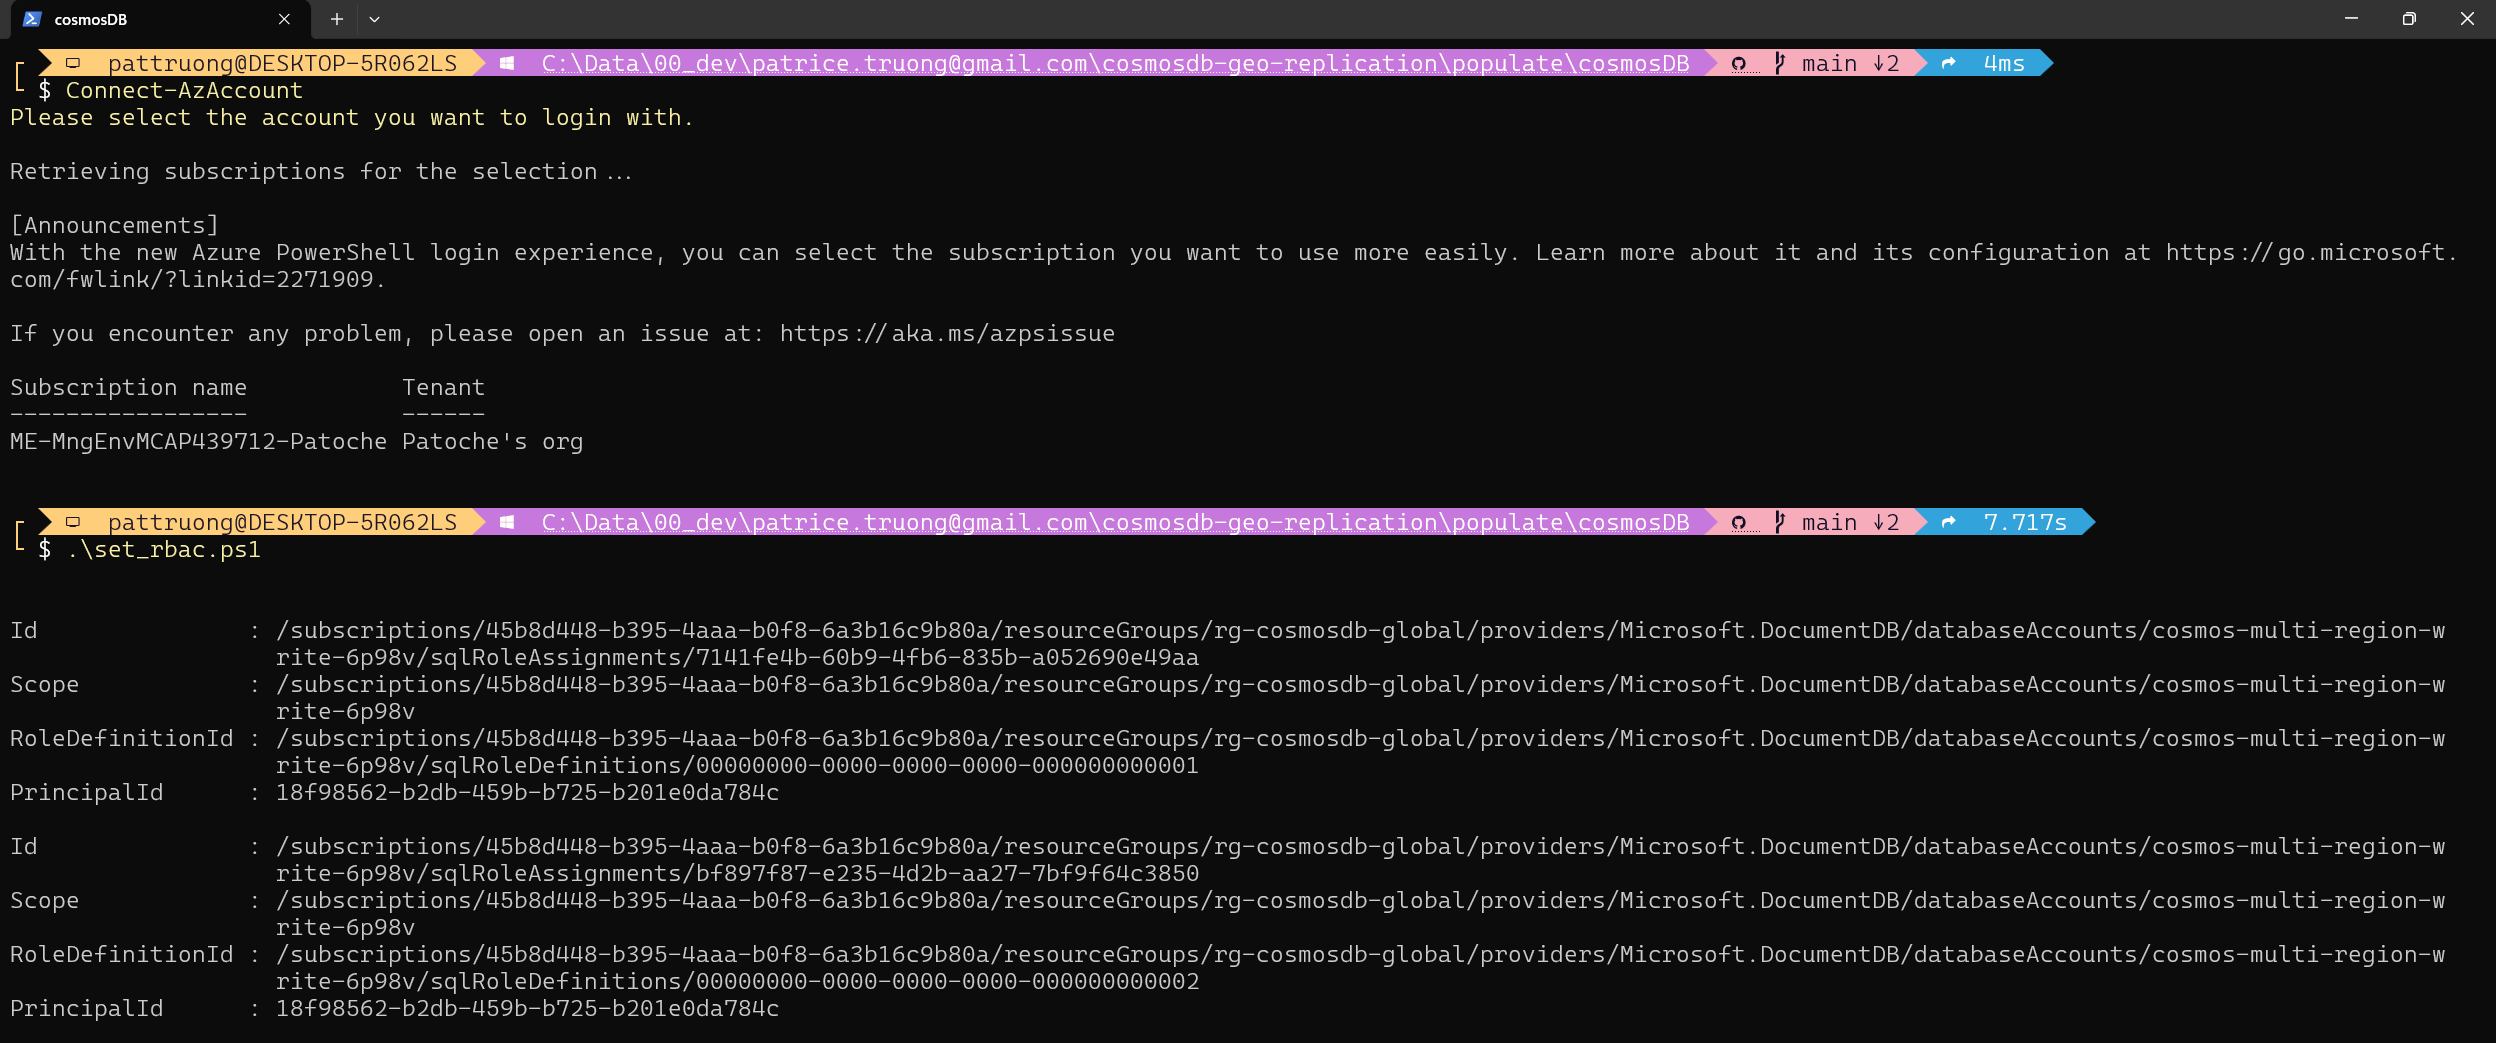
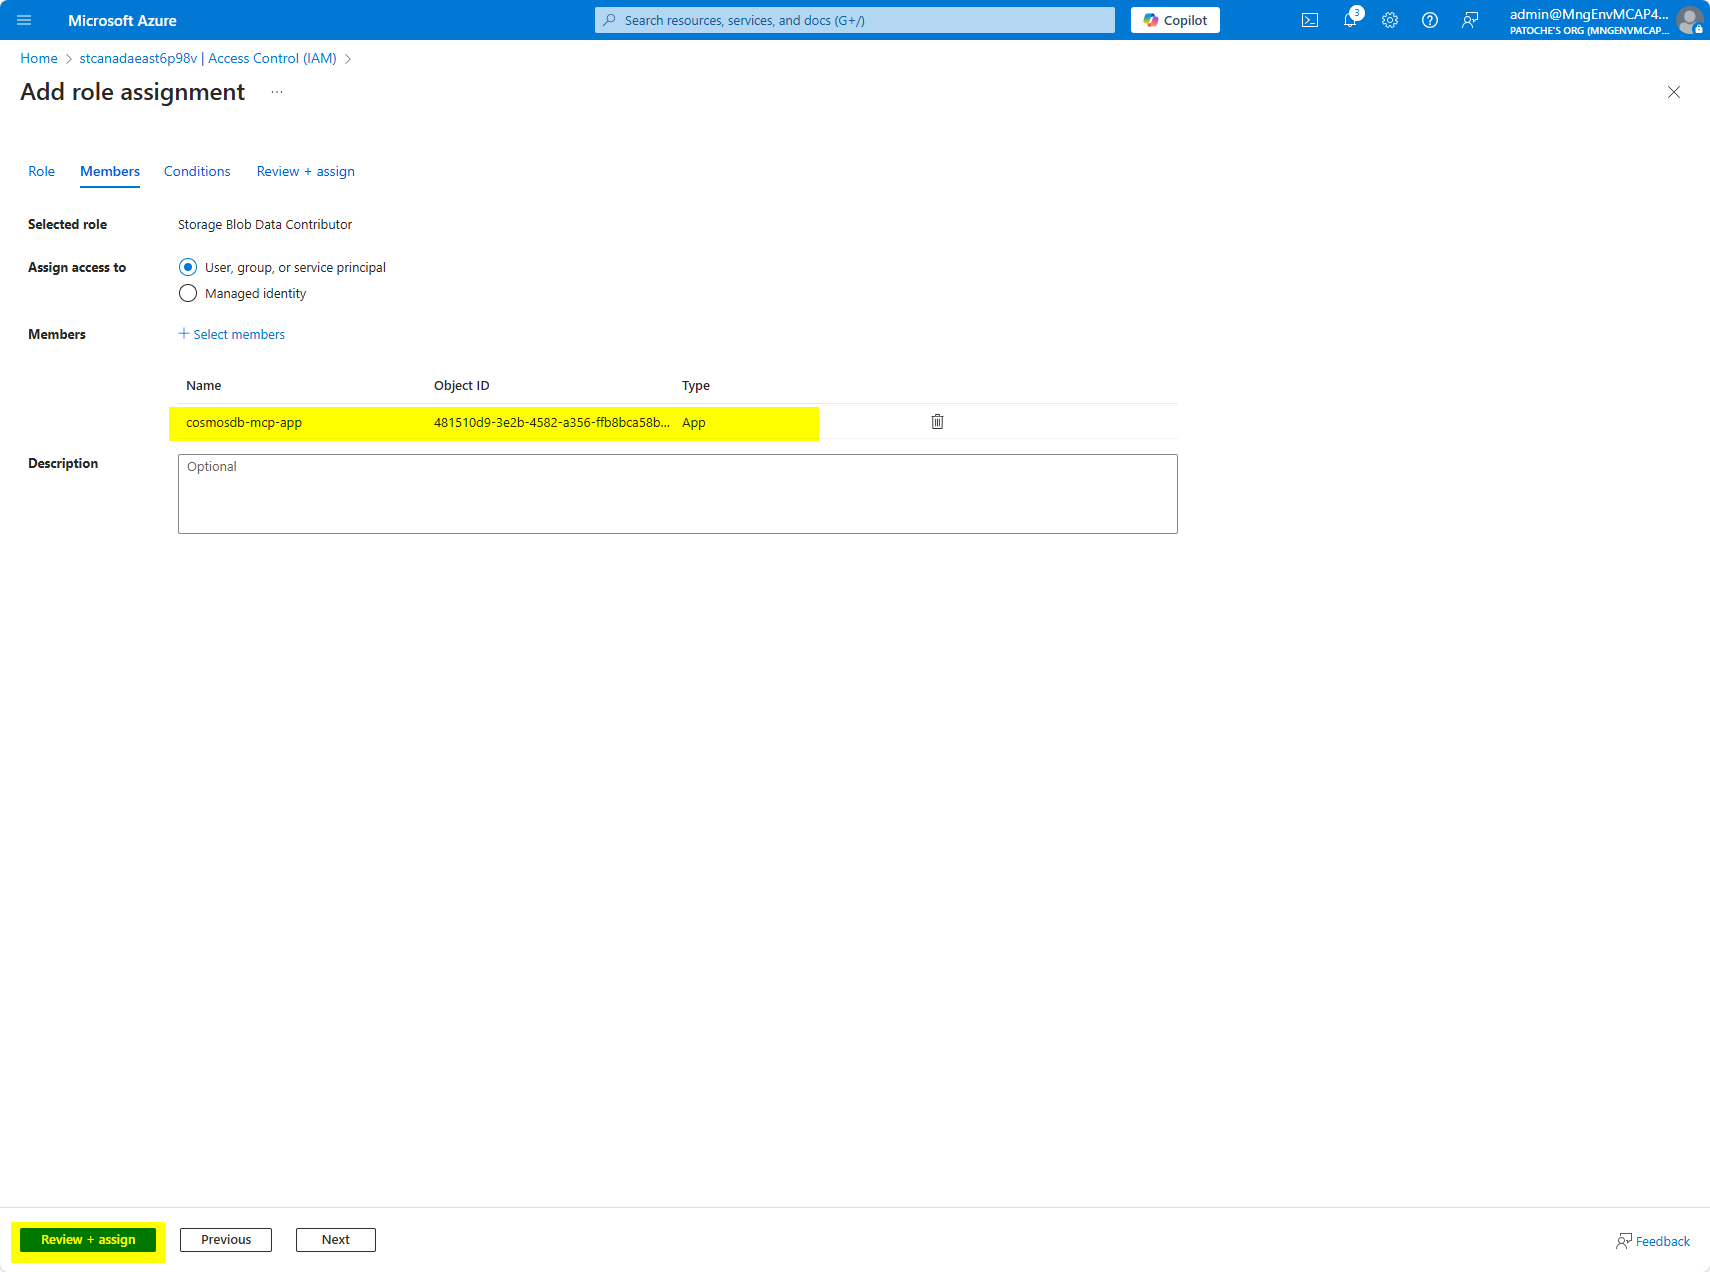
18. Allow your app (or virtual machine) to access the storage account
- In the Azure portal, goto your storage account
- Select Access Control (IAM) in the menu
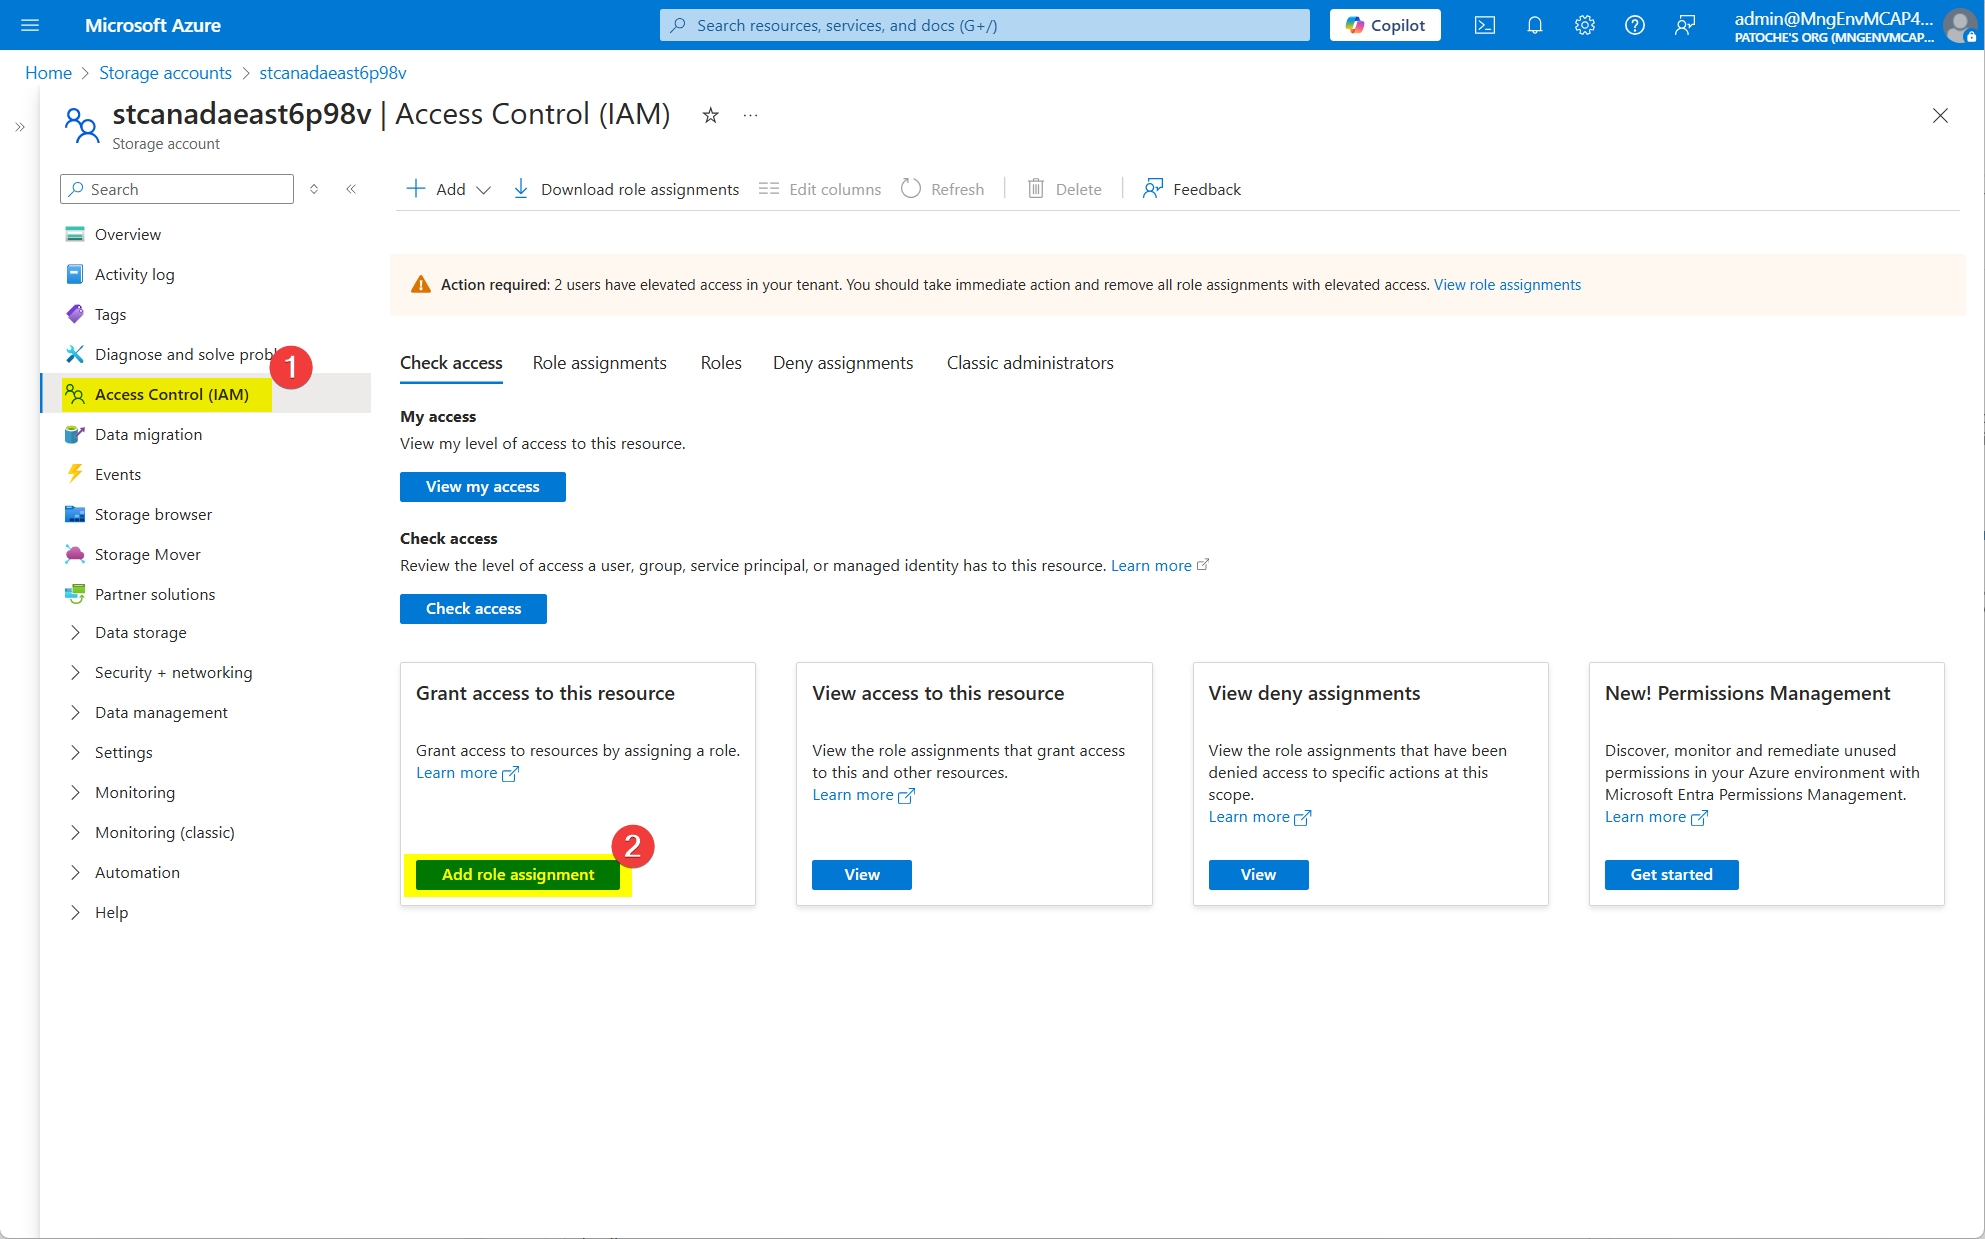
- Click on "Add role assignment"
- In the filter textbox, type "Storage Blob Data Contributor"
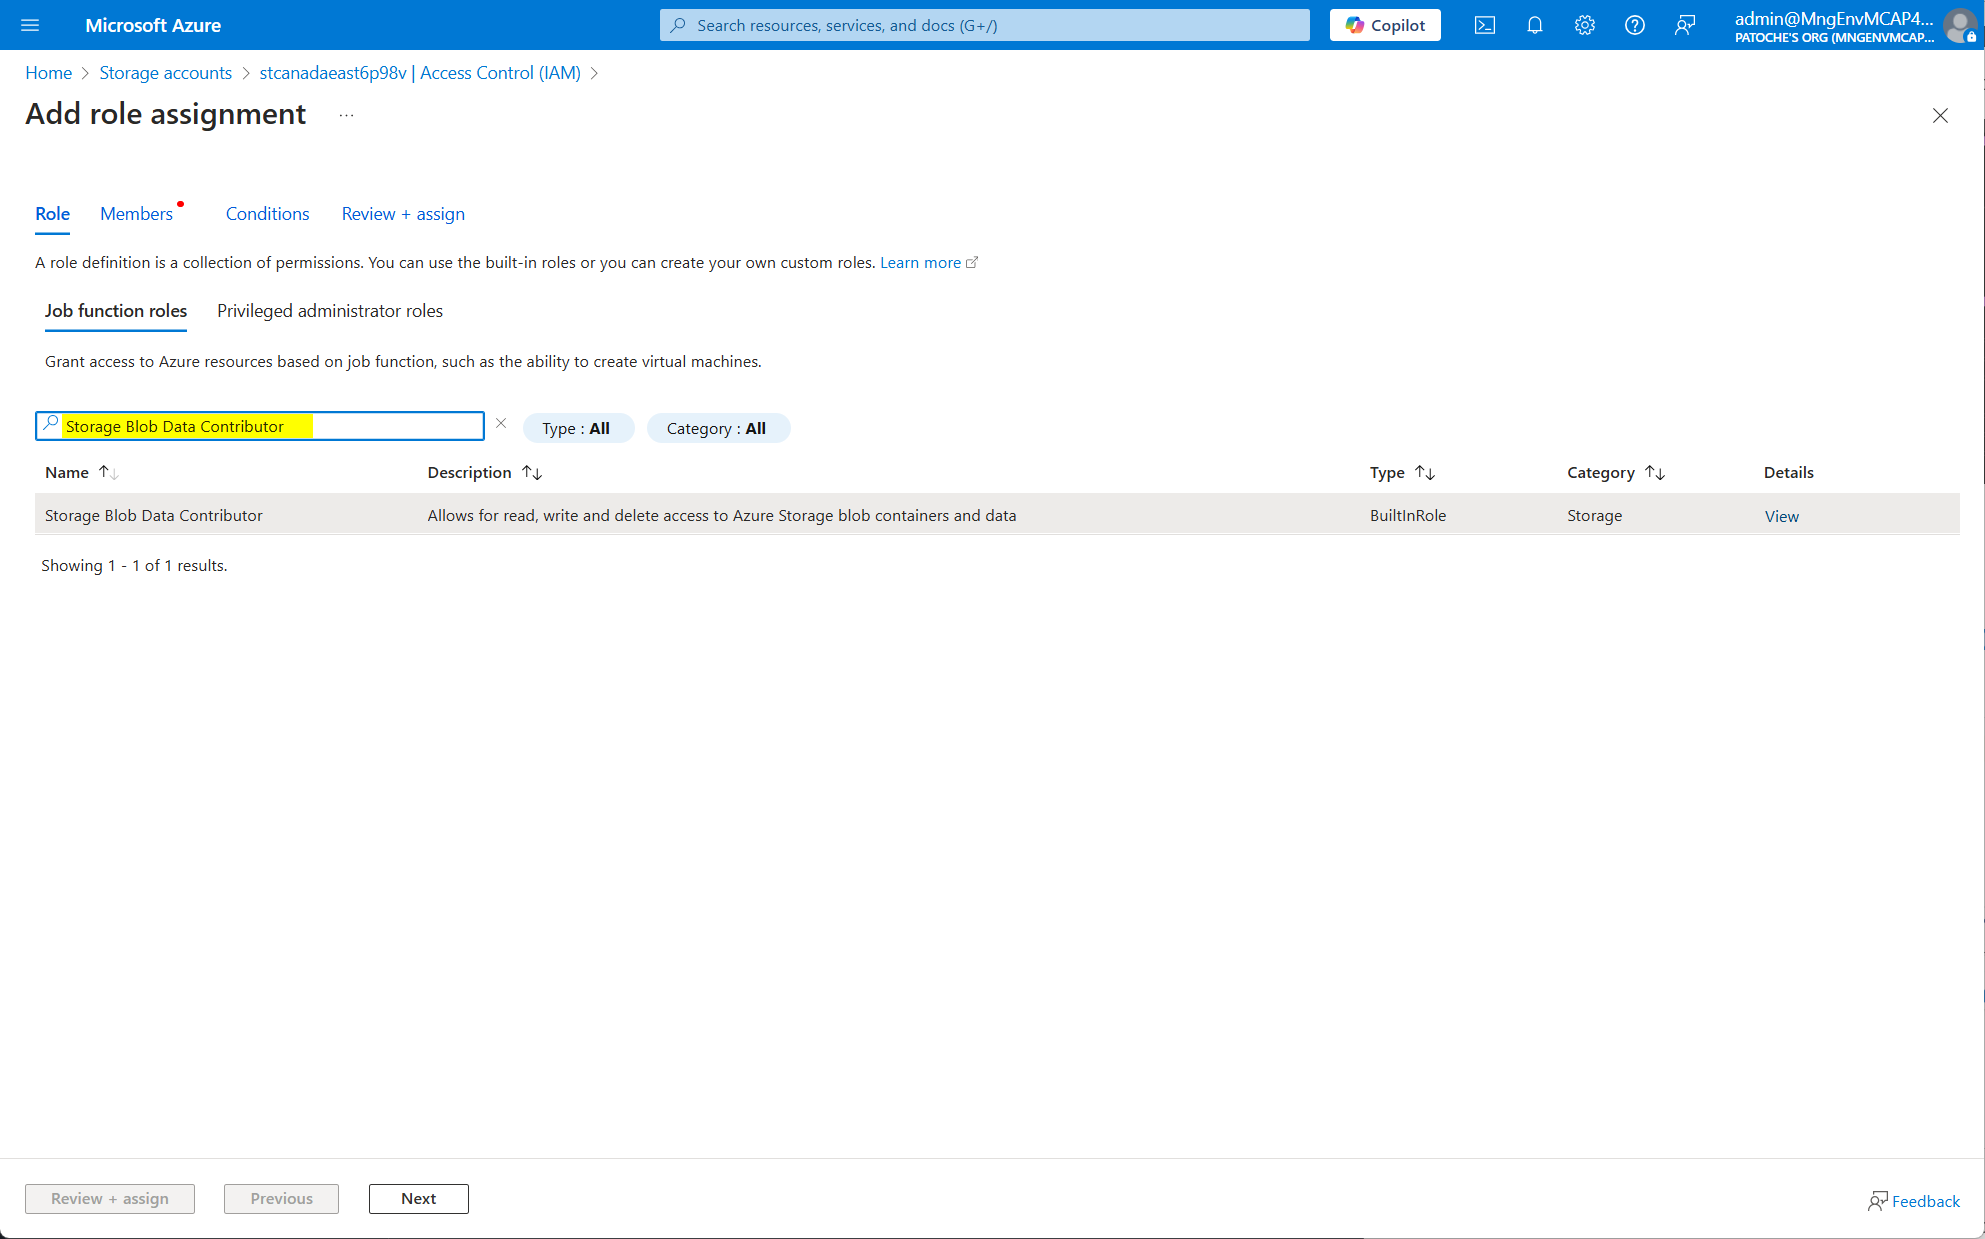
- Click on "Members"
- Select the name of your application
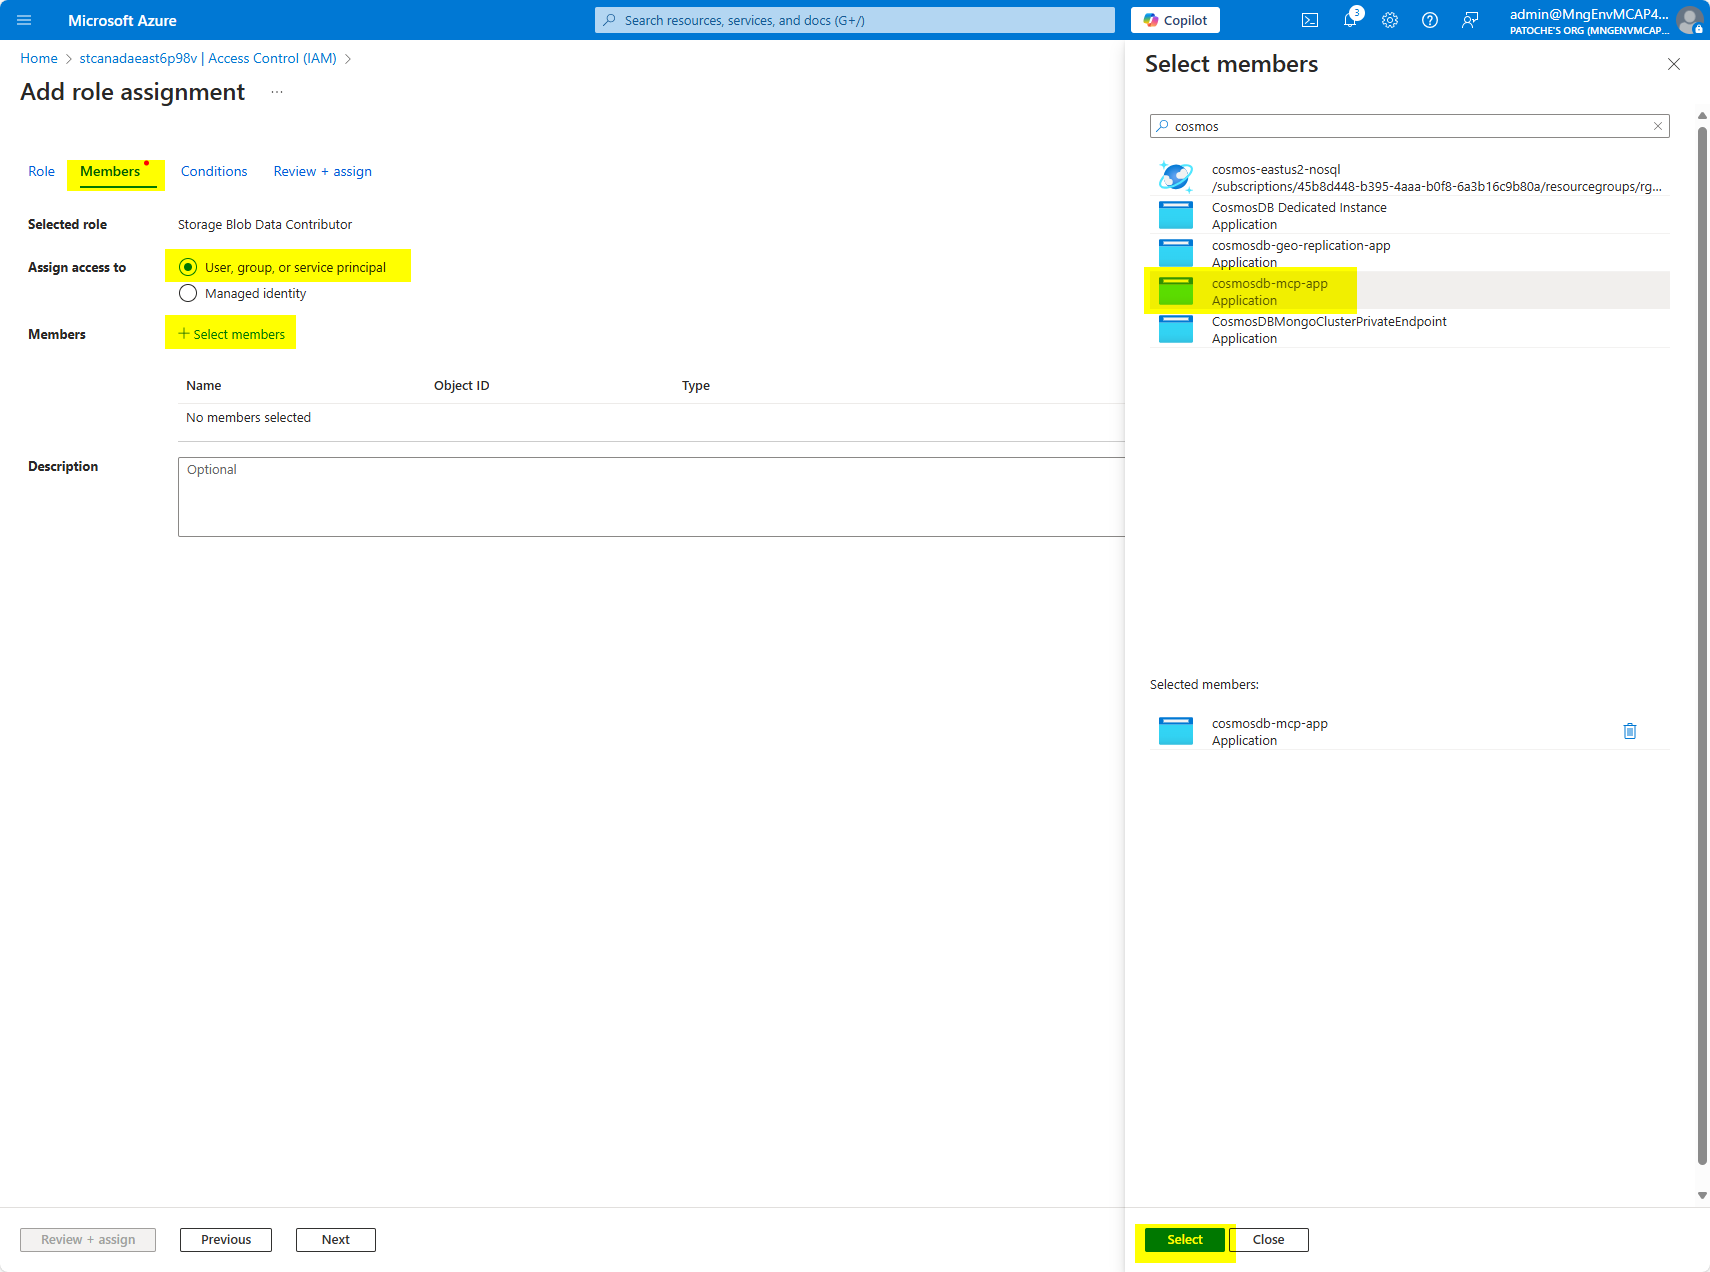
- Click on the "Select" button
- Click on "Review and assign"
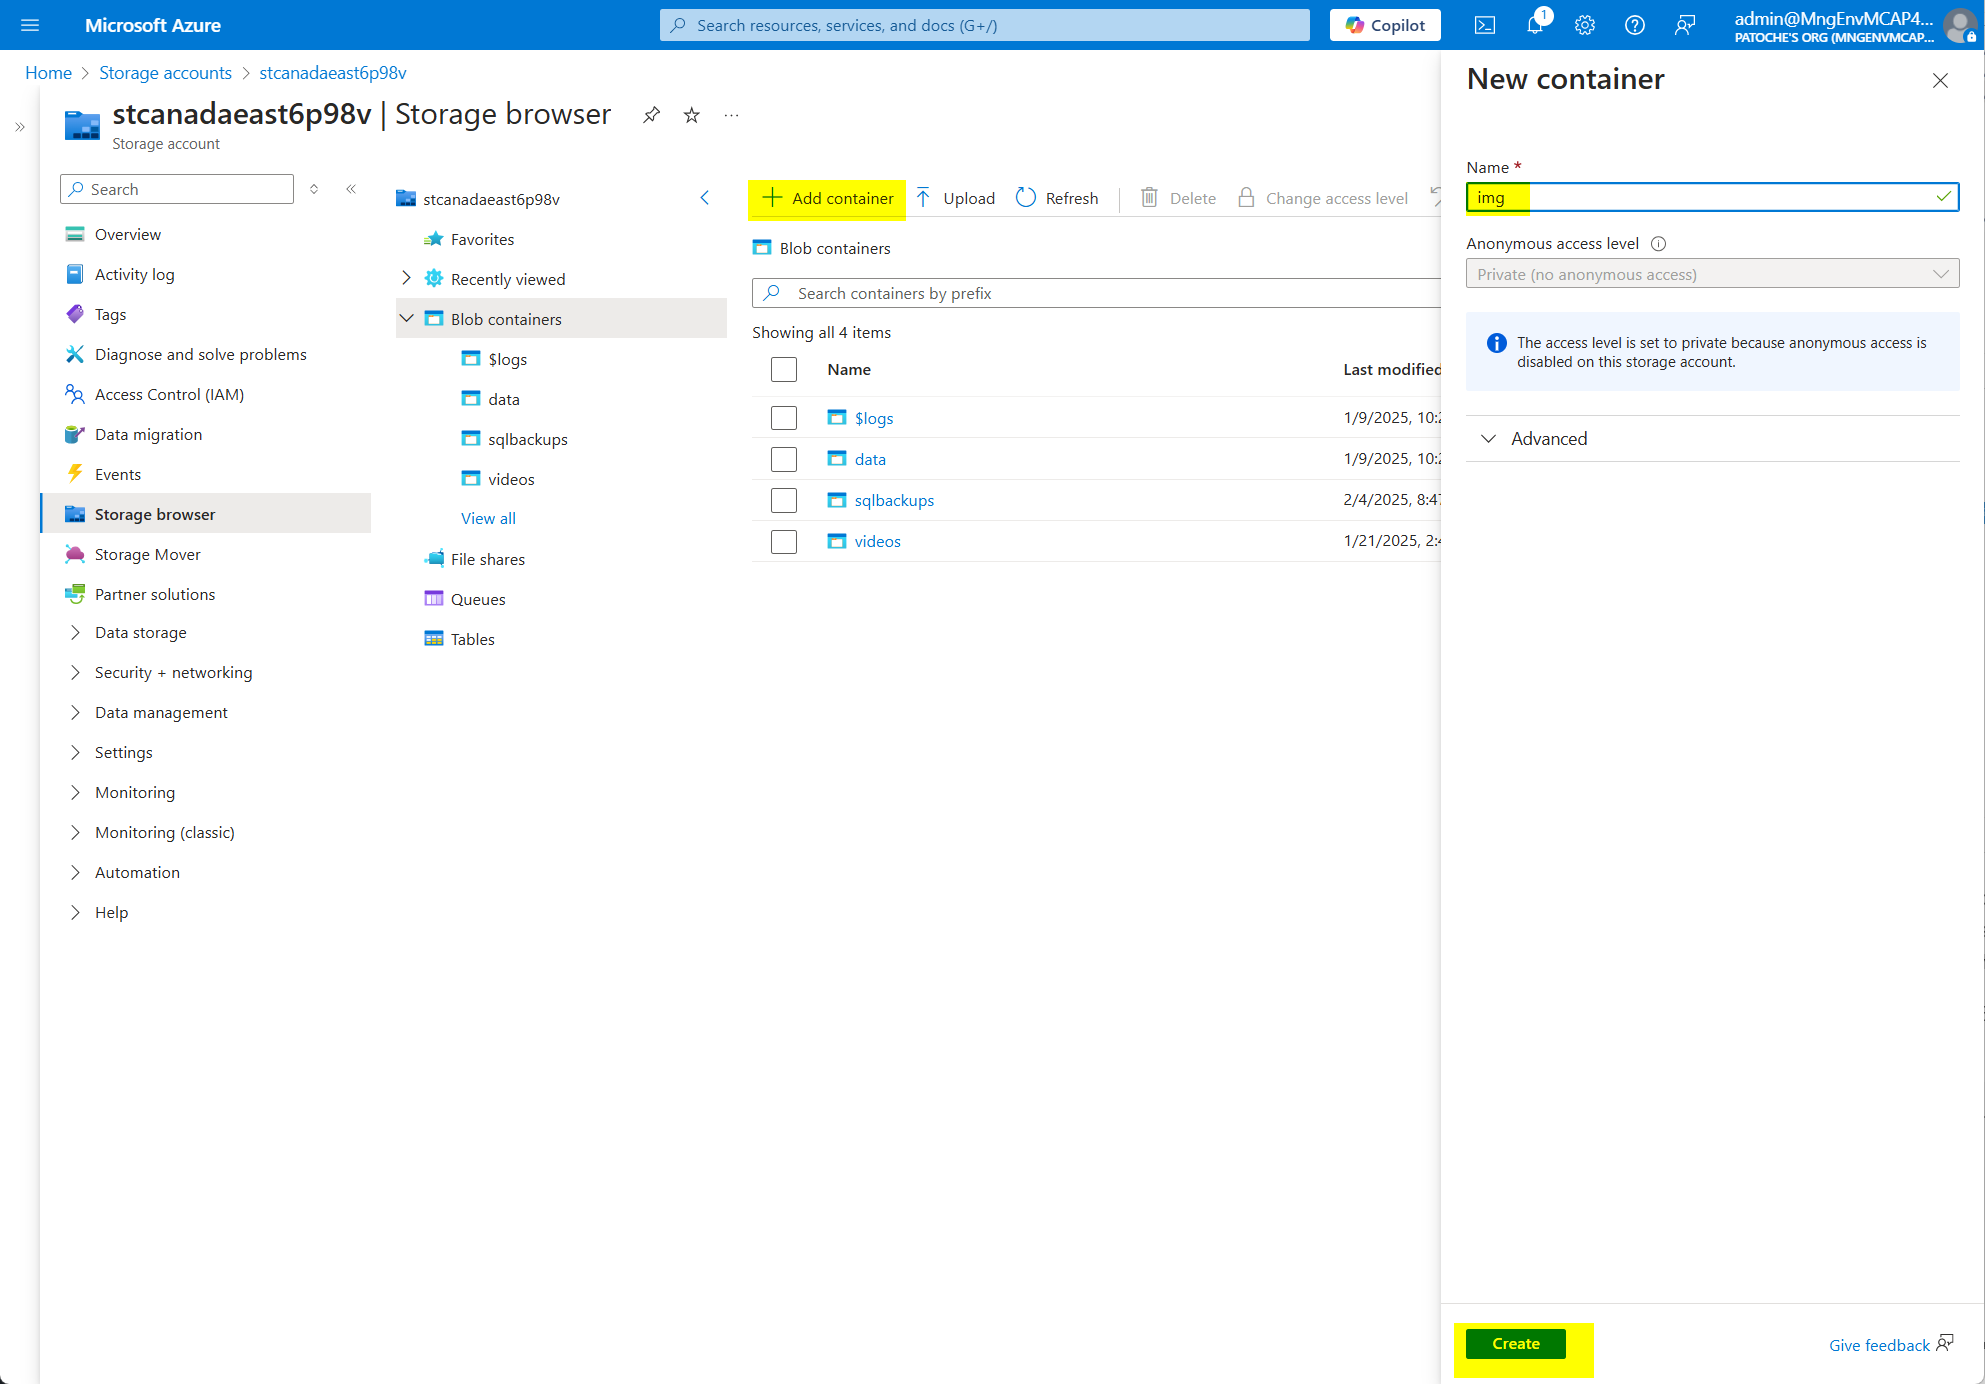
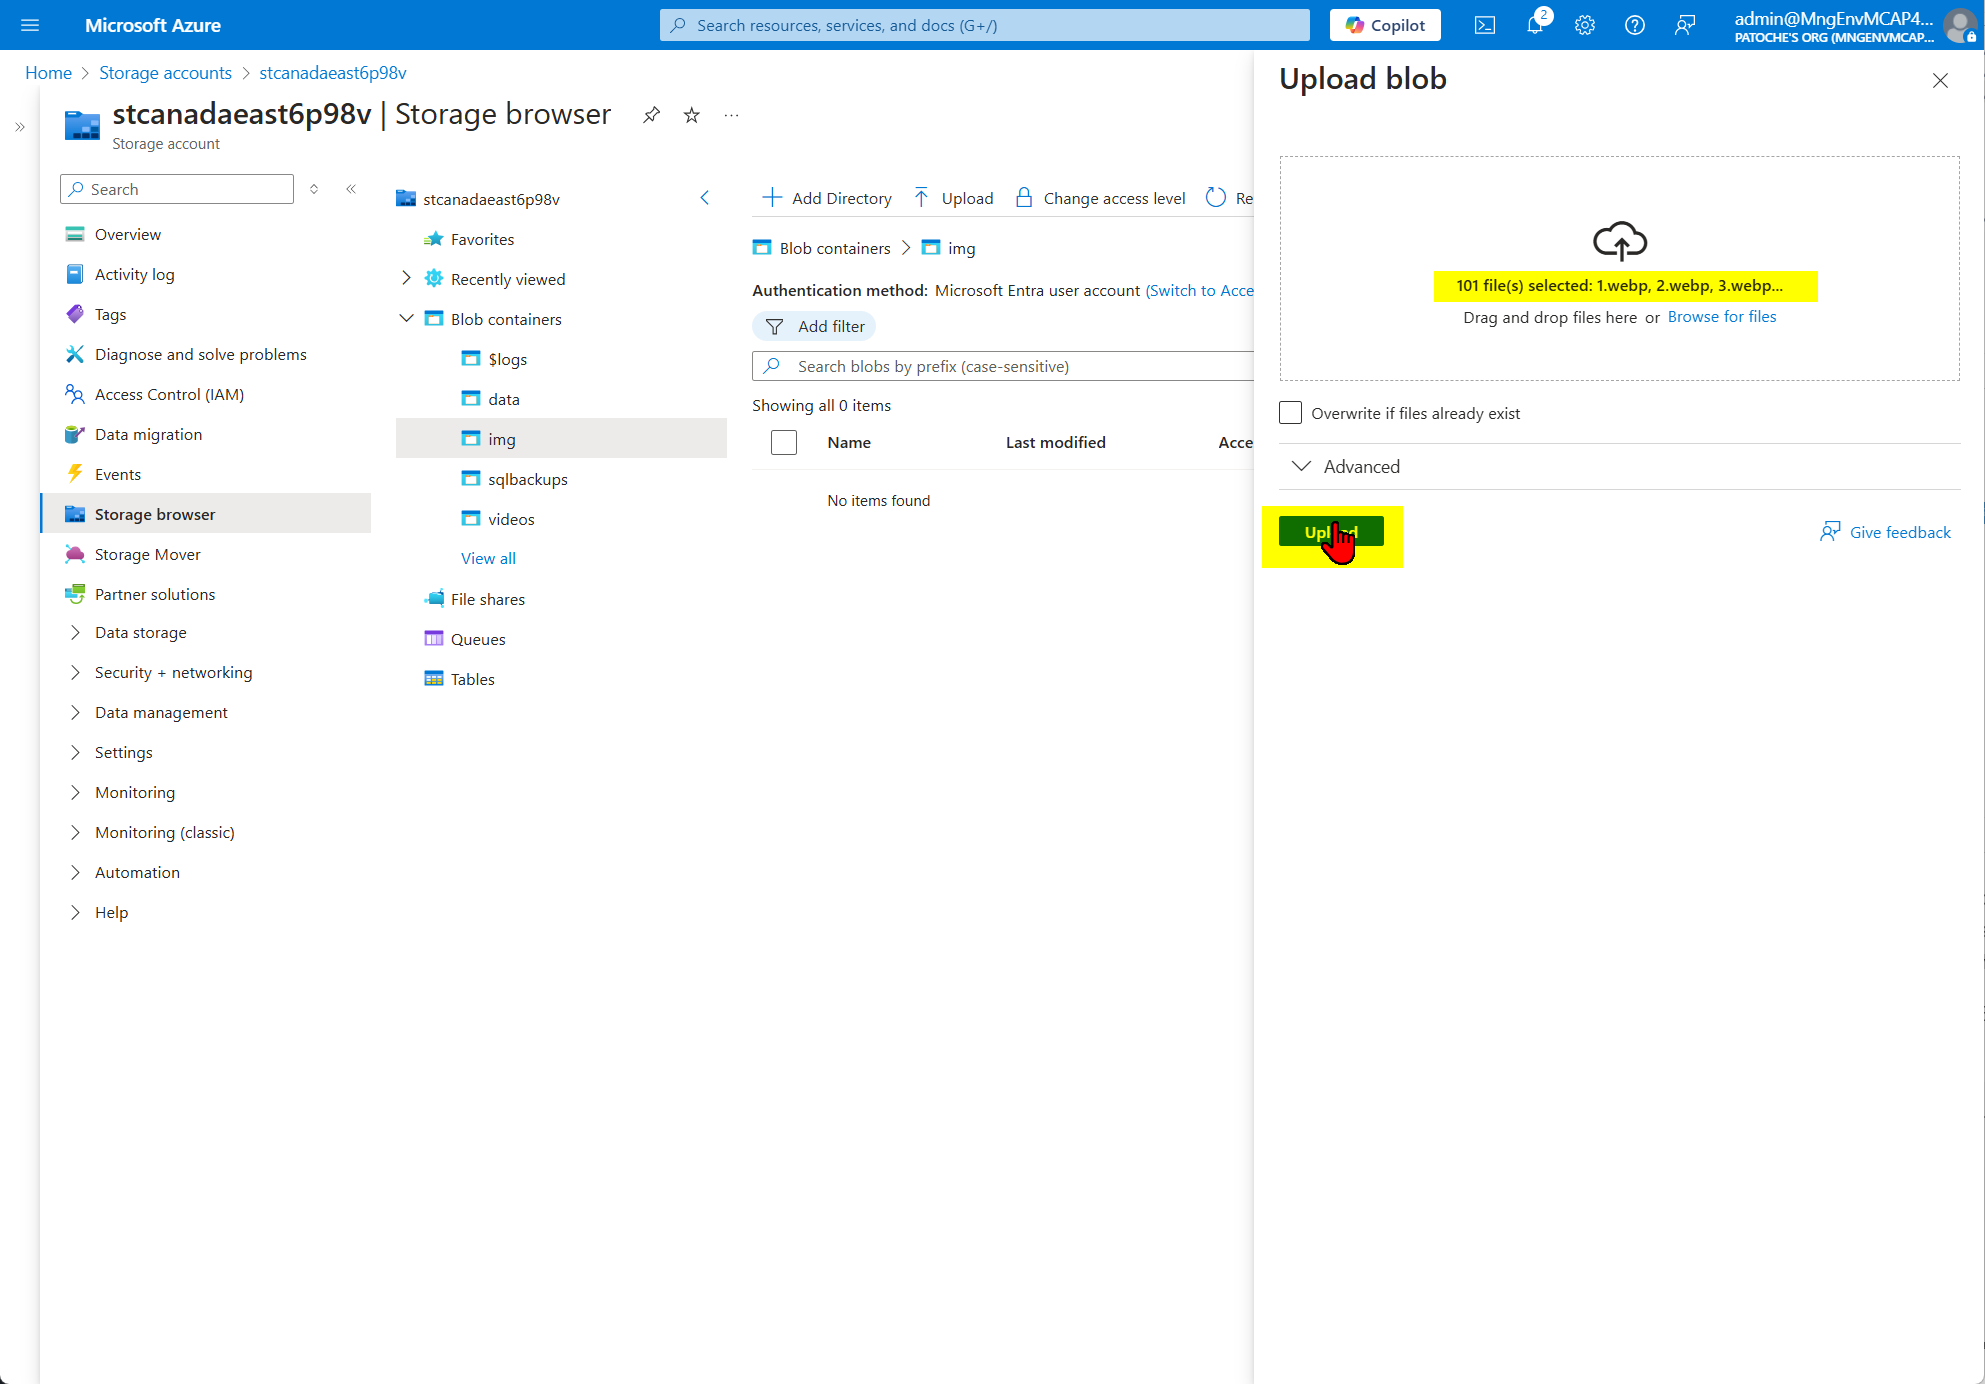
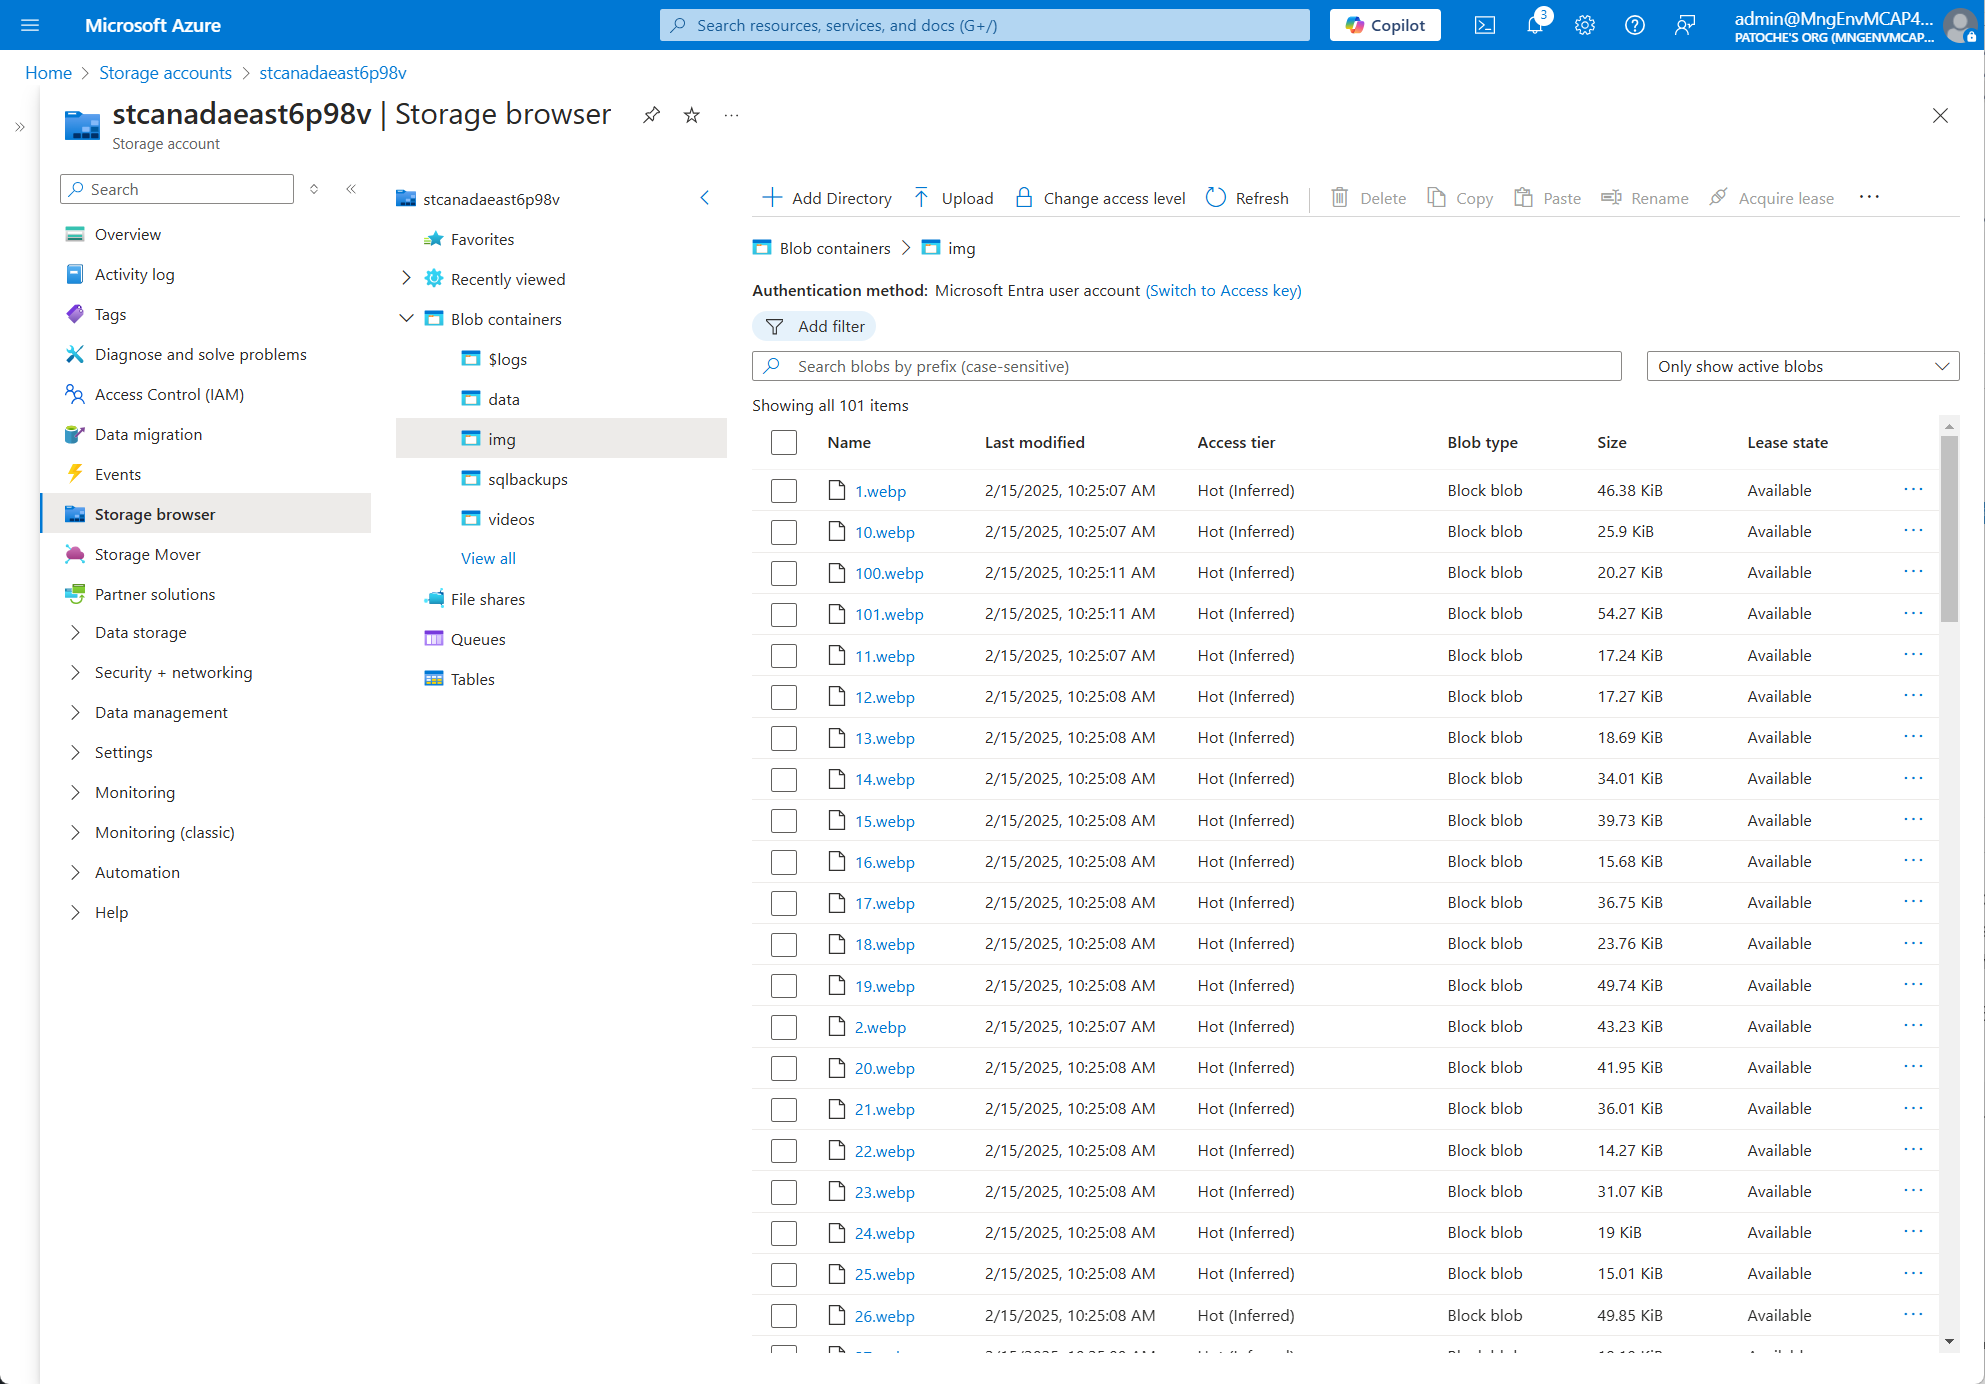
19. Create a container and copy the content of the "azure-storage" folder to your storage account
20. Build webapi backend project with dotnet build
cd webapi
dotnet build
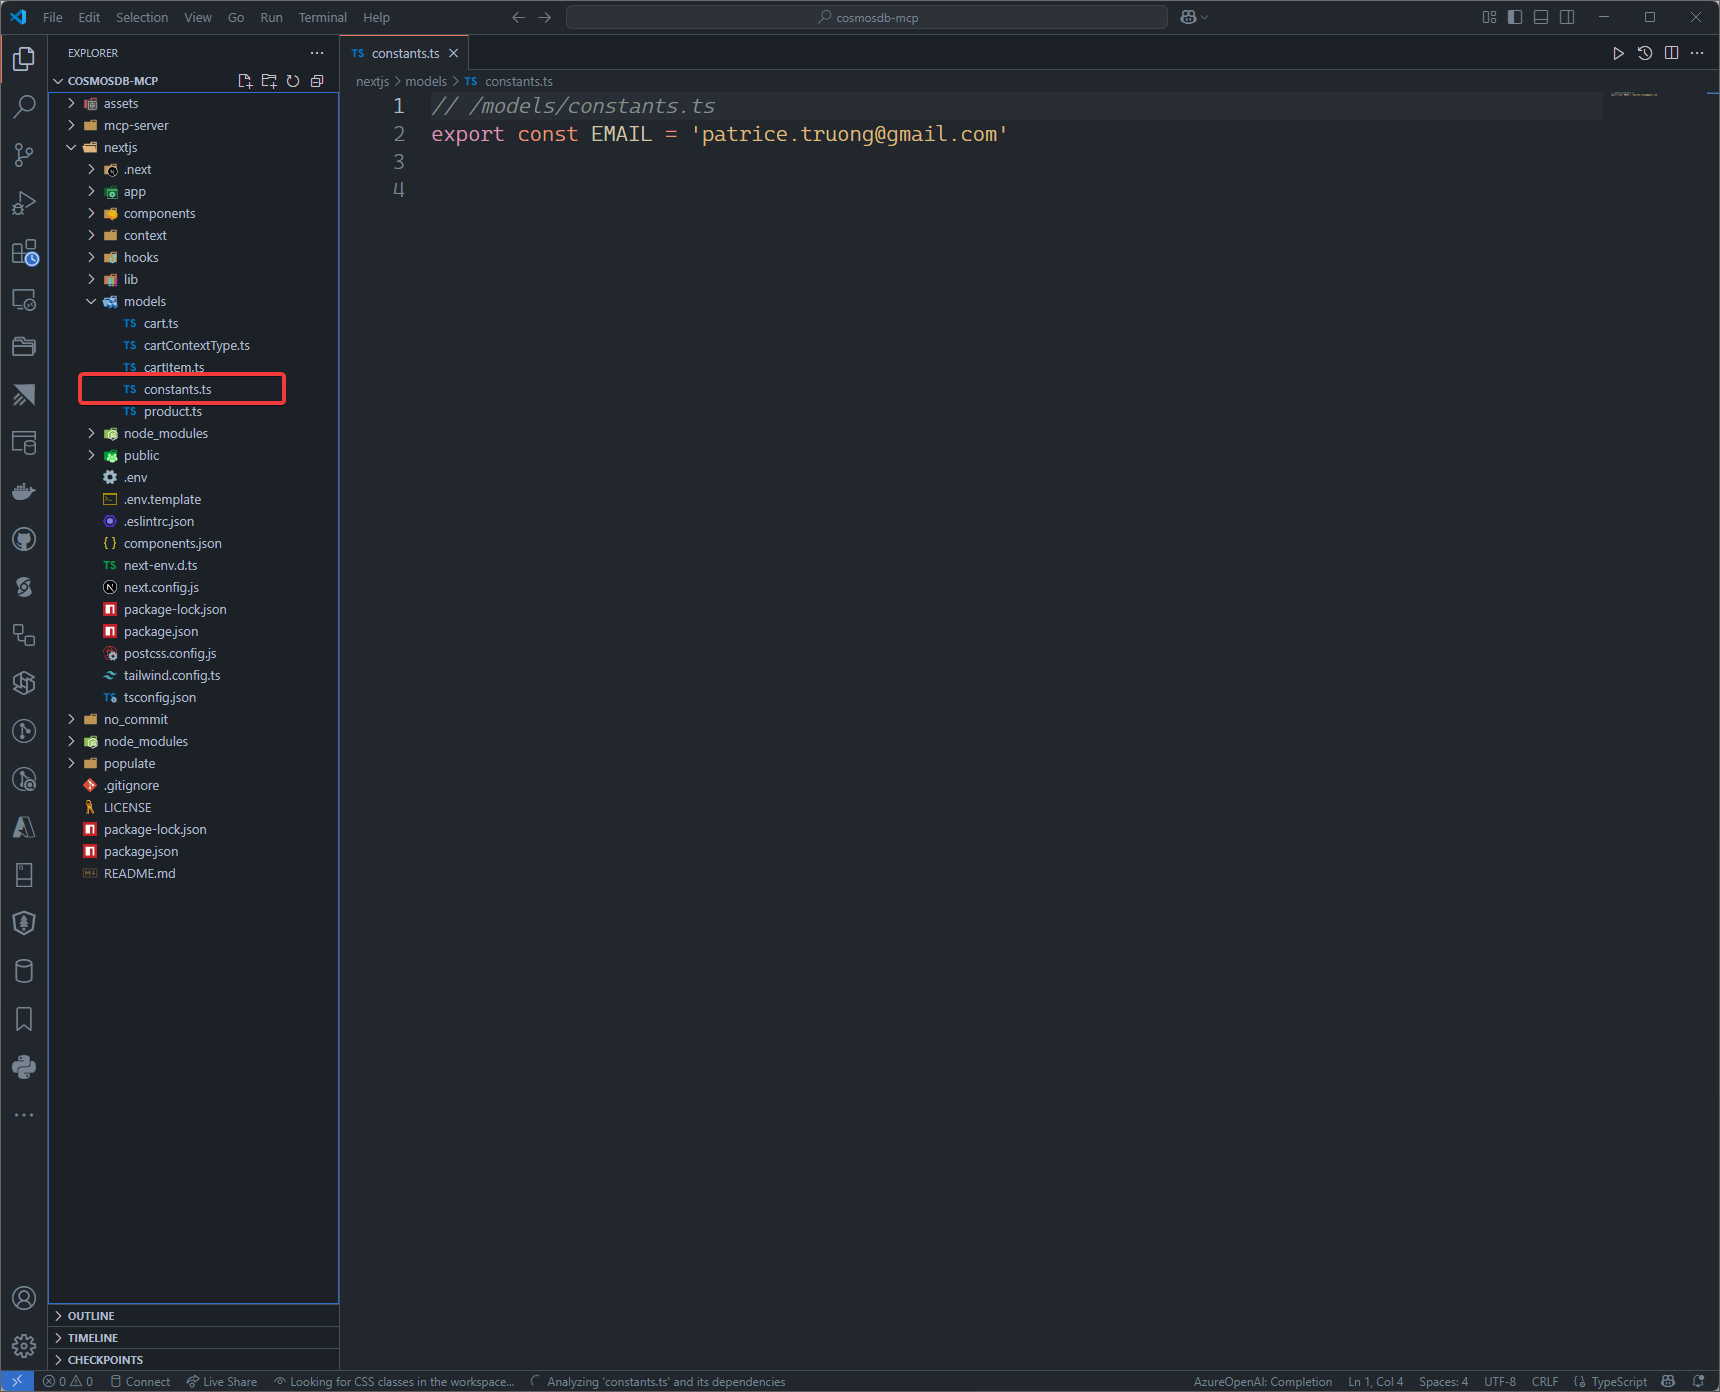
19. There is no authentication built into this project. The user email is hard-coded in /nextjs/models/constants.ts. Change it to suit your demo needs
19. In mcp-server and nextjs folders, copy .env.template to .env and modify the values to suit your demo needs
AZURE_COSMOSDB_NOSQL_ENDPOINT=https://.documents.azure.com:443/
AZURE_COSMOSDB_NOSQL_DATABASE=eshop
AZURE_COSMOSDB_NOSQL_PRODUCTS_CONTAINER=products
AZURE_COSMOSDB_NOSQL_CARTS_CONTAINER=carts
AZURE_COSMOSDB_NOSQL_ORDERS_CONTAINER=orders

NEXT_PUBLIC_AZURE_TENANT_ID=
NEXT_PUBLIC_AZURE_CLIENT_ID=
NEXT_PUBLIC_AZURE_CLIENT_SECRET=

NEXT_PUBLIC_AZURE_STORAGE_ACCOUNT_NAME=
NEXT_PUBLIC_AZURE_STORAGE_CONTAINER_NAME=img

AZURE_OPENAI_ENDPOINT=https://.openai.azure.com/
AZURE_OPENAI_API_KEY=
AZURE_OPENAI_EMBEDDING_MODEL=text-embedding-3-small
AZURE_OPENAI_API_VERSION=2024-05-01-preview
20. Build nextjs frontend project
cd nextjs
npm run build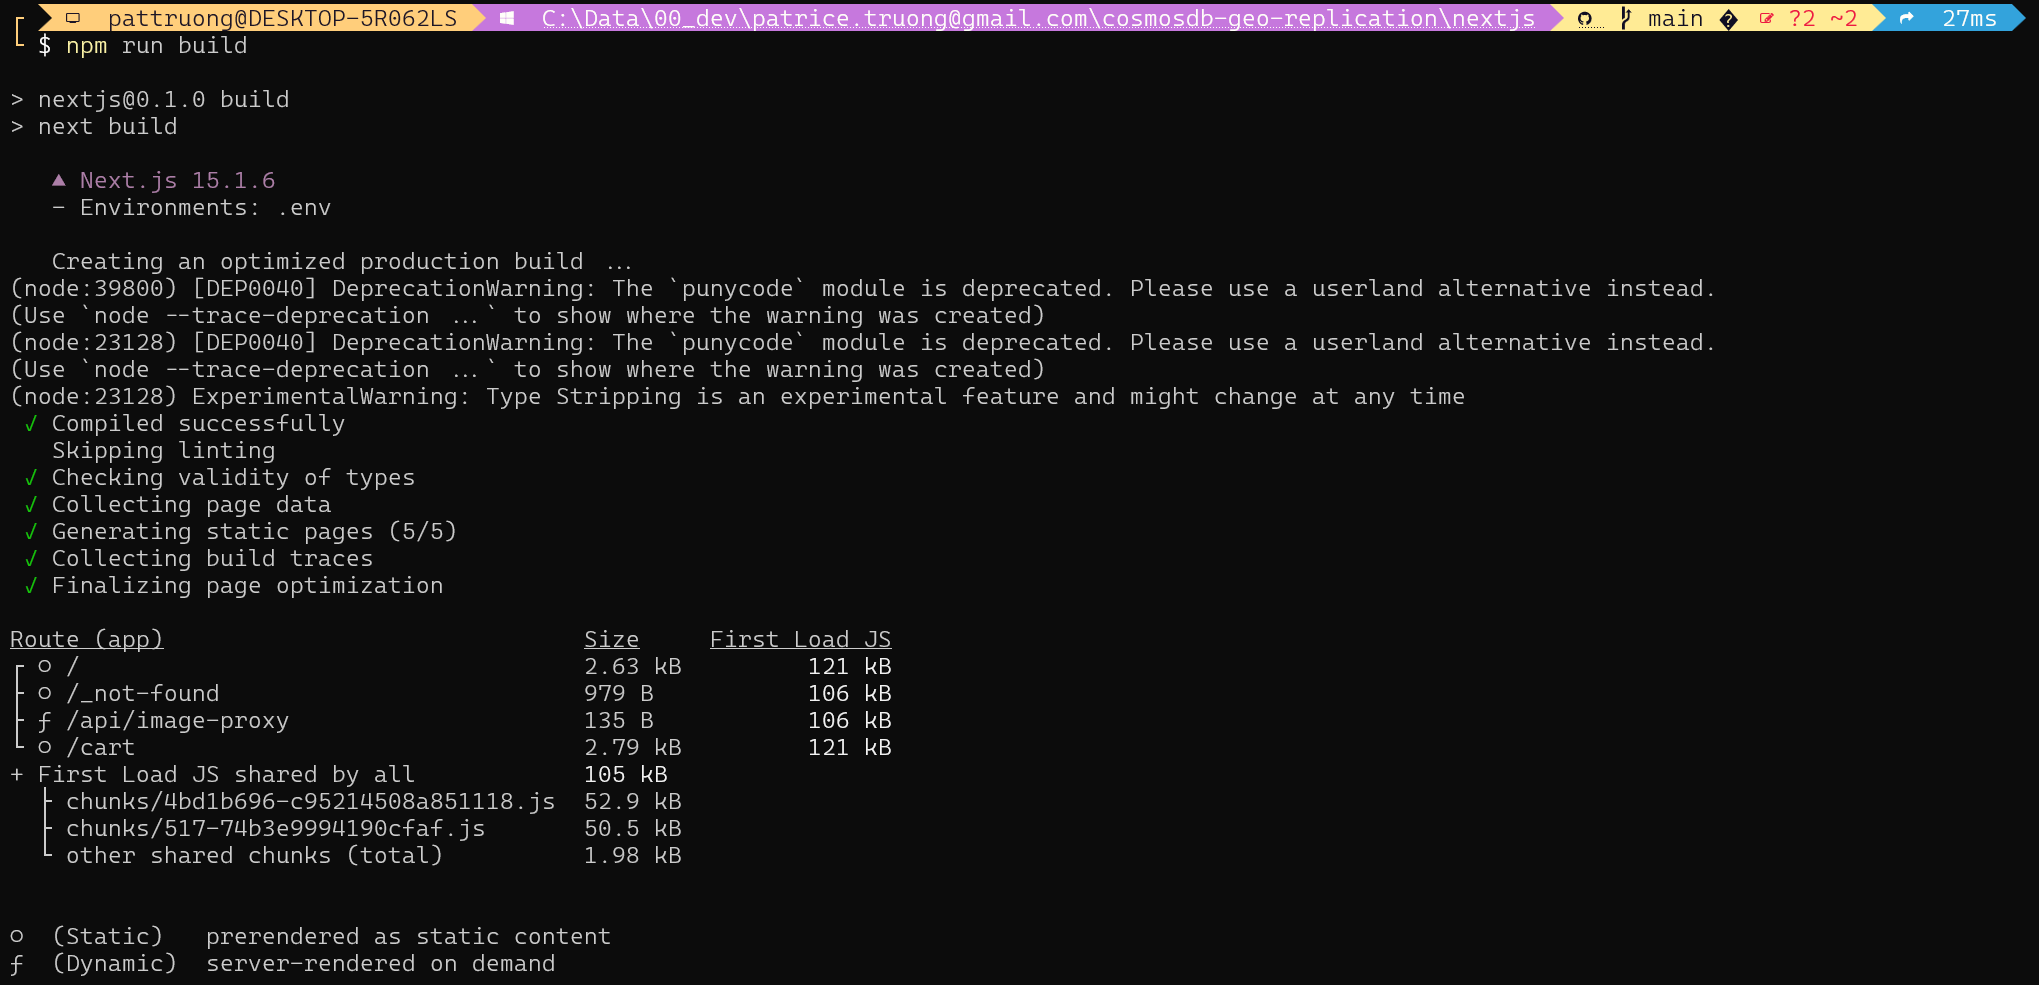
Populate the products catalog
In this section, we'll read the products catalog from the populate/catalog.json file and populate the Azure Cosmos DB for NoSQL database
1. Modify appsettings.json with your cosmosdb account name and
{
  "CosmosDb": {
    "Endpoint": "https://.documents.azure.com:443/",
    "TenantId": "",
    "DatabaseName": "eshop",
    "ProductsContainerName": "products",
    "OrdersContainerName": "orders",
  }
}
2. Open a terminal window, navigate to the populate folder, execute az login, then dotnet run
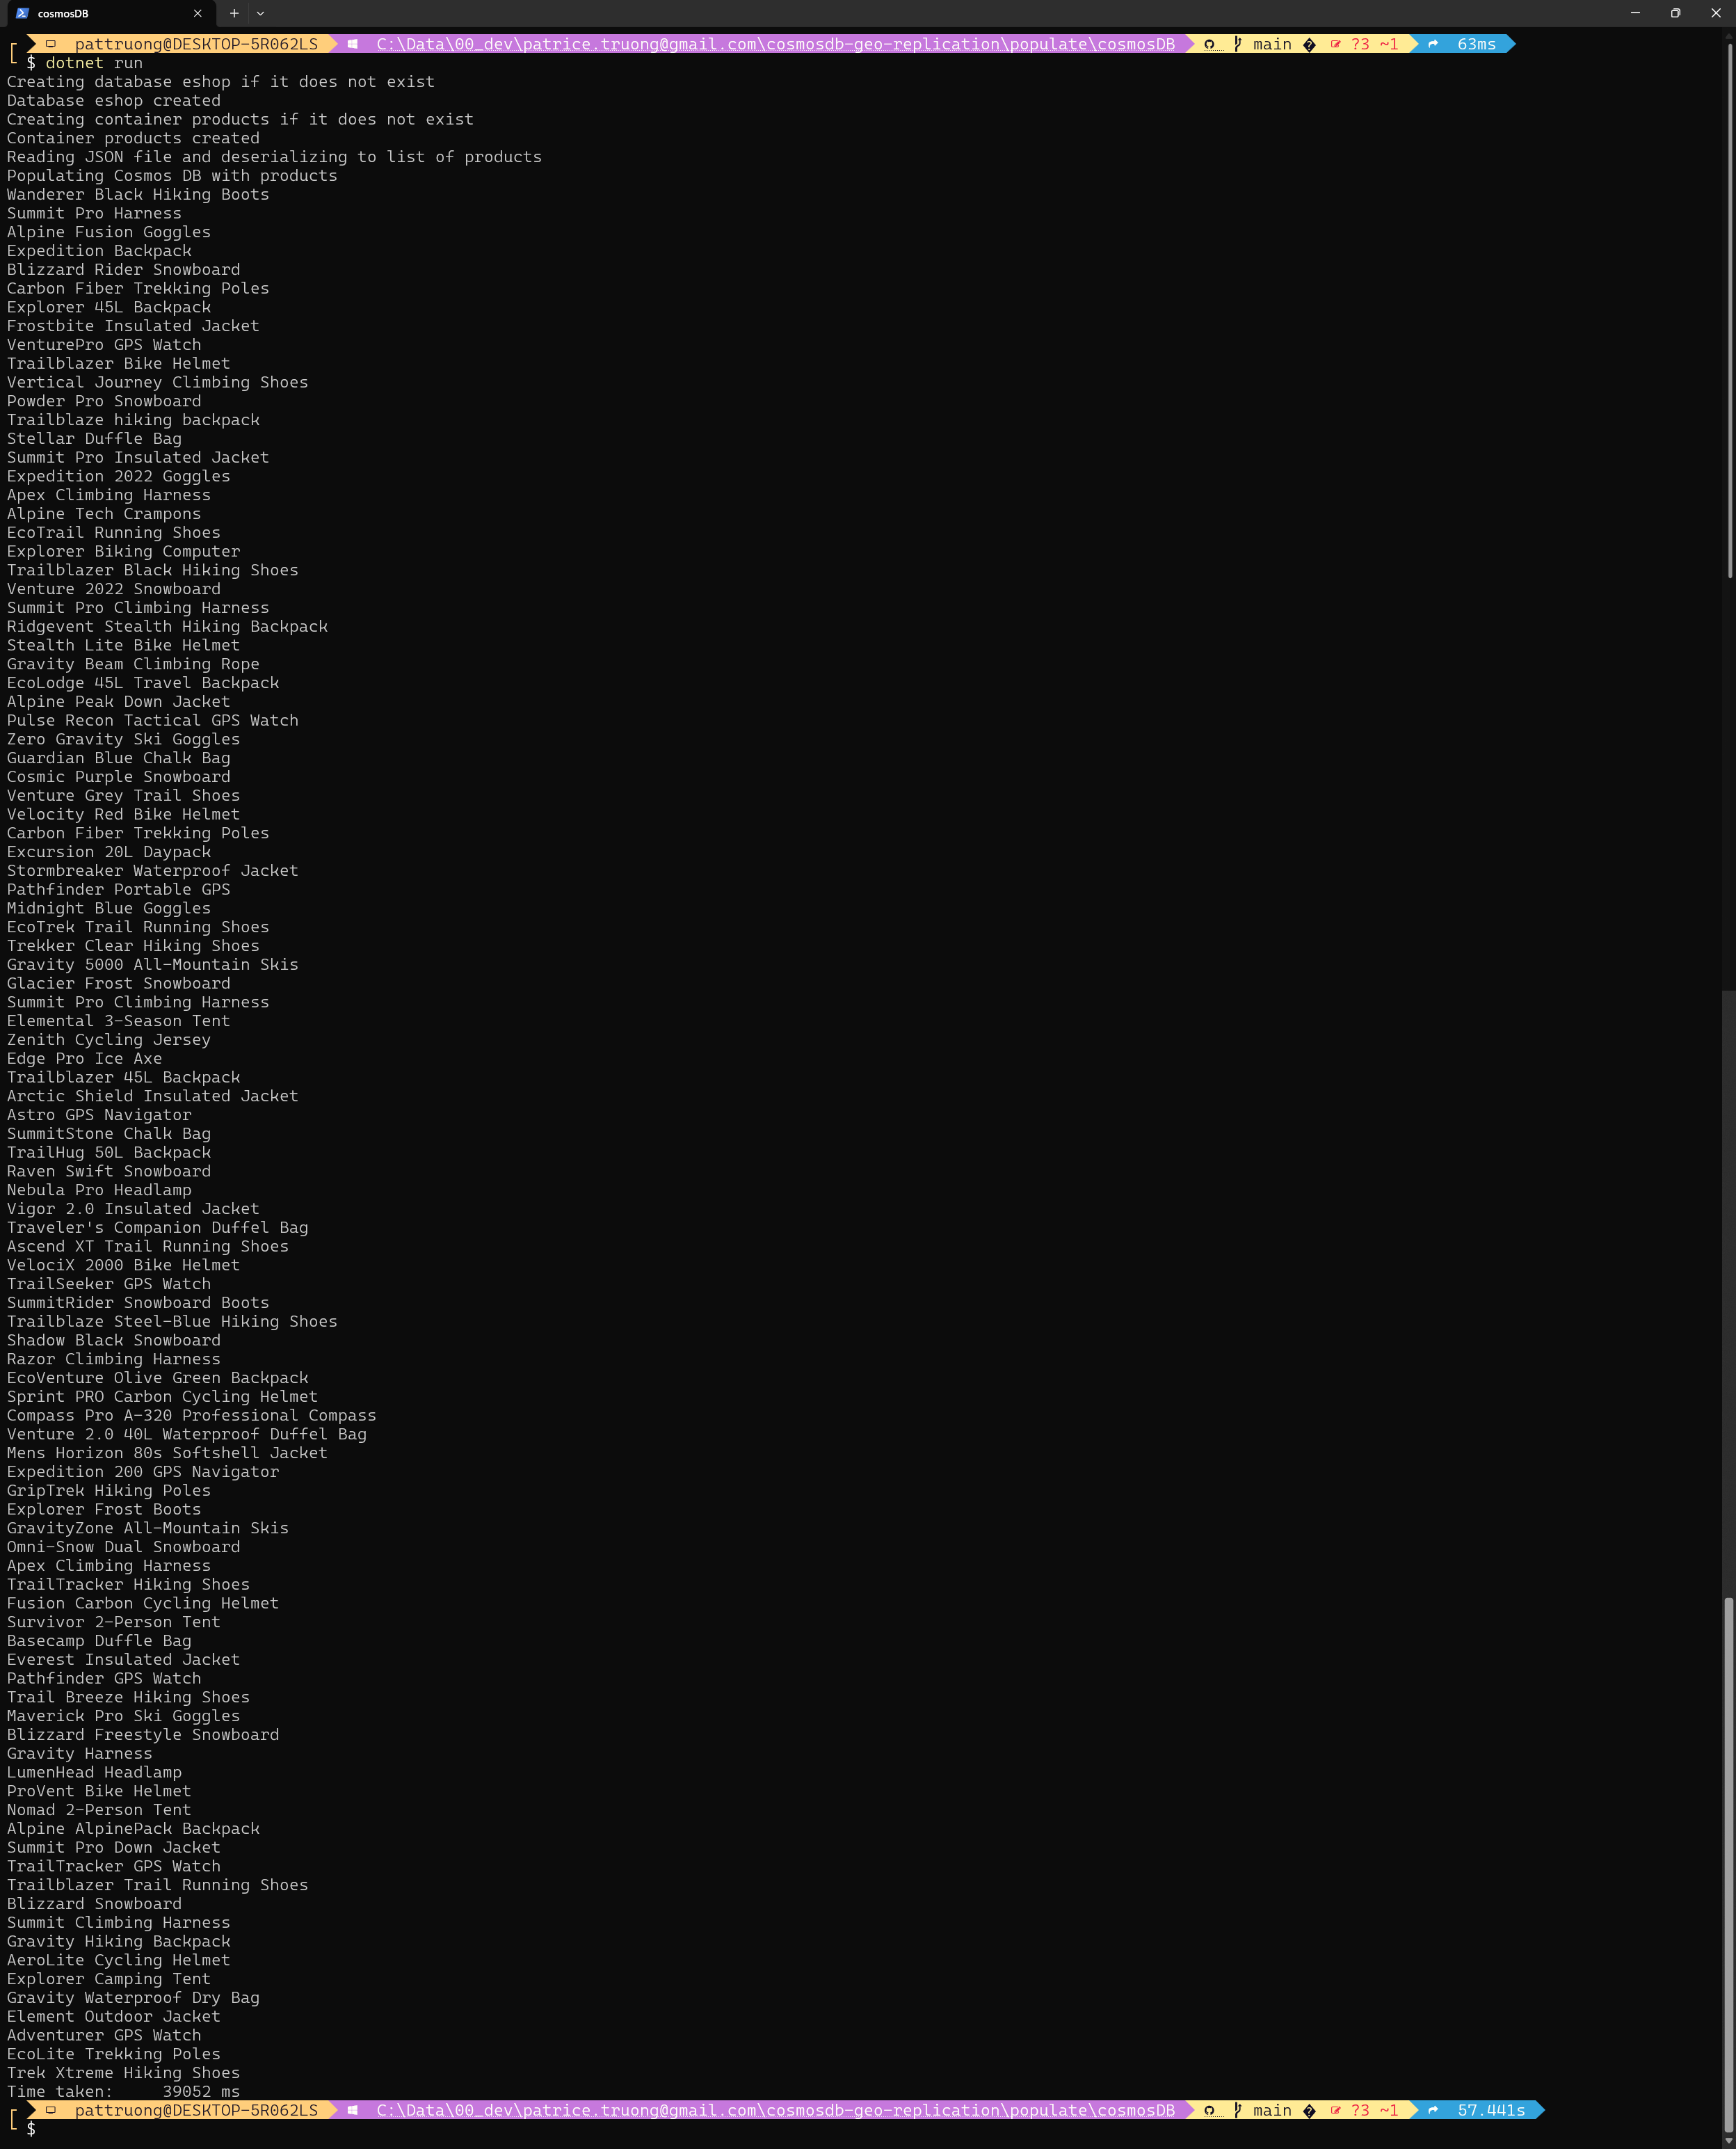
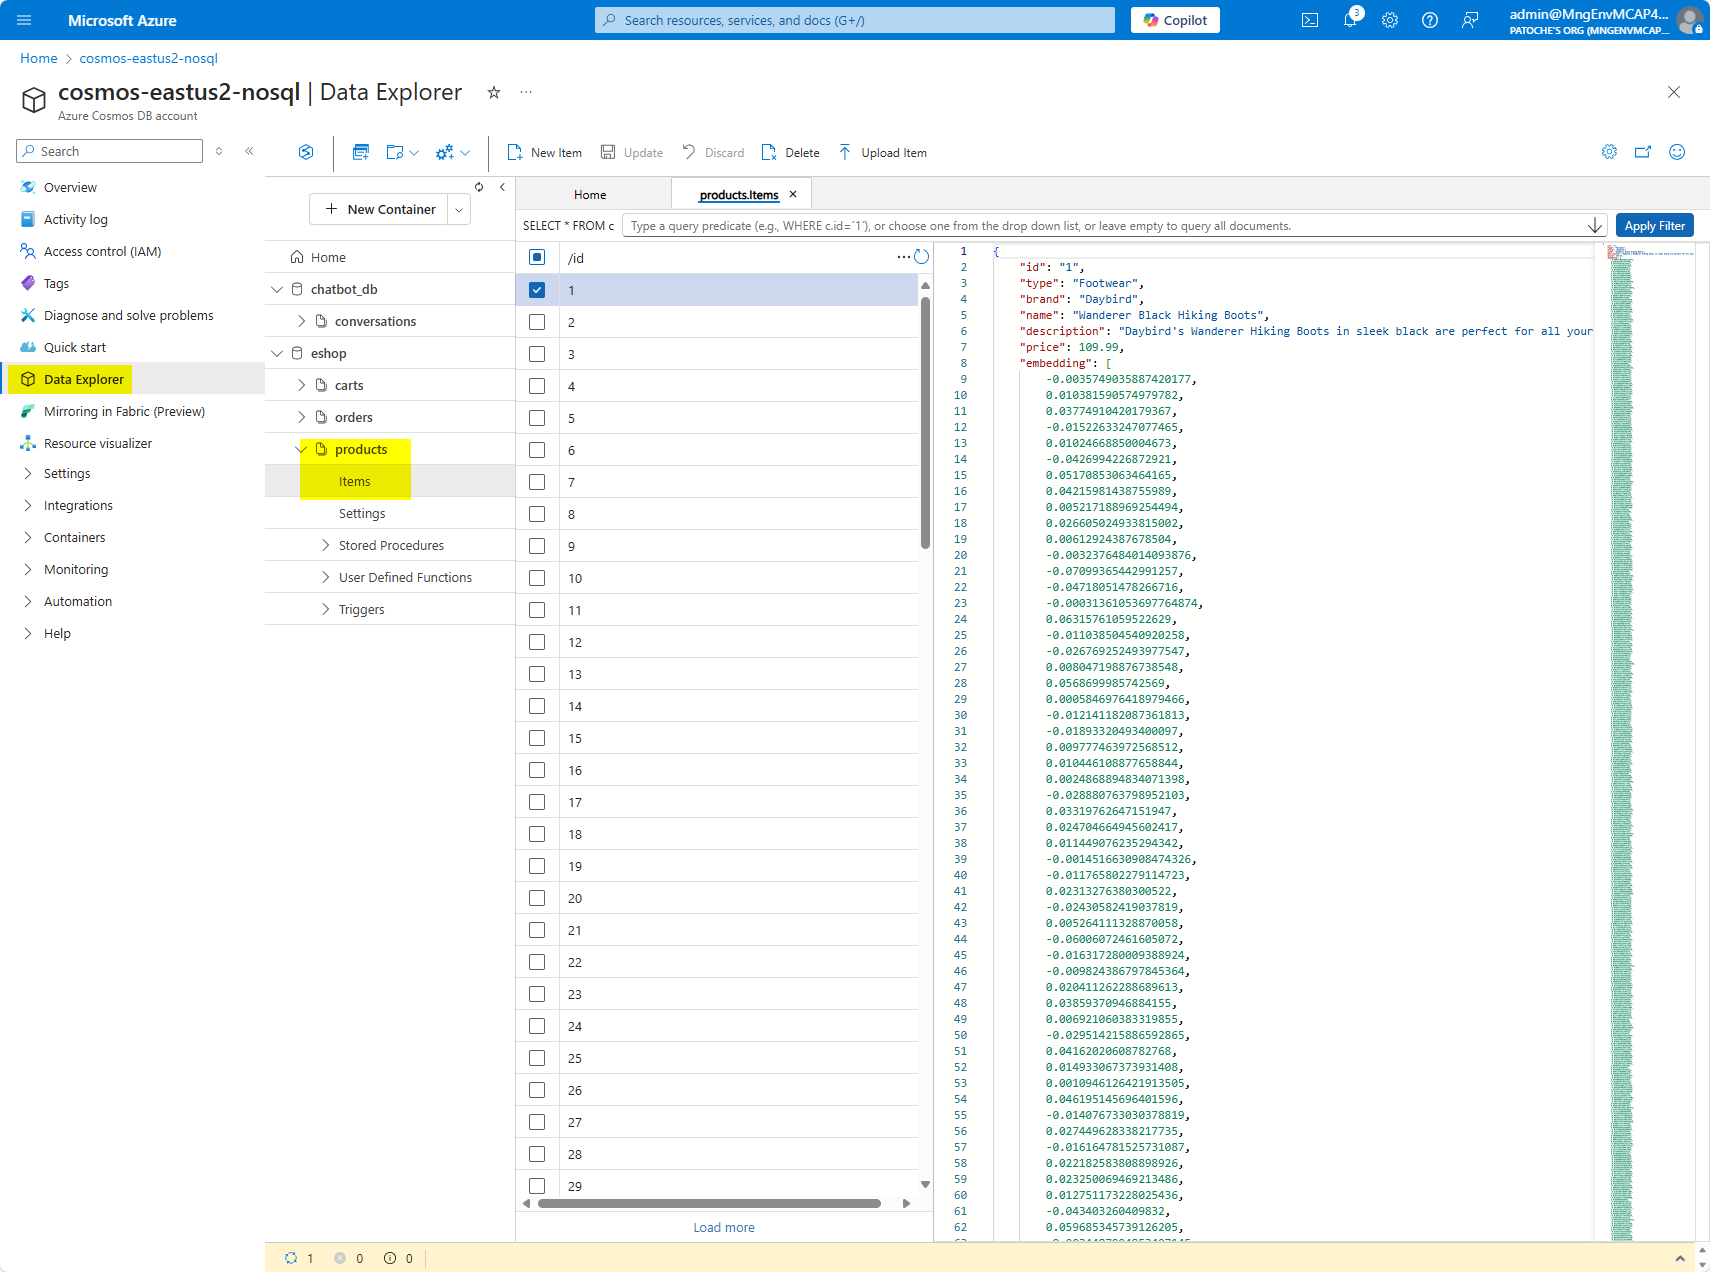
3. Verify that the Azure Cosmos DB container has been properly populated
Demo script
Demo initialization:
3. On your development computer, start the mcp server
cd mcp-server
npx ts-node src/server.ts
3. Start the front end project
- NextJS front end (store front)
- cd nextjs
- npm start
4. Optionally, open a command prompt and start the MCP inspector with this command:
npx -y @modelcontextprotocol/inspector
Demo steps:
1. Navigate to http://localhost:3002.
2.
2. Click on AI Assistant icon in the top right corner
3. Enter "I'm interested in backpacks" (the list of product refreshes with a list of backpacks)
4. Enter "Get my orders" (the list of orders refreshes with a list of orders)
Frequently asked questions
What is cosmosdb-mcp?
cosmosdb-mcp is Azure Cosmos DB MCP Client and Server
How do I install cosmosdb-mcp?
Open the GitHub repository and follow its README. Most MCP servers are added to your client's MCP config, then called by your agent.
Is cosmosdb-mcp open source?
Yes — it is hosted on GitHub at https://github.com/patrice-truong/cosmosdb-mcp and has 1 stars.
Related MCP tools
 playwright-mcp
Playwright MCP server TypeScript-based implementation. Trusted by 22000+ developers. Trusted by 22000+ developers. Trusted by 22000+ developers.
 notion-mcp-server
Official Notion MCP Server TypeScript-based implementation. Trusted by 3400+ developers. Trusted by 3400+ developers. Trusted by 3400+ developers.
 mcpso
mcpsoDirectory for Awesome MCP Servers TypeScript-based implementation. Trusted by 1900+ developers. Trusted by 1900+ developers.
 unla
unla🧩 MCP Gateway - A lightweight gateway service that instantly transforms existing MCP Servers and APIs into MCP servers with zero code changes.
 metamcp
MCP Aggregator, Orchestrator, Middleware, Gateway in one docker TypeScript-based implementation. Trusted by 1400+ developers.
 mcp-server-kubernetes
MCP Server for kubernetes management commands TypeScript-based implementation. Trusted by 1100+ developers. Trusted by 1100+ developers.
Run your own MCP server? See who uses it and what to fix.
Measure it with TrackMCP