Visual testing tool for MCP servers TypeScript-based implementation. Trusted by 7300+ developers. Trusted by 7300+ developers.
Documentation
MCP Inspector
A developer tool for inspecting Model Context Protocol (MCP) servers. It ships as a single package, @modelcontextprotocol/inspector, that provides three ways to inspect a server:
- Web — a Vite + React + Mantine single-page app with a Node backend.
- CLI — a scriptable command-line client for automation, CI, and fast agent feedback loops.
- TUI — an interactive terminal UI built with Ink.
All three run through one global mcp-inspector binary:
npx @modelcontextprotocol/inspector          # web UI (default)
npx @modelcontextprotocol/inspector --cli    # CLI
npx @modelcontextprotocol/inspector --tui    # TUI
Repo status. This is the v2 line of the Inspector (branch
v2/main). Themainbranch is the legacy v1 implementation (bug fixes only). v2 will eventually replacemain. See [AGENTS.md](./AGENTS.md) for branch/board conventions.
Project layout
v2 is not an npm workspace. Each client under clients/* keeps its own package.json and node_modules; shared code lives in core/ and is consumed via a @inspector/core build-time alias (no package.json of its own). A single npm install at the root cascades installs into every client (see Setup).
inspector/
├── clients/
│   ├── web/          # Web client (Vite + React + Mantine). src/ = browser app; server/ = Node dev/prod backend
│   ├── cli/          # CLI client (tsup bundle, @inspector/core alias)
│   ├── tui/          # TUI client (Ink + React, tsup bundle)
│   └── launcher/     # Shared launcher — provides the `mcp-inspector` bin, dispatches to web/cli/tui
├── core/             # Shared code consumed via the `@inspector/core` alias (no package.json)
│   ├── auth/         # OAuth: providers, discovery, storage, mid-session recovery (browser/node/remote backends)
│   ├── json/         # JSON + parameter/argument conversion utilities
│   ├── logging/      # Silent pino logger singleton
│   ├── mcp/          # InspectorClient runtime, state stores, transports, config import
│   ├── node/         # Node-only shared helpers: version reader, hostUrl (host normalize/canonicalize + all-interfaces/loopback detection)
│   ├── react/        # React hooks over the state stores
│   └── storage/      # File I/O helpers for the OAuth persist backends
├── test-servers/     # Composable MCP test servers + fixtures used by integration tests
├── scripts/          # Root build/verify tooling (install cascade, smokes, verify-build-gate, verify-format-coverage, pack:verify)
├── specification/    # Design/build specifications
├── AGENTS.md         # Contribution rules for agents AND humans (see below)
└── README.md         # You are here
Each client has its own README with client-specific detail:
Task-oriented guides live under [docs/](./docs):
- MCP server configuration — which server(s) the Inspector connects to:
--catalogvs.--config, ad-hoc targets, the--separator, the file format and its Inspector-specific per-server fields. Shared by all three clients; the cli and tui READMEs delegate their server-options sections to it. - Reviewing an MCP App — the CLI-first → one-shot-web recipe for automated App-tool review:
--app-infoprobe → deep-link navigate → rendered widget, plus OAuth handoff and proxy support. - Launcher and config consolidation — why the launcher runs a client in-process rather than spawning it, and how the shared config processor fits in.
Setup
Requires Node >=22.19.0.
npm install # root install; postinstall cascades into every client- Fresh clone: run
npm installat the repo root. - After a pull that changes a client's dependencies: re-run
npm installat the root to re-sync every client.
The cascade (scripts/install-clients.mjs) is dev-only — it exits early when the package is installed as a dependency, and the published tarball ships only each client's build/, so end users are unaffected. Set INSPECTOR_SKIP_CLIENT_INSTALL=1 to skip it.
Running during development
For day-to-day web iteration, run Vite directly from the web client (fast HMR, no launcher build needed):
cd clients/web && npm run devThe launcher-driven scripts below run the built launcher, so build first (npm run build):
npm run web        # prod web launcher against clients/web/dist
npm run web:dev    # web launcher in --dev mode (Vite)
The @inspector/core shared package
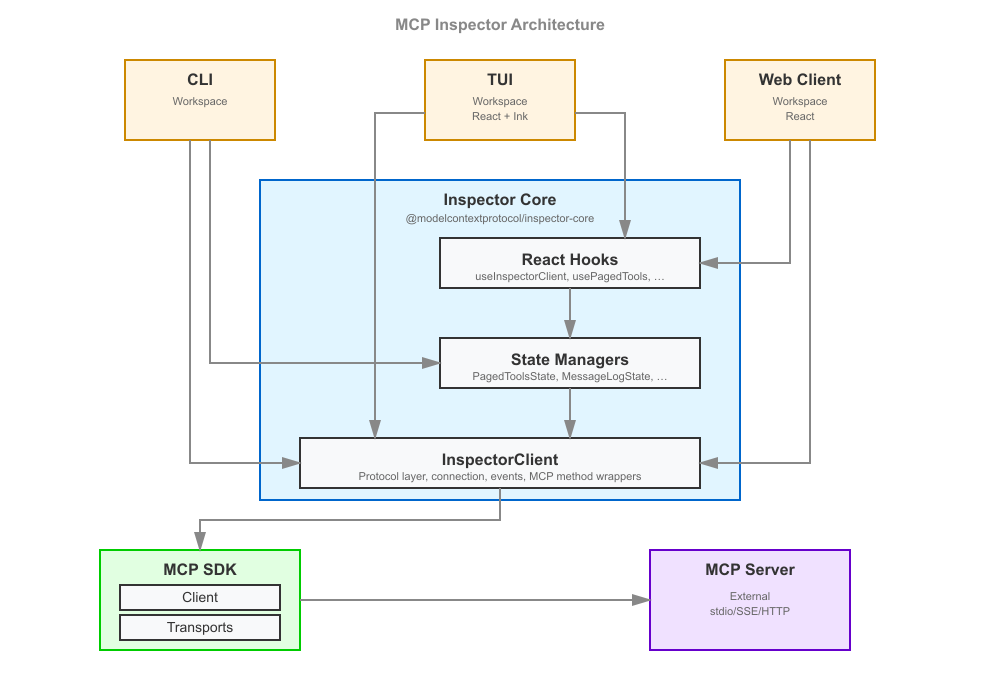
core/ holds the logic shared by all three clients so that web, CLI, and TUI behave identically. Its entry point is the **InspectorClient** class (core/mcp/), which owns the connection to an MCP server, the request/response lifecycle, and a set of state stores; core/react/ exposes React hooks over those stores that both the web and TUI (Ink) React trees consume. OAuth (core/auth/) is factored into isomorphic logic plus browser/node/remote backends so the same flows work in the browser, in Node, and against a remote backend.
core/ intentionally has **no package.json** — it is not published on its own. Each client bundles it in via a @inspector/core alias:
- CLI / TUI:
esbuildOptions.aliasin theirtsup.config.tsmaps@inspector/core→ the repocore/directory, andnoExternal: [/^@inspector\/core/]inlines it into the bundle. - Web: the same alias in
clients/web/vite.config.tsfor the browser app and the Node backend runner.
Publishing core/ as its own package (e.g. for third parties to build on) is deliberately deferred — see issue #1636.
Web client: "dumb components" + Storybook
The v2 web client is built from presentational ("dumb") components — they accept data and callbacks as props and contain only display logic, with no direct data fetching or client state. State comes from the @inspector/core hooks, wired in near the top of the tree. This keeps components isolated, testable, and documentable.
That approach is what makes Storybook first-class here: every screen and element component has a *.stories.tsx file (96+ stories) that renders it against fixture props. Storybook play functions double as interaction tests, run headless in CI (npm run ci:storybook, Chromium via Playwright).
Styling follows a strict Mantine-first convention (theme variants and component props over CSS classes, --inspector-* CSS custom properties over raw color literals). The full rules live in [AGENTS.md](./AGENTS.md) under React instructions — read them before touching web UI. Element components live in clients/web/src/components/elements/; theme variants in clients/web/src/theme/.
Test servers
test-servers/ provides composable MCP servers used by the integration and smoke suites, so tests exercise a real server over a real transport instead of mocks. A server is assembled from presets (fixture factories in test-servers/src/preset-registry.ts — tools, resources, prompts, tasks, elicitation, sampling, OAuth, …) and can be driven two ways:
- In-process — import the factories (
createTestServerHttp,createEchoTool, …) and run the server inside the test's event loop (used by the HTTP integration paths). - As a subprocess —
test-servers/build/test-server-stdio.jsis spawned as a real stdio child (used by the CLI smoke and stdio integration tests).
Configure a server declaratively with a JSON config (see test-servers/configs/*.json) selecting presets, then load it via --config. Because the servers are spawned as real subprocesses, the build output must exist first:
npm run test-servers:build # (from clients/web) → tsc -p test-servers, emits test-servers/build/The Vite alias @modelcontextprotocol/inspector-test-server (in clients/web/vite.config.ts) points at test-servers/build/index.js so getTestMcpServerPath() resolves to a real .js path.
Serving the modern protocol era
A streamable-HTTP server can also serve the modern (2026-07-28) protocol era via the SDK's createMcpHandler:
- Set
transport.modernin the JSON config —truefor dual-era stateless serving, or{ "legacy": "reject" }for modern-only strict. - Or pass
modernon theServerConfigfor an in-processcreateTestServerHttp.
This is what lets an Inspector connection negotiating protocolEra: "auto" | "modern" reach the modern leg (populated server/discover, sessionless). See test-servers/configs/modern-http.json.
Showcase configs
Each config below is a ready-made server for exercising one feature by hand. Load one with --config, and unless noted, connect with Protocol Era = Modern.
| Config | Demonstrates | Issue |
|---|---|---|
modern-mrtr-http.json | A single MRTR round-trip | — |
mrtr-showcase-http.json | Every MRTR preset in one server | — |
modern-network-http.json | Network tab: Mcp-* headers + error taxonomy | #1628 |
xmcpheader-modern-http.json | Tools tab: x-mcp-header mirroring and exclusions | #1632 |
pagination-http.json | Page-by-page list fetching | #1721 |
advertised-extensions-http.json | Tool registration gated on advertised extensions | #1739 |
logging-{legacy,modern}-http.json | Logging, both eras | #1629 |
subscriptions-{legacy,modern}-http.json | Resource subscriptions, both eras | #1630 |
tasks-{legacy,modern}-http.json | Tasks, both eras | #1631 |
MRTR
modern-mrtr-http.json serves the mrtr_confirm tool (preset mrtr_confirm, createMrtrTool) over the modern leg. Its handler returns inputRequired(...) embedding a form elicitation, so invoking it produces a real round-trip: input_required → the client fulfils the embedded elicitation and retries with a new id → complete.
The Inspector drives MRTR manually (inputRequired: { autoFulfill: false }), so the embedded elicitation pauses at the pending-request modal (tagged "input_required") for you to answer, then the retry completes. Useful for eyeballing both that pending-request UX and the Protocol view's MRTR conversation grouping.
mrtr-showcase-http.json bundles every MRTR preset in one server:
| Preset | Behavior |
|---|---|
mrtr_confirm | Single round |
mrtr_two_step | Two elicitation rounds via requestState |
mrtr_sample | Embedded sampling → the Sampling panel |
mrtr_roots | Embedded roots/list, auto-answered silently from configured roots (no modal) |
mrtr_edge | An inputRequests-only round, then a requestState-only round |
mrtr_loop | Never completes → trips the MRTR_MAX_ROUNDS bound |
The legacy
collect_elicitationpreset callsserver.elicitInput, which errors on the 2026-07-28 leg — server→client requests aren't allowed there. MRTR is the modern replacement.
Network tab — standardized headers and error taxonomy
modern-network-http.json covers SEP-2243 / SEP-2575. It serves a get_weather tool whose city argument carries an x-mcp-header: "City" annotation, so a modern client mirrors it to Mcp-Param-City.
It also serves four trigger_* tools that the modern leg's spec-error injector (transport.modern.injectSpecErrors: true) answers with a real HTTP status plus JSON-RPC error body:
| Tool | Response |
|---|---|
trigger_header_mismatch | 400 / -32020 |
trigger_missing_capability | 400 / -32021 |
trigger_unsupported_version | 400 / -32022 (with data.supported) |
trigger_method_not_found | 404 / -32601 |
Open the Network tab to see the mirrored Mcp-* headers highlighted, sentinel values decoded, and each error rendered distinctly.
**
Mcp-Param-*mirroring is skipped by the SDK in the browser** (detectProbeEnvironment() !== "browser"). So callingget_weatherfrom the web client omitsMcp-Param-Cityand the strict server answers-32020. The same tool is callable from the Node CLI/TUI, where mirroring is active.
x-mcp-header in the Tools tab
xmcpheader-modern-http.json serves:
echo— plain tool.get_weather— a validx-mcp-header: "City"annotation on itscityargument.invalid_header_tool— an annotation using the header name"Bad Header". The space makes it an invalid RFC 9110 token, so the whole tool definition is invalid.trigger_invalid_params— answered with a real-32602 Invalid paramserror whose message is _not_ about a missing tool.
Open the Tools tab: get_weather's detail panel shows a "Mirrored request headers (SEP-2243)" section (city → Mcp-Param-City), and invalid_header_tool appears struck-through under an "Excluded (SEP-2243)" divider with the reason on hover. A conforming Streamable HTTP client MUST drop it from tools/list; the Inspector surfaces _why_.
Under SDK v2 a tools/call rejecting with -32602 renders as a distinct error panel rather than an isError result — headed "Unknown Tool" when the message names a missing tool, or "Invalid Parameters" otherwise (run trigger_invalid_params).
Page-by-page fetching
pagination-http.json serves 12 tools, 12 resources, and 12 prompts (presets numbered_tools / numbered_resources / numbered_prompts, count: 12) with a maxPageSize of 4 each, so every list paginates into three pages.
Turn on "Fetch Lists One Page at a Time" (Server Settings — the paginatedLists setting, or the Paginated switch in a list sidebar) and the lists load page 1 only (4 items) with a Load next page control and an _N pages loaded_ status. Each click fetches the next 4 and appends them; Refresh resets to page 1. With the switch off (the default), the same lists auto-aggregate all three pages on connect.
Advertised extensions
advertised-extensions-http.json serves echo (always) and a get_weather tool **gated on the io.modelcontextprotocol/tasks extension** (extensionGatedTools): the tool is registered but starts disabled, and the server enables it on notifications/initialized only when the client declared that extension in its capabilities.extensions.
1. Connect — the Inspector advertises the Tasks extension by default, so the Tools list shows both echo and get_weather.
2. Open Server Settings → Advertised Extensions, uncheck Tasks (io.modelcontextprotocol/tasks), and reconnect.
3. The client now advertises no extensions, the server never enables get_weather, and the Tools list shows only echo.
This is the debugging knob for a server legitimately changing tool registration based on what the client advertises. Legacy stateful leg only — the modern per-request leg has no persistent oninitialized.
Logging, both eras
logging-legacy-http.json and logging-modern-http.json both serve logging: true plus a send_notification tool that emits a notifications/message at a chosen level. The legacy one is a plain streamable-HTTP server; the modern one sets transport.modern: true.
- Legacy — the Logs tab gives a session-scoped Set Active Level selector + Set button. Calling
send_notificationstreams the log into the panel. - Modern — the same tab instead shows Log Level per Request. Pick a level to opt in and the client stamps
_meta["io.modelcontextprotocol/logLevel"]on every subsequent request (verify in the Network tab's request body). Callingsend_notificationstreams the log over the request's SSE response. Set it back to Off and the same call is silently gated — the request omits thelogLevelkey, so the log never arrives.
That gating is faithful to the spec ("a server MUST NOT emit notifications/message for a request that didn't opt in") because send_notification emits through the SDK's request-scoped, threshold-aware extra.log (ctx.mcpReq.log). On the modern leg it reads the per-request logLevel opt-in from the request envelope and drops the message when the client didn't opt in or the level is below the requested severity; on legacy it honors the session level from logging/setLevel. Because it emits through the request's notify, the modern response upgrades to SSE and the log rides the originating request's stream.
Resource subscriptions, both eras
subscriptions-legacy-http.json and subscriptions-modern-http.json both serve three numbered_resources with subscriptions: true. The legacy one also serves an update_resource tool; the modern one sets transport.modern: true.
- Legacy — open a resource in the Resources tab and click Subscribe. The client sends
resources/subscribeand the Subscriptions section lists the URI with no stream chrome. Callupdate_resourcewith that URI and the server updates the content and emitsnotifications/resources/updated, stamping the subscribed tile's last-updated time. - Modern — the same Subscribe instead sends **
subscriptions/listen** (its filter carriesresourceSubscriptionsplus theresourcesListChangedopt-in) and resolves onnotifications/subscriptions/acknowledged. The Subscriptions section then shows a stream-status badge (Connecting…→Listening) in its header, and reconnects by re-listing if the long-lived stream drops.
The modern config deliberately omits update_resource. The SDK's modern leg is stateless/per-request (createMcpHandler(() => createMcpServer(config))), so the tool would run against a throwaway server instance — the content change wouldn't persist for the next resources/read, and its resources/updated wouldn't reach the separate listen stream. More confusing than useful.
So the live update-notification round-trip is demonstrated on the legacy (stateful-session) server, and the modern server is for the subscribe/listen/badge behavior. The Inspector's _receive_ path is era-transparent, so a real stateful modern server that routes resources/updated onto the listen stream drives the subscribed tile the same way.
Tasks, both eras
Legacy (tasks-legacy-http.json) advertises capabilities.tasks (tasks: { list, cancel }) with the simple_task / progress_task / elicitation_task presets. Run one of those tools with Run as task on, and the Tasks tab lists it (populated via tasks/list), polls tasks/get, fetches the payload with the blocking tasks/result, and cancels with tasks/cancel.
Modern (tasks-modern-http.json) sets transport.modern: true and tasksExtension: true, advertising the io.modelcontextprotocol/tasks extension (SEP-2663) and serving modern_task / modern_input_task. The Tasks tab is gated on the negotiated extension, not capabilities.tasks.
- Run
modern_taskas a task — thetools/callreturns aCreateTaskResult(resultType: "task", visible in the Protocol/Network tabs), the client polls **tasks/get** (notasks/list), and the completed task inlines its result (no blockingtasks/result). - Run
modern_input_task— the task moves toinput_required, surfacing an embedded elicitation through the pending-request modal. Answering it sends **tasks/update** with theinputResponses, and the next poll completes.
SDK v2 removed all tasks support and era-gates the tasks/* spec methods out of the modern era on both sides. So the Inspector drives the extension itself — the resultType: "task" frame is rewritten at the transport into a CallToolResult carrying the handle, and tasks/get / update / cancel ride a raw-wire request channel with the full modern envelope. The test server serves tasks/* from an Express interceptor ahead of the SDK handler, since the SDK's modern leg would answer them -32601.
The Tasks tab's Refresh re-polls the handles already known to the client — modern has no server-side task list.
Building
npm run build # builds all clients: web → cli → tui → launcherIndividual clients: build:web, build:cli, build:tui, build:launcher. The web build produces both the browser SPA (clients/web/dist, Vite) and the Node prod-server runner (clients/web/build, tsup).
Testing & the quality gate
Each client self-validates from its own folder; the root scripts chain them. There is no aggregate root test script — use validate (fast) or coverage (the gate).
| Script | What it does |
|---|---|
npm run validate | Runs verify:format-coverage (asserts every tracked source file is format-gated) first, then validate:core (the shared core/ format:check + lint gate), then per client: format:check + lint + **typecheck** (cli/tui only) + build + fast unit tests. The quick inner-loop check. |
npm run coverage | The per-file ≥90% gate (lines/statements/functions/branches) under v8 instrumentation, per client. CI-enforced. For web this also runs the integration project and covers the shared core/ runtime (including core/json and core/client). |
npm run smoke | End-to-end smokes through the built launcher (--help dispatch + prod cli/tui/web), plus a headless-Chromium boot smoke that runs the prod web bundle and asserts a clean first render (no uncaught error — sync exception or unhandled rejection, how a Node built-in reaching the browser bundle manifests). |
npm run verify:build-gate | Runs a real vite build with a Node built-in forced into the browser graph and asserts the build fails via the #1769 gate (which turns Vite's browser-externalization warning into a hard error). Guards against the warning phrasing drifting in a Vite bump and silently disabling the gate. Part of npm run ci. |
npm run verify:format-coverage | Parses the format:check globs out of every package.json (only those reachable from validate), enumerates all tracked source files, and fails listing any not covered by a glob — the durable guard for the "every first-party source file is format-gated" invariant (#1792). Runs first in validate. |
npm run test:scripts | Table-driven unit tests (node --test) for the guard's own pure parsers (scripts/lib/npm-scripts.mjs + the exported helpers of verify-typecheck-coverage.mjs), one case per rule they encode. Runs in validate — and verify:typecheck-coverage guards _this_ gate in turn (reachable from validate, non-empty test set, every test file matched by the test:scripts glob), since node --test silently skips a file its glob misses and still exits 0. |
npm run verify:typecheck-coverage | The typecheck-coverage analog of the above (#1791): for each Node client (auto-discovered from disk — enrolled via its typecheck script's projects, or for a tsc -b client like clients/web via its tsconfig.json references) it runs those projects with tsc --listFilesOnly, unions them, and fails listing any tracked .ts/.tsx/.mts/.cts under the client that lands in no project (so a new top-level config/helper can't silently go untypechecked). It also requires, deny-by-default, the first-party TS no client owns (test-servers/src, the root vitest.shared.mts, all of core/, and any new top-level location) to land in some client project's tsc pass — so a core *.tsx web's projects don't reach is caught too. Also asserts the gate is wired (each client's typecheck pass — its typecheck script, or web's tsc -b — is reachable from its validate, and the root chain runs each client's validate). Runs in validate. |
npm run ci | Mandatory pre-push command. validate → coverage → verify:build-gate → smoke → Storybook. A true superset of GitHub CI. |
npm run pack:verify | Publish smoke — see Publishing. |
Per-client scripts exist too (validate:web, coverage:cli, smoke:tui, …), plus root validate:core / format:core for the shared core/ package, format:scripts for the root scripts/ tooling, and format:shared / lint:shared for the root "shared" surface (test-servers/src/**, vitest.shared.mts, the root eslint.config.js). Run npm run format before committing — the root format fixes core/, the root scripts/, the shared surface, and every client; validate runs the non-fixing format:check and fails CI on any unformatted file.
For the full testing rules — the ≥90% per-file gate, where test files live, the unit vs. integration vs. storybook projects, and the v8 ignore policy — see [AGENTS.md](./AGENTS.md).
Publishing
The root @modelcontextprotocol/inspector package ships as one tarball with a single version number — no separate -web / -cli / -tui / -core packages. npm run build builds every client, then prepack runs before npm publish. Runtime dependencies are declared on the root package.json; client builds bundle @inspector/core and externalize npm packages resolved from the root install.
What ships, and the packaging invariants
The root package.json "files" allowlist is the source of truth for the tarball. A few non-obvious entries exist because they are read at runtime or were silently dropped by npm's packlist — do not remove them without re-running npm run pack:verify:
- No source maps. The client bundlers set
sourcemap: false(clients/{cli,tui}/tsup.config.ts,clients/web/tsup.runner.config.ts); Vite and the launcher'stscalready emit none. Maps are ~half the unpacked size and aren't needed at runtime — debug vianpm run devon the source. - **
clients/web/buildships viaclients/web/.npmignore.**clients/web/.gitignorelistsbuild/, and npm's packlist honors that nested.gitignoreover the root"files"allowlist — so the prod web-server runner was silently missing from the tarball whileclients/web/distslipped through (its.gitignoreonly listsdist-ssr).clients/web/.npmignoreoverrides the.gitignorefor publishing so bothbuild/(runner) anddist/(SPA) ship. The other clients don't need this — none ship a nested.gitignore. - **A single version number, read from the root
package.json. The Inspector ships as one package with one version, so only the root**package.jsoncarries aversion— the fourclients/*/package.jsons deliberately have none. Every Node client (CLI, TUI, and the web backend) resolves the version through the sharedreadInspectorVersion()reader incore/node/version.ts, which walks up to the root manifest (always present in the tarball). No clientpackage.jsonis read at runtime, so none needs to ship. The web browser can't read the filesystem; it gets its version from the backend viaGET /api/config(see #1639).
npm run pack:verify — publish smoke against the real tarball
The smoke:* scripts run against the in-repo build tree, which is not the published package. npm run pack:verify (scripts/pack-and-verify.mjs) closes that gap: it builds, npm packs the publishable tarball (asserting no source maps ship and that the runtime-required files are present), installs the tarball into a clean throwaway consumer — a fresh temp directory where it runs a real npm install (pulls runtime deps, runs postinstall), exactly as npx @modelcontextprotocol/inspector would — and drives the installed mcp-inspector bin end to end: --help dispatch, a real --cli tools/list over stdio, and a prod --web boot that must serve / from the shipped dist. It catches "works in --dev, breaks under npx …" path/packaging failures. It requires network access (the install pulls deps), so it is a local / release check, not part of the fast validate/ci loop.
Cutting a release
Publishing is automated by two release-gated jobs in [.github/workflows/main.yml](.github/workflows/main.yml) (github.event_name == 'release', both needs: build):
- **
publish** — the npm package. Runsnpm run pack:verifyas the pre-publish gate, asserts the release tag matches the rootpackage.jsonversion, thennpm publish --access public --provenance— a singlenpm publish(v2 is not an npm workspace, so there is no v1-stylepublish-all/--workspaces), with a signed provenance attestation via GitHub OIDC (id-token: write,environment: release). Authentication is npm trusted publishing — there is noNPM_TOKENsecret, and adding one would break the publish (an emptyNODE_AUTH_TOKENmakes npm failENEEDAUTHbefore OIDC is attempted). The job upgrades the npm CLI to>=11.5.1first, since trusted publishing requires it and Node 22 bundles npm 10.x. - **
publish-github-container-registry** — the container image (see Docker).
Because there is one version number (only the root package.json has one — the clients carry none, so there is nothing to keep in sync and no check-version step), the release flow is just:
npm version    # bumps the root package.json + tags
git push --follow-tags
# then draft & publish a GitHub Release for that tag → triggers `publish`
The release's target commit selects which workflow runs, so this only publishes when a release is cut from a commit carrying this (v2) workflow.
Docker
A container image is published to GHCR (ghcr.io/modelcontextprotocol/inspector, linux/amd64 + linux/arm64) by the release workflow. The [Dockerfile](Dockerfile) is a two-stage build: the first stage installs and npm packs the publishable tarball; the second stage npm install -gs that tarball, so the image ships the exact same artifact as npm, with a clean mcp-inspector bin.
# run the web UI (reads the auth token from the container logs)
docker run --rm -p 6274:6274 ghcr.io/modelcontextprotocol/inspector

# or build the image locally
docker build -t mcp-inspector .
docker run --rm -p 6274:6274 mcp-inspector
The image defaults to --web bound to 0.0.0.0:6274 with browser auto-open disabled; override the args to run another mode (docker run --rm ghcr.io/modelcontextprotocol/inspector --cli …). Pass -e MCP_INSPECTOR_API_TOKEN=… to set a known token (otherwise one is generated and printed in the logs), or -e DANGEROUSLY_OMIT_AUTH=true to disable auth. Binding 0.0.0.0 (all network interfaces) is refused by default outside a container — it exposes the process-spawning backend to the local network — so the image opts in explicitly with DANGEROUSLY_BIND_ALL_INTERFACES=true (already set in the Dockerfile); a bare HOST=0.0.0.0 without that flag exits with an error. If you remap the published port (-p 8080:6274), the browser's origin (http://localhost:8080) no longer matches the in-container port, so set -e ALLOWED_ORIGINS=http://localhost:8080,http://127.0.0.1:8080 (or run -e CLIENT_PORT=8080 -p 8080:8080) or connects will 403. ALLOWED_ORIGINS replaces the default list rather than merging, so list every loopback form you'll browse from (see the web README). The image runs as the non-root node user and has a HEALTHCHECK that probes the web UI — it assumes the default --web mode, so add --no-healthcheck when running --cli/--tui (which have no web server).
Contributing — AGENTS.md and CLAUDE.md
**[AGENTS.md](./AGENTS.md) is the contract for changing this codebase, and it applies to humans and AI agents alike.** It is not agent-only boilerplate — it holds the project's real conventions: the issue-and-board workflow, branch/label rules, the TypeScript and Mantine/React standards, the testing and coverage requirements, and the mandatory pre-push gate. Read it before making changes, and keep it up to date when you change structure, tooling, or rules.
CLAUDE.md is the entry point the Claude Code agent loads automatically; it simply includes AGENTS.md and this README, so both agents and humans work from the same source of truth. If you use a different agent that reads AGENTS.md, you get the same rules.
A key rule worth surfacing here: all work is issue-driven. Before starting, find or create a tracking issue on the v2 project board; open PRs against v2/main with Closes #. The exact recipes (labels, board IDs, statuses) are in AGENTS.md.
License
MIT.
Similar MCP
Based on tags & features
Trending MCP
Most active this week